# vue3 compositionApi
类似mixin和extend,但是可以明确告知内容的来源范围,而不是像mixin那么模糊不清。
# setup(props,context)
- created 实例被完全初始化之前
- setup 函数是一个新的组件选项。作为在组件内使用 Composition API 的入口点,setup中和在其他地方创建的数据或者方法需要return后才能绑定和操作。
- 使用 setup 函数时,它将接收两个参数:props,context
- props非常好理解,它其实就是父组件传递过来的属性会被放到props对象中,我们在setup中如果需要使用,那么就可以直接通过props参数获取:
- 对于定义props的类型,还是和之前的规则是一样的,在props选项中定义;
- 并且在template中依然是可以正常去使用props中的属性,比如message;
- 如果在setup函数中想要使用props,那么不可以通过 this 去获取;
- 因为props有直接作为参数传递到setup函数中,所以可以直接通过参数来使用即可;
- context可以解构出四个主要的功能:
attrs emits slots expose- attrs:所有的非prop的attribute;
- slots:父组件传递过来的插槽(这个在以渲染函数返回时会有作用,后面会讲到);
- emit:当我们组件内部需要发出事件时会用到emit(因为不能访问this,所以不可以通过 this.$emit发出事件);
- 执行时机在beforeCreate之前 ,在 setup() 内部,this 不是该活跃实例的引用,因为 setup() 是在解析其它组件选项之前被调用的,所以 setup() 内部的 this 的行为与其它选项中的 this 完全不同。
版本不同的vue,可能先后顺序略有变化
beforeCreate(){
		console.log('beforeCreate')
	},
	created(){
		console.log('created')
	},
    setup() {
		console.log('setup')
	}
 //setup
 //beforeCreate
 //created
<template>
  <div>
    Home Page
    <h2>{{message}}</h2>

    <h2>{{title}}</h2>
    <h2>当前计数: {{counter}}</h2>
    <button @click="increment">+1</button>
  </div>
</template>

<script>
  export default {
    props: {
      message: {
        type: String,
        required: true
      }
    },
    data() {
      return {
        counter: 100
      }
    },
    /**
     * 参数一: props, 父组件传递过来属性
     */
    // setup函数有哪些参数?
    // setup函数有什么样的返回值
    // setup(props, context) {
    setup(props, {attrs, slots, emit}) {
      console.log(props.message);
      console.log(attrs.id, attrs.class);
      console.log(slots);
      console.log(emit);

      return {
        title: "Hello Home",
        counter: 100
      }
    },
    methods: {
      btnClick() {
        this.$emit("")
      }
    }
  }
</script>
# setup的返回值
setup既然是一个函数,那么它也可以有返回值,它的返回值用来做什么呢?
- setup的返回值可以在模板template中被使用;
- 也就是说可以通过setup的返回值来替代data选项;
# ref reactive
- ref和reactive都是用来创建响应式对象的,ref是一个个,而reactive则是建立一个对象
- 当使用reactive(ref)函数处理的数据之后,数据再次被使用时就会进行依赖收集;
- 当数据发生改变时,所有收集到的依赖都是进行对应的响应式操作(比如更新界面);
- 事实上,我们编写的data选项,也是在内部交给了
reactive函数将其编程响应式对象的; - ref 会返回一个可变的响应式对象,该对象作为一个 响应式的引用 维护着它内部的值,这就是ref名称的来源;
- 它内部的值是在ref的 value 属性中被维护的
- 在模板中引入ref的值时,Vue会自动解包操作,所以并不需要在模板中通过 ref.value 的方式来使用;
- 但是在 setup 函数内部,它依然是一个 ref引用, 所以对其进行操作时,依然需要使用 ref.value的方式;
<template>
  <div class="home">
   home
	<div>{{count}}</div>
	<button @click="add">+</button>
	<div>money:{{state.yuan}}</div>
	<button @click="double">double</button>

  </div>
</template>

<script>

import {ref,reactive} from "vue"
let s1
export default {
  name: 'Home',
  mounted(){
	console.log(`mounted`,this)//proxy,但是与setup里函数的this不相等
	s1=this
  },
  setup(){
	  // setup根本就没做bind绑定
	  console.log(`setupthis`,this)//undefined
	   let count =ref(7)
	   function add(){
		   console.log(`add`,this)
		   console.log(this === s1)//false
		   console.log(this.count)//具体的值
		   console.log(count)//proxy
		   console.log(typeof count)//object
		   console.log(typeof this.count)//number
		   count.value++;//count单独使用它的value值才是真正需要的结果
		   this.count++;//加了this的话,就可以直接修改结果而不需要.value
		   //(改成ts,this在setup中不生效???)
		   //在函数外的this是undefined
		   //setup,不要在里面用this
	   }

	   let state=reactive({
		   yuan:1
	   })
	   //每次单独添加太麻烦,可以使用reactive一次性添加,引用的时候需要加上state了
	   function double(){
		   console.log(this.state.yuan)
		   state.yuan *=2
	   }
	 //需要使用的方法和数据需要return出去
	  return{
		  count,
		  add,
		  double,
		  state
	  }
  }

}
</script>
- ref的解包是浅层解包
<template>
  <div>
    Home Page
    <h2>{{message}}</h2>
    <!-- 当我们在template模板中使用ref对象, 它会自动进行解包 -->
    <h2>当前计数: {{counter}}</h2>
    <!-- ref的解包只能是一个浅层解包(info是一个普通的JavaScript对象) -->
    <h2>当前计数: {{info.counter.value}}</h2>
    <!-- 当如果最外层包裹的是一个reactive可响应式对象, 那么内容的ref可以解包 -->
    <h2>当前计数: {{reactiveInfo.counter}}</h2>
    <button @click="increment">+1</button>
  </div>
</template>
<script>
  import { ref, reactive } from 'vue';

  export default {
    props: {
      message: {
        type: String,
        required: true
      }
    },
    setup() {
      let counter = ref(100);

      const info = {
        counter
      }

      const reactiveInfo = reactive({
        counter
      })

      // 局部函数
      const increment = () => {
        counter.value++;
        console.log(counter.value);
      }

      return {
        counter,
        info,
        reactiveInfo,
        increment
      }
    }
  }
</script>
- reactive 将解包所有深层的 refs,同时维持 ref 的响应性。
const count = ref(1)
const obj = reactive({ count })

// ref 会被解包
console.log(obj.count === count.value) // true

// 它会更新 `obj.count`
count.value++
console.log(count.value) // 2
console.log(obj.count) // 2

// 它也会更新 `count` ref
obj.count++
console.log(obj.count) // 3
console.log(count.value) // 3
当将 ref 分配给 reactive property 时,ref 将被自动解包。
const count = ref(1)
const obj = reactive({})

obj.count = count

console.log(obj.count) // 1
console.log(obj.count === count.value) // true
# setup中使用ref 获取真实的 DOM 元素节点
在setup中如何使用ref或者元素或者组件?
其实非常简单,只需要定义一个ref对象,绑定到元素或者组件的ref属性上即可;
<template>
  <div>
    <h2 ref="title">哈哈哈</h2>
  </div>
</template>
<script>
  import { ref } from 'vue';
  export default {
    setup() {
      const title = ref(null);////名称要和dom ref属性一模一样!!!
      return {
        title
      }
    }
  }
</script>
# ref和reactive使用对比
<template>
    <p>mouse position {{x}} {{y}}</p>
	<!-- <p>mouse position {{state.x}} {{state.y}}</p> -->
</template>

<script>
import { reactive } from 'vue'
import useMousePosition from './useMousePosition'
// import useMousePosition2 from './useMousePosition'

export default {
    name: 'MousePosition',
    setup() {
        const { x, y } = useMousePosition()
        return {
            x,
            y
        }

        // const state = useMousePosition2()
        // return {
        //     state
        // }
    }
}
</script>
import { reactive, ref, onMounted, onUnmounted } from 'vue'

function useMousePosition() {
    const x = ref(0)
    const y = ref(0)

    function update(e) {
        x.value = e.pageX
        y.value = e.pageY
    }

    onMounted(() => {
        console.log('useMousePosition mounted')
        window.addEventListener('mousemove', update)
    })

    onUnmounted(() => {
        console.log('useMousePosition unMounted')
        window.removeEventListener('mousemove', update)
    })

    return {
        x,
        y
    }
}

// function useMousePosition2() {
//     const state = reactive({
//         x: 0,
//         y: 0
//     })

//     function update(e) {
//         state.x = e.pageX
//         state.y = e.pageY
//     }

//     onMounted(() => {
//         console.log('useMousePosition mounted')
//         window.addEventListener('mousemove', update)
//     })

//     onUnmounted(() => {
//         console.log('useMousePosition unMounted')
//         window.removeEventListener('mousemove', update)
//     })

//     return state
// 这里当然也可以借助toRef或者toRefs进行处理,保证使用方可以直接解构
// }

export default useMousePosition
// export default useMousePosition2
# vue3 readonly
我们通过reactive或者ref可以获取到一个响应式的对象,但是某些情况下,我们传入给其他地方(组件)的这个响应式对象希望在另外一个地方(组件)被使用,但是不能被修改,这个时候如何防止这种情况的出现呢?
- Vue3为我们提供了readonly的方法;
- readonly会返回原生对象的只读代理(也就是它依然是一个Proxy,这是一个proxy的set方法被劫持,并且不能对其进行修改);
在readonly的使用过程中,有如下规则:
- readonly返回的对象都是不允许修改的;
- 但是经过readonly处理的原来的对象是允许被修改的;
- 比如 const info = readonly(obj),info对象是不允许被修改的;
- 当obj被修改时,readonly返回的info对象也会被修改;
- 但是我们不能去修改readonly返回的对象info;
- 其实本质上就是readonly返回的对象的 setter方法劫持 了而已;
# Reactive Ref判断的API
- isProxy:检查对象是否是由 reactive 或 readonly创建的 proxy。
- isReactive:检查对象是否是由 reactive创建的响应式代理: 如果该代理是 readonly 建的,但包裹了由 reactive 创建的另一个代理,它也会返回 true;
- isReadonly:检查对象是否是由 readonly 创建的只读代理。
- toRaw 返回 reactive 或 readonly 代理的原始对象(不建议保留对原始对象的持久引用。
请谨慎使用)。 - shallowReactive 创建一个响应式代理,它跟踪其自身 property 的响应性,但不执行嵌套对象的深层响应式转换 (深层还是原生对象)。
- shallowReadonly 创建一个 proxy,使其自身的 property 为只读,但不执行嵌套对象的深度只读转换(深层还是可读、可写的)。
- unref 如果我们想要获取一个ref引用中的value,那么也可以通过unref方法:
- 如果参数是一个 ref,则返回内部值,否则返回参数本身;
- 这是 val = isRef(val) ? val.value : val 的语法糖函数;
- isRef 判断值是否是一个ref对象
- shallowRef 创建一个浅层的ref对象
- triggerRef 手动触发和 shallowRef 相关联的副作用
<template>
  <div>
    <h2>{{info}}</h2>
    <button @click="changeInfo">修改Info</button>
  </div>
</template>

<script>
  import { ref, shallowRef, triggerRef } from 'vue';

  export default {
    setup() {
      const info = shallowRef({name: "why"})

      const changeInfo = () => {
        info.value.name = "james";//浅层的响应式Ref修改了名字页面不会有反应
        triggerRef(info);//利用手动触发的ref方法强制页面上的数据进行修改,实现变化的功能
      }

      return {
        info,
        changeInfo
      }
    }
  }
</script>
# vue3之props
因为 props 是响应式的,你不能使用 ES6 解构,它会消除 prop 的响应性。
如果需要解构 prop,可以在 setup 函数中使用 toRefs 函数来完成此操作:
import { toRefs } from 'vue'
setup(props) {
  const { title } = toRefs(props)
  console.log(title.value)
}
如果 title 是可选的 prop,则传入的 props 中可能没有 title 。在这种情况下,toRefs 将不会为 title 创建一个 ref 。需要使用 toRef 替代它:
import { toRef } from 'vue'
setup(props) {
  const title = toRef(props, 'title')
  console.log(title.value)
}
# vue3移除filters
在 3.x 中,已将过滤器移除,不在支持。作为替代,将它们替换为方法调用或是计算属性。
<template>
  <h1>Bank Account Balance</h1>
  <p>{{ accountInUSD }}</p>
</template>

<script>
  export default {
    props: {
      accountBalance: {
        type: Number,
        required: true
      }
    },
    computed: {
      accountInUSD() {
        return '$' + this.accountBalance
      }
    }
  }
</script>
# toRef toRefs
如果使用ES6的解构语法,对reactive返回的对象进行解构获取值,那么之后无论是修改结构后的变量,还是修改reactive返回的state对象,数据都不再是响应式的:
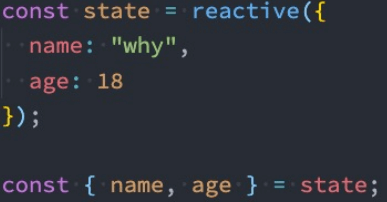
- 那么有没有办法解构出来的属性是响应式的呢?
- Vue提供了一个toRefs的函数,可以将reactive返回的对象中的属性都转成ref;
- 那么我们再次进行结构出来的 name 和 age 本身都是 ref的;

这种做法相当于已经在state.name和ref.value之间建立了 链接 ,任何一个修改都会引起另外一个变化;
- 如果我们只希望转换一个reactive对象中的属性为ref, 那么可以使用toRef的方法:
<template>
  <div>
    <h2>{{name}}-{{age}}</h2>
    <button @click="changeAge">修改age</button>
  </div>
</template>

<script>
  import { reactive, toRefs, toRef } from 'vue';
  export default {
    setup() {
      const info = reactive({name: "why", age: 18});
      // 1.toRefs: 将reactive对象中的所有属性都转成ref, 建立链接
      // let { name, age } = toRefs(info);
      // 2.toRef: 对其中一个属性进行转换ref, 建立链接
      let { name } = info;
      let age = toRef(info, "age");

      const changeAge = () => {
        age.value++;
      }
      return {
        name,
        age,
        changeAge
      }
    }
  }
</script>
export default defineComponent({
  setup(){
	let data =reactive({xxx})

	//其他步骤省略
	const refData=toRefs(data)
	return {
		...refData
	}
  }
});
# customRef
创建一个自定义的ref,并对其依赖项跟踪和更新触发进行显示控制:
- 它需要一个工厂函数,该函数接受 track 和 trigger 函数作为参数;
- 并且应该返回一个带有 get 和 set 的对象;
<template>
  <div>
    <input v-model="message"/>
    <h2>{{message}}</h2>
  </div>
</template>
<script>
  import debounceRef from './hook/useDebounceRef';
  export default {
    setup() {
      const message = debounceRef("Hello World");
      return {
        message
      }
    }
  }
</script>
import { customRef } from 'vue';
// 自定义ref
export default function(value, delay = 300) {
  let timer = null;
  return customRef((track, trigger) => {
    return {
      get() {
        track();
        return value;
      },
      set(newValue) {
        clearTimeout(timer);
        timer = setTimeout(() => {
          value = newValue;
          trigger();
        }, delay);
      }
    }
  })
}
# vue3 computed
接受一个 getter 函数,并根据 getter 的返回值返回一个不可变的响应式 ref 对象。
const count = ref(1)
const plusOne = computed(() => count.value + 1)

console.log(plusOne.value) // 2

plusOne.value++ // 错误
或者,接受一个具有 get 和 set 函数的对象,用来创建可写的 ref 对象。
<template>
  <div>
    <h2>{{fullName}}</h2>
    <button @click="changeName">修改firstName</button>
  </div>
</template>

<script>
  import { ref, computed } from 'vue';

  export default {
    setup() {
      const firstName = ref("Kobe");
      const lastName = ref("Bryant");

      // 1.用法一: 传入一个getter函数
      // computed的返回值是一个ref对象
      const fullName = computed(() => firstName.value + " " + lastName.value);

      // 2.用法二: 传入一个对象, 对象包含getter/setter
      const fullName = computed({
        get: () => firstName.value + " " + lastName.value,
        set(newValue) {
          const names = newValue.split(" ");
          firstName.value = names[0];
          lastName.value = names[1];
        }
      });

      const changeName = () => {
        // firstName.value = "James"
        fullName.value = "coder why";
      }

      return {
        fullName,
        changeName
      }
    }
  }
</script>
# computed开发模式增加调试钩子函数
onTrack onTrigger两个钩子函数仅在开发模式下生效
 const plusOne = computed(() => count.value + 1, {
	    onTrack(e) {
	      // 当 count.value 作为依赖被追踪时触发
	      debugger
	    },
	    onTrigger(e) {
	      // 当 count.value 被修改时触发
	      debugger
	    }
	  })
	  // 访问 plusOne,应该触发 onTrack
	  console.log(plusOne.value)
	  // 修改 count.value,应该触发 onTrigger
	  count.value++
# watch watchEffect
在Composition API中,我们可以使用watchEffect和watch来完成响应式数据的侦听;
- watchEffect用于自动收集响应式数据的依赖;
- watch需要手动指定侦听的数据源;同vue2中的watch选项。
- 当侦听到某些响应式数据变化时,我们希望执行某些操作,这个时候可以使用 watchEffect。
- 首先,watchEffect传入的函数会被立即执行一次,并且在执行的过程中会收集依赖;
- 其次,只有收集的依赖发生变化时,watchEffect传入的函数才会再次执行;
- 不能获取之前数据的值,而watch可以获取newVal和oldVal
  //代码运行的时候,会首先执行一次,然后发现使用到了name和age,就收集依赖,下次有关name或者age变化时,会再次触发这里的操作
  watchEffect(() => {
	console.log("name:", name.value, "age:", age.value);
  });
# watchEffect可中止操作
<template>
  <div class="home">
	<div class='count'>{{count}}</div>
	<button @click="add">+</button>
	<button @click="stopwatch">stop</button>
  </div>
</template>
<script>

import {ref,reactive,toRefs,computed,watchEffect,watch, ,effect} from "vue"
export default {
  name: 'Home',
  setup(props,context){
      let count =ref(7)
	  const stop= watchEffect(() => {
       	 console.log(`effect 触发了!${count.value}`);
      });
	   function add(){
		   count.value++;
		   console.log(`count.value`,count.value)
	   }
	  // 停止监听
	 const stopwatch = () => stop();
	  return{
          count,
		  add,
		  stopwatch
	  }
  }

}
</script>
# watchEffect清除副作用
- 什么是清除副作用呢?
- 比如在开发中需要在侦听函数中执行网络请求,但是在网络请求还没有达到的时候,停止了侦听器,
- 或者侦听器侦听函数被再次执行了。
- 那么上一次的网络请求应该被取消掉,这个时候我们就可以清除上一次的副作用;
- 在我们给watchEffect传入的函数被回调时,其实可以获取到一个参数:onInvalidate
- 当副作用即将重新执行 或者 侦听器被停止 时会执行该函数传入的回调函数;
- 我们可以在传入的回调函数中,执行一些清楚工作;
const stop = watchEffect((onInvalidate) => {
        const timer = setTimeout(() => {
          console.log("网络请求成功~");
        }, 2000)

        // 根据name和age两个变量发送网络请求
        onInvalidate(() => {
          // 在这个函数中清除额外的副作用
          // request.cancel()
          clearTimeout(timer);
          console.log("onInvalidate");
        })
        console.log("name:", name.value, "age:", age.value);
      });
# watchEffect执行时机 pre/post/sync
默认情况下,组件的更新会在副作用函数执行之前:
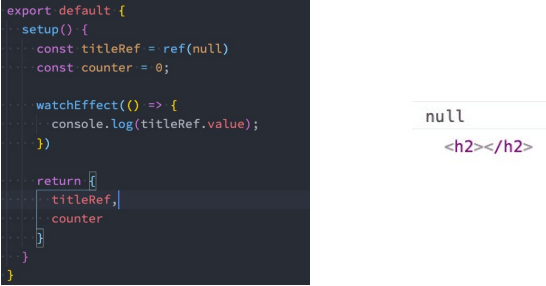
会发现打印结果打印了两次:
- 这是因为setup函数在执行时就会立即执行传入的副作用函数,这个时候DOM并没有挂载,所以打印为null;
- 而当DOM挂载时,会给title的ref对象赋值新的值,副作用函数会再次执行,打印出来对应的元素;
<template>
  <div>
    <h2 ref="title">哈哈哈</h2>
  </div>
</template>

<script>
  import { ref, watchEffect } from 'vue';
  export default {
    setup() {
      const title = ref(null);
      watchEffect(() => {
        console.log(title.value);
      }, {
        flush: "post"
      })
      return {
        title
      }
    }
  }
</script>
需要改变副作用函数的执行时机,它的默认值是pre,它会在元素 挂载 或者 更新 之前执行;可以设置副作用函数的执行时机post;flush 选项还接受 sync,这将强制效果始终同步触发。然而,这是低效的,应该很少需要。
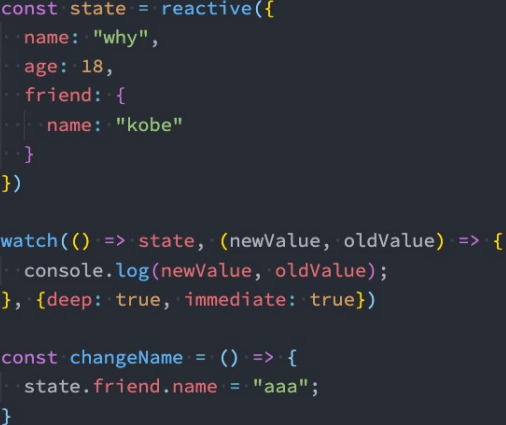
# vue3 watch
watch基本等同于vue2 watch,具备一定的惰性 lazy,同watchEffect一样,也可以中止
它的写法:
- 一个getter函数:但是该getter函数必须引用可响应式的对象(比如reactive或者ref);
- 直接写入一个可响应式的对象,reactive或者ref(比较常用的是ref);
<template>
  <div>
    <h2 ref="title">{{info.name}}</h2>
    <button @click="changeData">修改数据</button>
  </div>
</template>
<script>
  import { ref, reactive, watch } from 'vue';

  export default {
    setup() {
      const info = reactive({name: "why", age: 18});

      // 1.侦听watch时,传入一个getter函数
      watch(() => info.name, (newValue, oldValue) => {
        console.log("newValue:", newValue, "oldValue:", oldValue);
      })

      // 2.传入一个可响应式对象: reactive对象/ref对象
      // 情况一: reactive对象获取到的newValue和oldValue本身都是reactive对象
	  //newValue和oldValue打印出来一致
      // watch(info, (newValue, oldValue) => {
      //   console.log("newValue:", newValue, "oldValue:", oldValue);
      // })

      // 如果希望newValue和oldValue是一个普通的对象
	  //newValue和oldValue打印出来有区别
      watch(() => {
        return {...info}
      }, (newValue, oldValue) => {
        console.log("newValue:", newValue, "oldValue:", oldValue);
      })

      // 情况二: ref对象获取newValue和oldValue是value值的本身
	  // 使用ref打印出来的值,内部已经处理了,不需要.value了
      // const name = ref("why");
      // watch(name, (newValue, oldValue) => {
      //   console.log("newValue:", newValue, "oldValue:", oldValue);
      // })

      const changeData = () => {
        info.name = "kobe";
      }

      return {
        changeData,
        info
      }
    }
  }
</script>
- 侦听器还可以使用数组以同时侦听多个源:
//监听两个值,fooRef,barRef;变化后foo bar值;变化前的值prevFoo prevBar
watch([fooRef, barRef], ([foo, bar], [prevFoo, prevBar]) => {
  /* ... */
})
- 如果是reactive对象,则要以函数的形式
watch([() => nameObj.name, () => nameObj.englishName], ([curName, curEng], [prevName, preEng]) => {
        console.log('watch', curName, prevName, '---', curEng, preEng);
      }, { immediate: true })
 const info = reactive({name: "why", age: 18});// 自动深层监听
  const name = ref("why");

  // 2.侦听器watch 结构后的对象,如果需要深度监听,需要手动添加
  watch([() => ({...info}), name], ([newInfo, newName], [oldInfo, oldName]) => {
	console.log(newInfo, newName, oldInfo, oldName);
  })
# vue3生命周期

setup中如何使用生命周期函数呢,可以使用直接导入的 onX 函数注册生命周期钩子;
# vue3 setup中Provide Inject
- 为了增加 provide 值和 inject 值之间的 响应性 ,可以在 provide 值时使用 ref 和 reactive
- 如果需要修改可响应的数据,那么最好是在数据提供的位置来修改
<template>
  <div>
    <home/>
    <h2>App Counter: {{counter}}</h2>
    <button @click="increment">App中的+1</button>
  </div>
</template>
<script>
  import { provide, ref, readonly } from 'vue';
  import Home from './Home.vue';
  export default {
    components: {
      Home
    },
    setup() {
      const name = ref("coderwhy");
      let counter = ref(100);

      provide("name", readonly(name));
      provide("counter", readonly(counter));

      const increment = () => counter.value++;

      return {
        increment,
        counter
      }
    }
  }
</script>
<template>
  <div>
    <h2>{{name}}</h2>
    <h2>{{counter}}</h2>
    <button @click="homeIncrement">home+1</button>
  </div>
</template>
<script>
  import { inject } from 'vue';
  export default {
    setup() {
      const name = inject("name");
      const counter = inject("counter");
      const homeIncrement = () => counter.value++
      return {
        name,
        counter,
        homeIncrement
      }
    }
  }
</script>
# vue3 hooks写法
- useTitle.js:利用watch动态更新
import { ref, watch } from 'vue';
export default function(title = "默认的title") {
  const titleRef = ref(title);
  watch(titleRef, (newValue) => {
    document.title = newValue
  }, {
    immediate: true
  })
  return titleRef
}
- useCounter.js
import { ref, computed } from 'vue';
export default function() {
  const counter = ref(0);
  const doubleCounter = computed(() => counter.value * 2);
  const increment = () => counter.value++;
  const decrement = () => counter.value--;
  return {
    counter,
    doubleCounter,
    increment,
    decrement
  }
}
- App.vue
<template>
  <div>
    <h2>当前计数: {{counter}}</h2>
    <h2>计数*2: {{doubleCounter}}</h2>
    <button @click="increment">+1</button>
    <button @click="decrement">-1</button>

    <h2>{{data}}</h2>
    <button @click="changeData">修改data</button>

    <p class="content"></p>

    <div class="scroll">
      <div class="scroll-x">scrollX: {{scrollX}}</div>
      <div class="scroll-y">scrollY: {{scrollY}}</div>
    </div>
    <div class="mouse">
      <div class="mouse-x">mouseX: {{mouseX}}</div>
      <div class="mouse-y">mouseY: {{mouseY}}</div>
    </div>
  </div>
</template>

<script>
  import { ref, computed } from 'vue';

  import {
    useCounter,
    useTitle
  } from './hooks';

  export default {
    setup() {
      // counter
      const { counter, doubleCounter, increment, decrement } = useCounter();//①

      // title
      const titleRef = useTitle("coderwhy");
      setTimeout(() => {
        titleRef.value = "kobe"
      }, 3000);

      return {
        counter,
        doubleCounter,
        increment,
        decrement
		// ...useCounter() 这种写法①和上面的四个属性都不需要写,但是可读性不好,不推荐,不知道变量哪里来的
      }
    }
  }
</script>
# vue3中setup顶层写法
- 不需要手动导出变量
- props和emit需要使用defineProps, defineEmit来定义
- 子组件只需要引入,不需要手动挂载
<script setup>
  import { defineProps, defineEmit } from 'vue';
  const props = defineProps({
    message: {
      type: String,
      default: "哈哈哈"
    }
  })
  const emit = defineEmit(["increment", "decrement"]);
  const emitEvent = () => {
    emit('increment', "100000")
  }
</script>
# vue3之render函数
一些特殊的场景,需要JavaScript的完全编程的能力,这个时候可以使用 渲染函数 ,它比模板更接近编译器
- Vue在生成真实的DOM之前,会将节点转换成VNode,而VNode组合在一起形成一颗树结构,就是虚拟DOM(VDOM);
- 事实上,之前编写的 template 中的HTML 最终也是使用渲染函数生成对应的VNode;
- 那么,如果想充分的利用JavaScript的编程能力,可以自己来编写 createVNode 函数,生成对应的VNode;
- h() 函数是一个用于创建 vnode 的一个函数;其实更准备的命名是 createVNode() 函数
- h函数可以在两个地方使用:
- render函数选项中;
- setup函数选项中(setup本身需要是一个函数类型,函数再返回h函数创建的VNode );
- 简单写法
<script>
  import { h } from 'vue';

  export default {
    render() {
      return h("h2", {class: "title"}, "Hello Render")
    }
  }
</script>

<style scoped>

</style>
- 结合data写法
<script>
  import { h } from 'vue';
  export default {
    data() {
      return {
        counter: 0
      }
    },
    render() {
      return h("div", {class: "app"}, [
        h("h2", null, `当前计数: ${this.counter}`),
        h("button", {
          onClick: () => this.counter++
        }, "+1"),
        h("button", {
          onClick: () => this.counter--
        }, "-1"),
      ])
    }
  }
</script>
- 结合setup写法:可以放在setupr的return中,也可以像上面的写法,把render单独当选项处理,不过render的代码需要改成和上面一致
<script>
  import { ref, h } from 'vue';

  export default {
    setup() {
      const counter = ref(0);

      return () => {
        return h("div", {class: "app"}, [
          h("h2", null, `当前计数: ${counter.value}`),
          h("button", {
            onClick: () => counter.value++
          }, "+1"),
          h("button", {
            onClick: () => counter.value--
          }, "-1"),
        ])
      }
    }
  }
</script>
- 传递插槽数据写法
- 父组件
<script>
  import { h } from 'vue';
  import HelloWorld from './HelloWorld.vue';

  export default {
    render() {
      return h("div", null, [
        h(HelloWorld, null, {
          default: props => h("span", null, `app传入到HelloWorld中的内容: ${props.name}`)
        })
      ])
    }
  }
</script>
- 子组件
<script>
  import { h } from "vue";

  export default {
    render() {
      return h("div", null, [
        h("h2", null, "Hello World"),
        this.$slots.default ? this.$slots.default({name: "coderwhy"}): h("span", null, "我是HelloWorld的插槽默认值")
      ])
    }
  }
</script>
# vue3之jsx
新版脚手架已实现了内部配置jsx,但是如果用的其他版本可能要自行配置babel

# vue3之自定义指令
在某些情况下,需要对DOM元素进行底层操作,这个时候就会用到自定义指令;
例子:输入框聚焦
- 默认操作
<template>
  <div>
    <input type="text" ref="input">
  </div>
</template>

<script>
  import { ref, onMounted } from "vue";

  export default {
    setup() {
      const input = ref(null);

      onMounted(() => {
        input.value.focus();
      })

      return {
        input
      }
    }
  }
</script>
- 局部指令
<template>
  <div>
    <input type="text" v-focus>
  </div>
</template>

<script>
  export default {
    // 局部指令
    directives: {
      focus: {
        mounted(el, bindings, vnode, preVnode) {
          console.log("focus mounted");
          el.focus();
        }
      }
    }
  }
</script>
- 全局指令
const app = createApp(App);
app.directive("focus", {
  mounted(el, bindings, vnode, preVnode) {
    console.log("focus mounted");
    el.focus();
  }
})
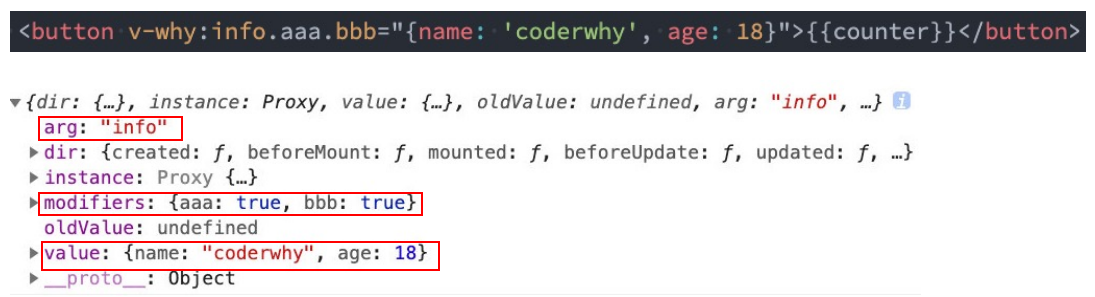
<template>
  <div>
    <button v-if="counter < 2" v-why.aaaa.bbbb="'coderwhy'" @click="increment">当前计数: {{counter}}</button>
  </div>
</template>

<script>
  import { ref } from "vue";
  export default {
    // 局部指令
    directives: {
      why: {
        created(el, bindings, vnode, preVnode) {
          console.log("why created", el, bindings, vnode, preVnode);
          console.log(bindings.value);
          console.log(bindings.modifiers);
        },
        beforeMount() {
          console.log("why beforeMount");
        },
        mounted() {
          console.log("why mounted");
        },
        beforeUpdate() {
          console.log("why beforeUpdate");
        },
        updated() {
          console.log("why updated");
        },
        beforeUnmount() {
          console.log("why beforeUnmount");
        },
        unmounted() {
          console.log("why unmounted");
        }
      }
    },
    setup() {
      const counter = ref(0);
      const increment = () => counter.value++;

      return {
        counter,
        increment
      }
    }
  }
</script>
- 自定义指令的应用场景:
- 权限控制
- 取代部分过滤器功能,时间戳转具体格式
- 手动触发
import dayjs from 'dayjs';

export default function(app) {
  app.directive("format-time", {
    created(el, bindings) {
      bindings.formatString = "YYYY-MM-DD HH:mm:ss";
      if (bindings.value) {
        bindings.formatString = bindings.value;
      }
    },
    mounted(el, bindings) {
      const textContent = el.textContent;
      let timestamp = parseInt(textContent);
      if (textContent.length === 10) {
        timestamp = timestamp * 1000
      }
      el.textContent = dayjs(timestamp).format(bindings.formatString);
    }
  })
}
# vue3之Teleport
- 在组件化开发中,封装一个组件A,在另外一个组件B中使用:
- 那么组件A中template的元素,会被挂载到组件B中template的某个位置;
- 最终我们的应用程序会形成一颗DOM树结构;
- 但是某些情况下,我们希望组件不是挂载在这个组件树上的,可能是移动到Vue app之外的其他位置:
- 比如移动到body元素上,或者我们有其他的div#app之外的元素上;
- 这个时候我们就可以通过teleport来完成;
- Teleport是什么呢?
- 它是一个Vue提供的内置组件,类似于react的Portals;
- teleport翻译过来是心灵传输、远距离运输的意思;
- 它有两个属性:
- to:指定将其中的内容移动到的目标元素,可以使用选择器;
- disabled:是否禁用 teleport 的功能;
- 如果我们将多个teleport应用到同一个目标上(to的值相同),那么这些目标会进行合并,所以没有问题。
- 把嵌入在子组件的内的内容,传送到相应的地方去
<div id="app"></div>
<div id="app2"></div>
- 这样写在app2中自然会出现a标签的内容
<teleport to="#app2">
		<a>11122221</a>
</teleport>
# vue3之getCurrentInstance访问内部组件实例
getCurrentInstance 支持访问内部组件实例。
import { getCurrentInstance } from 'vue'

const MyComponent = {
  setup() {
    const internalInstance = getCurrentInstance()

    internalInstance.appContext.config.globalProperties // 访问 globalProperties
  }
}
# vue3之插件
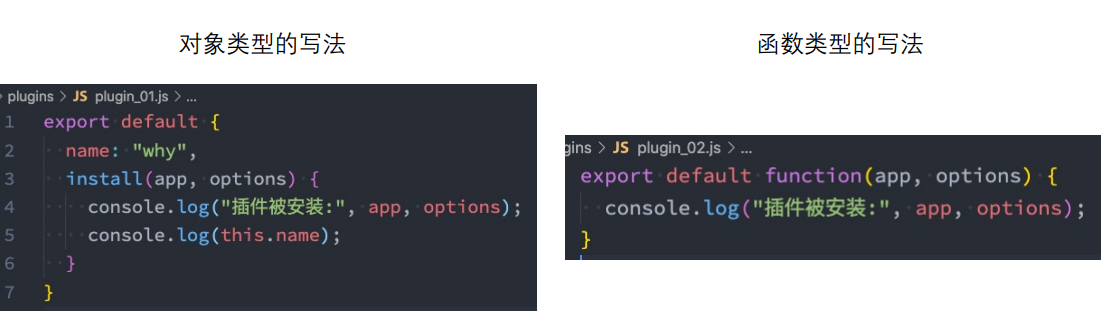
通常我们向Vue全局添加一些功能时,会采用插件的模式,它有两种编写方式:
- 对象类型:一个对象,但是必须包含一个 install 的函数,该函数会在安装插件时执行;
- 函数类型:一个function,这个函数会在安装插件时自动执行;
插件可以完成的功能没有限制,比如下面的几种都是可以的:
- 添加全局方法或者 property,通过把它们添加到 config.globalProperties 上实现;
- 添加全局资源:指令/过滤器/过渡等;
- 通过全局 mixin 来添加一些组件选项;
- 一个库,提供自己的 API,同时提供上面提到的一个或多个功能;
export default {
  install(app) {
    app.config.globalProperties.$name = "coderwhy"
  }
}
- setup获取全局变量比较繁琐
<template>
  <div class="app">
  </div>
</template>

<script>
  import { getCurrentInstance } from "vue";

  import HelloWorld from './HelloWorld.vue';

  export default {
    components: {
      HelloWorld
    },
    setup() {
	  //获取实例
      const instance = getCurrentInstance();
      console.log(instance.appContext.config.globalProperties.$name);
    },
    mounted() {
      console.log(this.$name);
    }

  }
</script>

<style scoped>

</style>
# vue3.2 setup标签上使用
- defineExpose:组件暴露自己的属性 ,如果组件使用defineComponent这种模式,则不需要暴露。
// 父组件
//通过ref
      <tree :show="show"
      ref="treeRef">
      </tree>
// ref
const treeRef = ref()
const handleClick = () => {
//获取ref中的子组件方法handleNodeClick()
 treeRef.value.handleNodeClick()
}
// 子组件
import { ref, defineExpose } from 'vue'
const handleNodeClick = () => {
 console.log('要执行的方法')
}
//将方法暴露出
defineExpose({ handleNodeClick})
- defineEmits:子组件向父组件事件传递.
// 父组件
//getGatewayData要获取的参数
<tree :show="show"
@gatewayData="getGatewayData">
</tree>
//执行方法获取参数
const getGatewayData = (e) => {
  console.log('getGatewayData', e)
}
// 子组件
import { ref, defineEmits } from 'vue'
const emits = defineEmits(['handleNodeClick'])
const handleNodeClick = (e) => {
 emits('gatewayData', label.value)
}
- defineProps:获取组件传值
template>
  <h1>{{ msg }}</h1>
  <div @click="clickThis">1111</div>
</template>

<script setup lang="ts">
  defineProps<{ // 采用ts专有声明,无默认值
    msg: string,
    num?: number
  }>()
     // 采用ts专有声明,有默认值
    interface Props {
        msg?: string
        labels?: string[]
    }
    const props = withDefaults(defineProps<Props>(), {
        msg: 'hello',
        labels: () => ['one', 'two']
    })

  defineProps({ // 非ts专有声明
    msg: String,
    num: {
      type:Number,
      default: ''
    }
  })
</script>