# vue响应式原理
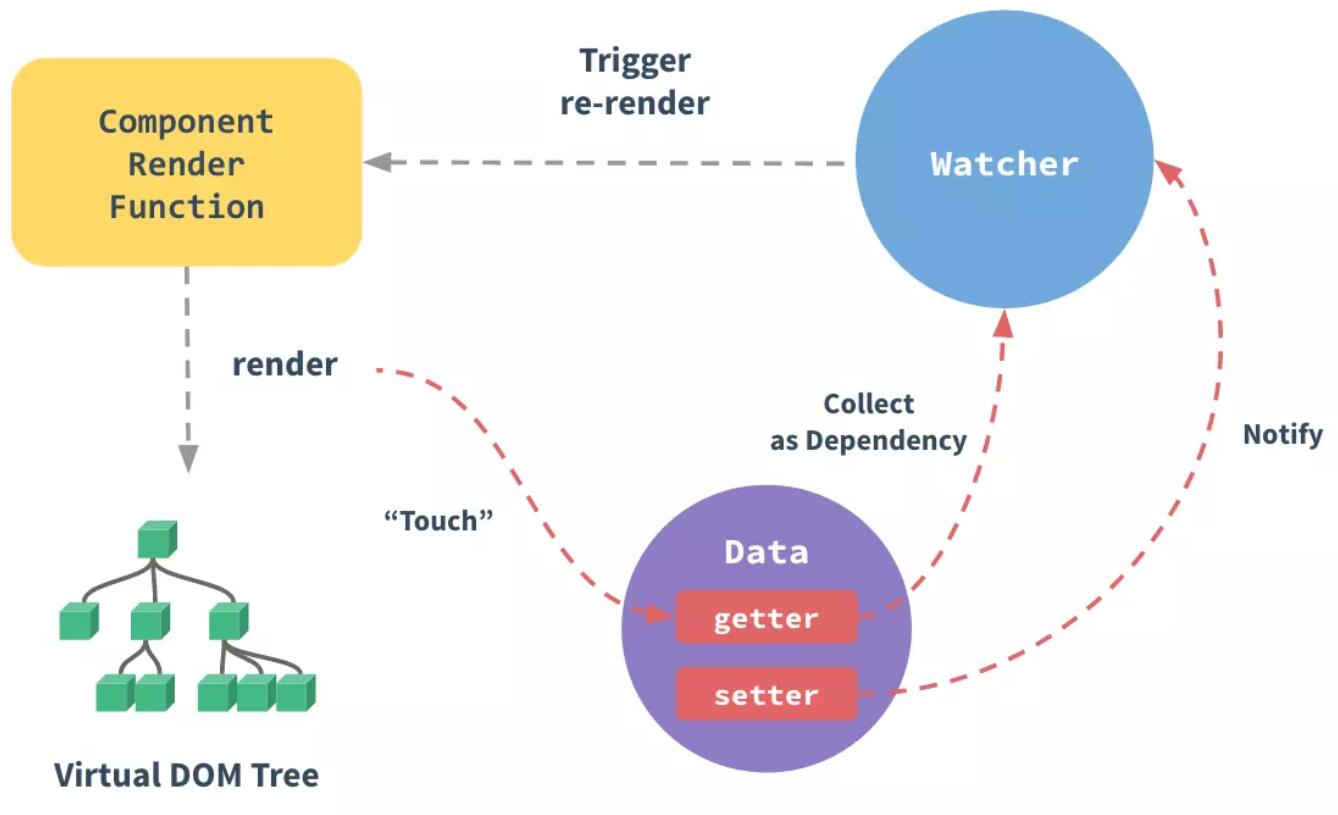
vue2通过Object.defineProperty实现vue的响应式.
<meta http-equiv="Content-Type" content="text/html;charset=UTF-8">
<div id="app">
	<p @click="add">{{counter}}</p>
	<p>{{counter}}</p>
	<p k-text="counter"></p>
	<p k-html="desc"></p>
	<input type="text" k-model="desc">
</div>

<script src="./kvue.js"></script>
<script>
	const app = new KVue({
		el: '#app',
		data: {
			counter: 1,
			desc: '<span style="color:red">村长真棒</span>'
		},
		methods: {
			add() {
				this.counter++
			}
		},
	})
	setInterval(() => {
		app.counter++
	}, 1000);
</script>
// 给一个obj定义一个响应式的属性
function defineReactive(obj, key, val) {
  // 递归
  // val如果是个对象,就需要递归处理
  observe(val);

  // 创建Dep实例
  const dep = new Dep()

  Object.defineProperty(obj, key, {
    get() {
      console.log("get", key);
      // 依赖关系收集
      Dep.target && dep.addDep(Dep.target)
      return val;
    },
    set(newVal) {
      if (newVal !== val) {
        console.log("set", key);
        val = newVal;
        // 新值如果是对象,仍然需要递归遍历处理
        observe(newVal);
        // update()
        dep.notify()
      }
    },
  });
}

// 遍历响应式处理
function observe(obj) {
  if (typeof obj !== "object" || obj == null) {
    return obj;
  }

  new Observer(obj);
}

// 能够将传入对象中的所有key代理到指定对象上
function proxy(vm) {
  Object.keys(vm.$data).forEach((key) => {
    Object.defineProperty(vm, key, {
      get() {
        return vm.$data[key];
      },
      set(v) {
        vm.$data[key] = v;
      },
    });
  });
}

class Observer {
  constructor(obj) {
    // 判断传入obj类型,做相应处理
    if (Array.isArray(obj)) {
      // todo
    } else {
      this.walk(obj);
    }
  }

  walk(obj) {
    Object.keys(obj).forEach((key) => defineReactive(obj, key, obj[key]));
  }
}

class KVue {
  constructor(options) {
    // 0.保存选项
    this.$options = options;
    this.$data = options.data;

    // 1.对data做响应式处理
    observe(options.data);

    // 2.代理
    proxy(this);

    // 3.编译
    new Compile(options.el, this);
  }
}

class Compile {
  constructor(el, vm) {
    this.$vm = vm;
    this.$el = document.querySelector(el);

    if (this.$el) {
      this.compile(this.$el);
    }
  }

  // 遍历node,判断节点类型,做不同处理
  compile(node) {
    const childNodes = node.childNodes;

    Array.from(childNodes).forEach((n) => {
      // 判断类型
      if (this.isElement(n)) {
        // console.log('编译元素', n.nodeName);
        this.compileElement(n);
        // 递归
        if (n.childNodes.length > 0) {
          this.compile(n);
        }
      } else if (this.isInter(n)) {
        // 动态插值表达式
        // console.log('编译文本', n.textContent);
        this.compileText(n);
      }
    });
  }

  isElement(n) {
    return n.nodeType === 1;
  }

  // 形如{{ooxx}}
  isInter(n) {
    return n.nodeType === 3 && /\{\{(.*)\}\}/.test(n.textContent);
  }

  // 编译插值文本 {{ooxx}}
  compileText(n) {
    // 获取表达式
    // n.textContent = this.$vm[RegExp.$1];
    this.update(n, RegExp.$1, "text");
  }

  // 编译元素:遍历它的所有特性,看是否k-开头指令,或者@事件
  compileElement(n) {
    const attrs = n.attributes;
    Array.from(attrs).forEach((attr) => {
      // k-text="xxx"
      // name = k-text,value = xxx
      const attrName = attr.name;
      const exp = attr.value;
      // 指令
      if (this.isDir(attrName)) {
        // 执行特定指令处理函数
        const dir = attrName.substring(2);
        this[dir] && this[dir](n, exp);
      }
    });
  }

  update(node, exp, dir) {
    // 1.init
    const fn = this[dir + 'Updater']
    fn && fn(node, this.$vm[exp])
	console.warn(node,exp,dir)
    // 2.update
    new Watcher(this.$vm, exp, val => {
      fn && fn(node, val)
    })
  }

  // k-text
  text(node, exp) {
    this.update(node, exp, "text");
  }

  textUpdater(node, val) {
    node.textContent = val;
  }

  // k-html
  html(node, exp) {
    this.update(node, exp, "html");
  }

  htmlUpdater(node, val) {
    node.innerHTML = val;
  }

  isDir(attrName) {
    return attrName.startsWith("k-");
  }
}

// 负责dom更新
class Watcher {
  constructor(vm, key, updater) {
    this.vm = vm;
    this.key = key;
    this.updater = updater;

    // 触发一下get
    Dep.target = this
    this.vm[this.key]
    Dep.target = null
  }

  // 将来会被Dep调用
  update() {
    this.updater.call(this.vm, this.vm[this.key]);
  }
}

// 保存watcher实例的依赖类
class Dep {
  constructor() {
    this.deps = []
  }
  // 此处dep就是Watcher的实例
  addDep(dep) {
    // 创建依赖关系时调用
    this.deps.push(dep)
  }
  notify() {
    this.deps.forEach(dep => dep.update())
  }
}
- 在Vue2.X 响应式中使用到了 defineProperty 进行数据劫持,所以对它必须有一定的了解。
<body>
    <div id="app"></div>
    <script>
        // 模拟 Vue的data
        let data = {
            msg: '',
        }
        // 模拟 Vue 实例
        let vm = {}
        // 对 vm 的 msg 进行数据劫持
        Object.defineProperty(vm, 'msg', {
            // 获取数据
            get() {
                return data.msg
            },
            // 设置 msg
            set(newValue) {
                // 如果传入的值相等就不用修改
                if (newValue === data.msg) return
                // 修改数据
                data.msg = newValue
                document.querySelector('#app').textContent = data.msg
            },
        })
        // 这样子就调用了 defineProperty vm.msg 的 set
        vm.msg = '1234'
    </script>
</body>
- 当参数是多个时
<body>
    <div id="app"></div>
	<script>
        // 模拟 Vue的data
        let data = {
            msg: '哈哈',
            age: '18',
        }
        // 模拟 Vue 实例
        let vm = {}
        // 把多个属性转化 响应式
        function proxyData() {
            // 把data 中每一项都[msg,age] 拿出来操作
            Object.keys(data).forEach((key) => {
                // 对 vm 的 属性 进行数据劫持
                Object.defineProperty(vm, key, {
                    // 可枚举
                    enumerable: true,
                    // 可配置
                    configurable: true,
                    // 获取数据
                    get() {
                        return data[key]
                    },
                    // 设置 属性值
                    set(newValue) {
                        // 如果传入的值相等就不用修改
                        if (newValue === data[key]) return
                        // 修改数据
                        data[key] = newValue
                        document.querySelector('#app').textContent = data[key]
                    },
                })
            })
        }
        // 调用方法
        proxyData(data)

	</script>
</body>
- vue3使用proxy实现响应式
<body>
    <div id="app"></div>
    <script>
            // 模拟 Vue data
            let data = {
                msg: '',
                age: '',
            }
            // 模拟 Vue 的一个实例
            // Proxy 第一个
            let vm = new Proxy(data, {
                // get() 获取值
                // target 表示需要代理的对象这里指的就是 data
                // key 就是对象的 键
                get(target, key) {
                    return target[key]
                },
                // 设置值
                // newValue 是设置的值
                set(target, key, newValue) {
                    // 也先判断下是否和之前的值一样 节省性能
                    if (target[key] === newValue) return
                    // 进行设置值
                    target[key] = newValue
                    document.querySelector('#app').textContent = target[key]
                },
            })
    </script>
</body>
- 发布订阅模式 首先来说简单介绍下 一共有三个角色
发布者、 订阅者、 信号中心 举个现实中例子 作者(发布者)写一篇文章 发到了掘金(信号中心) ,掘金可以处理文章然后推送到了首页,然后(订阅者)就可以订阅文章
在Vue 中的例子 就是EventBus $on $emit
<body>
  <div id="app"></div>
  <script>
    class Vue {
      constructor() {
        // 用来存储事件
        // 存储的 例子 this.subs = { 'myclick': [fn1, fn2, fn3] ,'inputchange': [fn1, fn2] }
        this.subs = {}
      }
      // 实现 $on 方法 type是任务队列的类型 ,fn是方法
      $on(type, fn) {
        // 判断在 subs是否有当前类型的 方法队列存在
        if (!this.subs[type]) {
          // 没有就新增一个 默认为空数组
          this.subs[type] = []
        }
        // 把方法加到该类型中
        this.subs[type].push(fn)
      }
      // 实现 $emit 方法
      $emit(type,f) {
        // 首先得判断该方法是否存在
        if (this.subs[type]) {
          // 获取到参数
		  console.log(arguments)
          const args = Array.prototype.slice.call(arguments, 1)
          // 循环队列调用 fn
          this.subs[type].forEach((fn) => fn(...args))
        }
      }
    }

    // 使用
    const eventHub = new Vue()
    // 使用 $on 添加一个 sum 类型的 方法到 subs['sum']中
    eventHub.$on('sum', function () {
      let count = [...arguments].reduce((x, y) => x + y)
      console.log(count)
    })
    // 触发 sum 方法
    eventHub.$emit('sum', 1, 2, 4, 5, 6, 7, 8, 9, 10)
  </script>
</body>
- 观察者模式
与发布订阅者不同 观察者中 发布者和订阅者(观察者)是相互依赖的 必须要求观察者订阅内容改变事件 ,而发布订阅者是由调度中心进行调度,那么看看观察者模式 是如何相互依赖,下面就举个简单例子
<body>
  <div id="app"></div>
  <script>
    // 目标
    class Subject {
      constructor() {
        this.observerLists = []
      }
      // 添加观察者
      addObs(obs) {
        // 判断观察者是否有 和 存在更新订阅的方法
        if (obs && obs.update) {
          // 添加到观察者列表中
          this.observerLists.push(obs)
        }
      }
      // 通知观察者
      notify() {
        this.observerLists.forEach((obs) => {
          // 每个观察者收到通知后 会更新事件
          obs.update()
        })
      }
      // 清空观察者
      empty() {
        this.subs = []
      }
    }

    class Observer {
      // 定义观察者内容更新事件
      update() {
        // 在更新事件要处理的逻辑
        console.log('目标更新了')
      }
    }

    // 使用
    // 创建目标
    let sub = new Subject()
    // 创建观察者
    let obs1 = new Observer()
    let obs2 = new Observer()
    // 把观察者添加到列表中
    sub.addObs(obs1)
    sub.addObs(obs2)
    // 目标开启了通知 每个观察者者都会自己触发 update 更新事件
    sub.notify()
  </script>
</body>