# T[vuerouter]
# vue3+vue-router@4版本写法
# vue路由重定向redirect
如何可以让路径默认跳到到首页, 并且<router-view>渲染首页组件呢?
{
	path: "/",
	redirect: "/home"
},
{
	path: "/home",
	name: "home",
	component: () => import(/* webpackChunkName: "home-chunk" */"../pages/Home.vue"),
	meta: {
	  name: "why"
	},
	children: [
	  {
		path: "",
		redirect: "/home/message"
	  },
	  {
		path: "message",
		component: () => import("../pages/HomeMessage.vue")
	  }
	]
},
# vue 嵌套路由
- active-class属性:设置激活a元素后应用的class,默认是router-link-active
- exact-active-class属性:链接精准激活时,应用于渲染的
<a>的 class,默认是router-link-exact-active;
{
	path: "/home",
	name: "home",
	component: () => import(/* webpackChunkName: "home-chunk" */"../pages/Home.vue"),
	meta: {
	  name: "why"
	},
	children: [
	  {
		path: "",
		redirect: "/home/message"//如果重定向的话,要注意完整路径
	  },
	  {
		path: "message",//不需要加/开头
		component: () => import("../pages/HomeMessage.vue")
	  }
	]
},
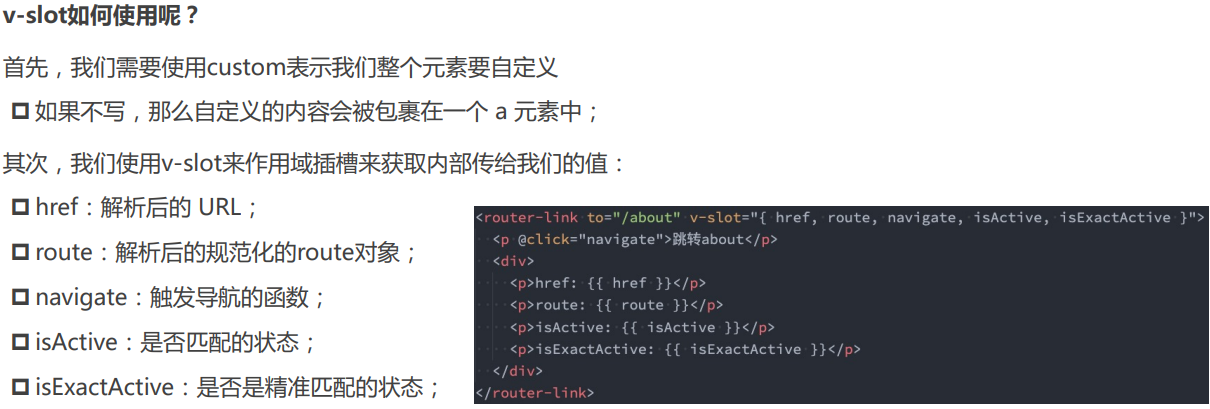
# router-link
在vue-router3.x的时候,router-link有一个tag属性,可以决定router-link到底渲染成什么元素:
- 但是在vue-router4.x开始,该属性被移除了;
- 而提供了更加具有灵活性的v-slot的方式来定制渲染的内容;
# vue编程式路由
// router.go(-1)
// router.forward()
// router.back()
//router.push(xxx)
router.replace(xxx)
# router-view
router-view也提供给我们一个插槽,可以用于 <transition> 和 <keep-alive> 组件来包裹你的路由组件:
- Component:要渲染的组件;
- route:解析出的标准化路由对象;
  <router-view v-slot="props">
      <!-- <transition name="why"> -->
        <keep-alive>
          <component :is="props.Component"></component>
        </keep-alive>
      <!-- </transition> -->
    </router-view>
# Hash 模式
www.test.com/#/ 就是 Hash URL,当 # 后面的哈希值发生变化时,可以通过 hashchange 事件来监听到 URL 的变化,从而进行跳转页面,并且无论哈希值如何变化,服务端接收到的 URL 请求永远是 www.test.com。
window.addEventListener('hashchange', () => {
  // ... 具体逻辑
})
Hash 模式相对来说更简单,并且兼容性也更好,页面不刷新,会有前进后退操作。
# History 模式
History 模式是 H5 新推出的功能,主要使用 history.pushState 和 history.replaceState 改变 URL。
通过 History 模式改变 URL 同样不会引起页面的刷新,只会更新浏览器的历史记录。
// 新增历史记录
history.pushState(stateObject, title, URL)
// 替换当前历史记录
history.replaceState(stateObject, title, URL)
当用户做出浏览器动作时,比如点击后退按钮时会触发 popState 事件
window.addEventListener('popstate', e => {
  // e.state 就是 pushState(stateObject) 中的 stateObject
  console.log(e.state)
})
# 两种模式对比
- Hash 模式只可以更改 # 后面的内容,History 模式可以通过 API 设置任意的同源 URL
- History 模式可以通过 API 添加任意类型的数据到历史记录中,Hash 模式只能更改哈希值,也就是字符串
- Hash 模式无需后端配置,兼容性好。History 模式在用户手动输入地址或者刷新页面的时候会发起 URL 请求,后端需要配置 index.html 页面用于匹配不到静态资源的时候
1.安装 vue-router
cnpm i vue-router -save
2.在src下创建router目录,目录下方index.js进行路由配置 3.配置index.js
//引入vue和vue-router及所有路由组件
import Vue from 'vue'
import Router from 'vue-router'
import Login from '../components/Login'
import Index from '../components/Index'
import Work  from '../components/Work'
import Linkman from  '../components/Linkman'
import Qq from  '../components/Qq'


//使用router
Vue.use(Router)
//注意参数是routes
export default new Router({
  routes: [
    {
      path: '/',
      name: 'Login',
      component: Login
    },
    {
      path: '/qq',
      name: 'Qq',
      component:Qq
    },

    {
      path: '/index',
      name: 'Index',
      component: Index,
	  //有子路由的配置
      children:[

        {
          path: '',
          name: 'Work',
          component:Work
        },
        {
          path: 'linkman',
          name: 'Linkman',
          component:Linkman
        }
      ]
    }
  ]
})
- mainjs挂载路由
import router from './router'
new Vue({
  el: '#app',
  router,
  store,
  components: { App },
  template: '<App/>'
})
- 跳转路由
import router from "../router";
router.push(`/index`)
query一般要用 path 来引入,params一般要用 name 来引入,接收参数都是类似的,分别是 this.$route.query.name和 this.$route.params.name
# params模式
//params传参 使用name
this.$router.push({
  name:'second',
  params: {
    id:'20180822',
     name: 'query'
  }
})

//params接收参数
this.id = this.$route.params.id ;
this.name = this.$route.params.name ;

//路由

{
path: '/second/:id/:name',
name: 'second',
component: () => import('@/view/second')
}
# query模式
import router from "../router";
router.push(`/meetingdetail?id=${v}`)

//axiosget请求中,用的params其实和url写在?后的效果一致,其实这和vue-router无关系!!!
 let that=this;
 Indicator.open()
 this.$axios.get('/conference/selectDetailCon',{
	 params:{
		 id:that.$route.query.id
	 }
 })
//传参:
this.$router.push({
        path:'/xxx',
        query:{
          id:id
        }
      })

//接收参数:
this.$route.query.id
注意
获取参数时,注意是$route!!!!
- $router为VueRouter实例,想要导航到不同URL,则使用$router.push方法
- $route为当前router跳转对象,里面可以获取name、path、query、params等
# vue动态路由匹配和name与path传参
- 动态路由:path中添加了动态参数
{
    path: '/about/:have',
    name: 'About11',
    component: () => import(/* webpackChunkName: "about" */ '../views/About.vue')
  },
- 跳转时可以使用push name的方法,也可以使用push path的方法
- 使用path传参
this.$router.push('about/3')
// /#/about/3 浏览器可以看到3
- 使用name传参
this.$router.push({
	name:'About11',
	params:{
		have:1000,
		hello:30000
	}
})
// /#/about/1000 浏览器只能看到hava的1000,name无法查看
// 在About.vue中可以获取$route.params => {have: 1000, hello: 30000}
// hava作为动态参数了
- 如果不是动态路由,使用path传递params的参数,字符串方法会失败,对象方法会成功,但是params会是个空对象,使用name对象方法能成功,且所有参数都已查到
{
	path: '/testpath',
	name: 'Test',
	component: () => import(/* webpackChunkName: "test" */ '../views/Test.vue')
}
this.$router.push({
	path:'/testpath',
	params:{
		id:2
	},
	query:{
		id:1000
	}
})
//只能打印出1000

this.$router.push("/testpath/2?id=300")
//匹配不到路由页面
this.$router.push({
	name:'Test',
	params:{
		id:2
	},
	query:{
		id:1000
	}
})
// {id: 2}
// {id: 1000}
# vue-router 404配置
vue-router@4版本,可编写一个动态路由用于匹配所有的页面
 {
    path: "/:pathMatch(.*)",//固定写法
    component: () => import("../pages/NotFound.vue")
  }
- 通过 $route.params.pathMatch获取到传入的参数:/aa/bb/cc
- /:pathMatch(.*)* 后面又加了一个 *,参数被解析陈数组['aa','bb','cc']
新路由 删除 *(加注星标或捕获全部)匹配方式,新增:/:pathMatch(.*) *;
 //通配符的使用
    {
      path: '/user-*',
      component:test
    },
    {
      path: '/*',
      component:notFound
    }

//{ path: '*' // 会匹配所有路径 } { path: '/user-*' // 会匹配以 `/user-` 开头的任意路径 }
# 路由的守卫
- 全局守卫
- 独享守卫
- 组件内守卫
next
vue3不推荐在beforeEach使用next参数!(暂时保留)
全局的前置守卫beforeEach是在导航触发时会被回调的,它有两个参数:
- to:即将进入的路由Route对象;
- from:即将离开的路由Route对象;
它有返回值:
- false:取消当前导航;
- 不返回或者undefined:进行默认导航;
- 返回一个路由地址:
- 可以是一个string类型的路径;
- 可以是一个对象,对象中包含path、query、params等信息;
- 可选的第三个参数:next
# main.js中设置全局守卫全局守卫
作用:登录校验跳转等
回调函数中的参数,to:进入到哪个路由去,from:从哪个路由离开,next:函数,决定是否展示你要看到的路由页面。
import router from './router'

router.beforeEach((to,from,next)=>{
	console.log(to,from)
    next()

})
// 在导航被确认之前,同时在所有组件内守卫和异步路由组件被解析之后,解析守卫就被调用
router.beforeResolve((to,from,next)=>{
	console.log(2)
	next()
})

router.afterEach((to,from)=>{
	console.log(to,from)

})
next 函数在任何给定的导航守卫中都被严格调用一次。它可以出现多于一次,但是只能在所有的逻辑路径都不重叠的情况下,否则钩子永远都不会被解析或报错。
// BAD
router.beforeEach((to, from, next) => {
  if (to.name !== 'Login' && !isAuthenticated) next({ name: 'Login' })
  // 如果用户未能验证身份,则 `next` 会被调用两次
  next()
})
// GOOD
router.beforeEach((to, from, next) => {
  if (to.name !== 'Login' && !isAuthenticated) next({ name: 'Login' })
  else next()
})
# 独享守卫
用法与全局守卫一致。只是,将其写进其中一个路由对象中,只在这个路由下起作用。
import Vue from 'vue'
import VueRouter from 'vue-router'
import Home from '../views/Home.vue'

Vue.use(VueRouter)

const routes = [
  {
    path: '/',
    name: 'Home',
    component: Home
  },
  {
    path: '/about',
    name: 'About',
    // route level code-splitting
    // this generates a separate chunk (about.[hash].js) for this route
    // which is lazy-loaded when the route is visited.
    component: () => import(/* webpackChunkName: "about" */ '../views/About.vue')
  },
  {
	  path:'/give',
	  name:"Give",
	  beforeEnter : ( to , from , next ) => {
	  		  console.log("hello")
	  },
	  component: () => import(/* webpackChunkName: "about" */ '../views/Give.vue')

  }
]

const router = new VueRouter({
  routes
})

export default router
# 组件内守卫beforeRouteEnter vm
beforeRouteEnter路由守卫还未获取到this对象,只能使用next回调中的vm来获取, beforeRouteEnter 是支持给 next 传递回调的唯一守卫。对于 beforeRouteUpdate 和 beforeRouteLeave 来说,this 已经可用了,所以不支持传递回调,因为没有必要了。
<template>
  <div class="home">
    <img alt="Vue logo" src="../assets/logo.png">
    <HelloWorld msg="Welcome to Your Vue.js App"/>
  </div>
</template>

<script>
// @ is an alias to /src
import HelloWorld from '@/components/HelloWorld.vue'

export default {
  name: 'Home',
  components: {
    HelloWorld
  },
  beforeRouteEnter:(to,from,next)=>{
        next(vm=>{
			 // 通过“vm”访问组件实例`
			//可以通过vm.name去访问data里面的name属性,跟this.name一样效果
			console.log(this)
           console.log("enter");

        })
    },
  beforeRouteUpdate:(to,from,next)=>{

		   console.log(this)
           console.log("update");
		   next()

    },
beforeRouteLeave:(to,from,next)=>{
	    console.log(this)
        console.log("leave")
		next()
    },


}
</script>
# 路由组件应用实例
beforeEnter+beforeEach登录跳转控制
import { createRouter, createWebHashHistory } from 'vue-router'

const routes = [{
    path: '/',
    name: 'Home',
    component: () => import(/* webpackChunkName: "home" */ '../views/home/Home')
  },
  {
    path: '/login',
    name: 'Login',
    component: () => import(/* webpackChunkName: "login" */ '../views/login/Login'),
    beforeEnter(to, from, next) {
      const { isLogin } = localStorage;
      isLogin ? next({ name: 'Home'}):  next();
    }
  }
]

const router = createRouter({
  history: createWebHashHistory(),
  routes
})

router.beforeEach((to, from ,next) => {
  const { isLogin } = localStorage;
  const { name } = to;
  const isLoginOrRegister = (name === "Login" || name === "Register");
  (isLogin || isLoginOrRegister) ? next() : next({ name: 'Login'});
})

export default router
- fullpath重定向
router.beforeEach((to, from, next) => {
	if (to.meta.auth) {
		if (window.isLogin) {
			next()
		} else {
			next('/login?redirect='+to.fullPath)
		}
	} else {
			next()
	}
})
{
	path: '/about',
	meta: {
		auth: true
	}
},
{
	path: '/login',
	component: () => import('../views/Login.vue')
},
// About.vue
beforeRouteEnter(to, from, next) {
	if (window.isLogin) {
		next();
	} else {
		next("/login?redirect=" + to.fullPath);
	}
}
# 异步组件路由懒加载
集合webpack,异步组件不需要import引入在js中,好处是可以按需加载。除了首页,其他的可以触发加载。
import Vue from 'vue'
import VueRouter from 'vue-router'
import Home from '../views/Home.vue'

Vue.use(VueRouter)

const routes = [
  {
    path: '/',
    name: 'Home',
    component: Home
  },
  {
    path: '/about',
    name: 'About',
    // route level code-splitting
    // this generates a separate chunk (about.[hash].js) for this route
    // which is lazy-loaded when the route is visited.
    component: () => import(/* webpackChunkName: "about" */ '../views/About.vue')
  }

]

const router = new VueRouter({
  routes
})

export default router
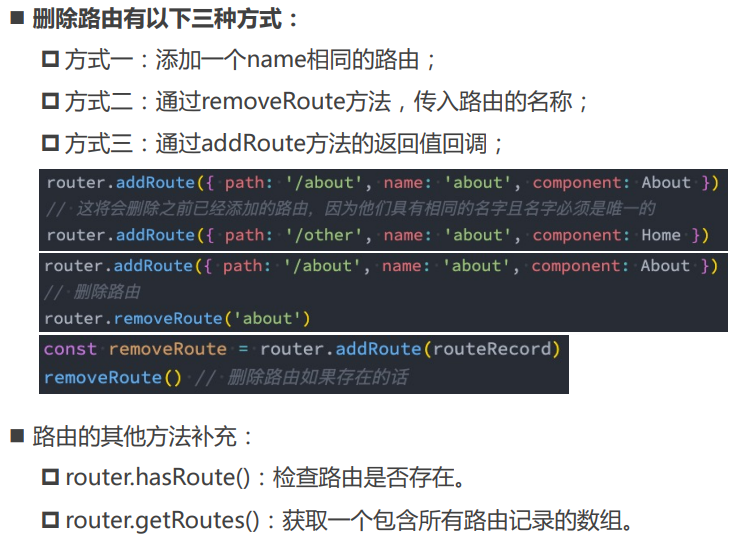
# 动态添加路由表
当有可能涉及到权限页面时,就可以使用动态路由进行配置.使用方法为addRoutes.
<template>
  <div id="app">
    <div id="nav">
		<div v-for="item in arr" >
			 <router-link :to="item.to">{{item.name}}</router-link> |
		</div>
  </div>
</template>
<script>
import Vue from "vue"

	export default{
		name:"app",
		data(){
			return{

				arr:[
					{to:"/",name:"Home"},
					{to:"/about",name:"About"},
				]
			}
		},
		mounted(){
			const asyncRoute =
			  [{
				path: '/wei',
				name: 'Wei',
				component: () => import('@/views/Wei'),
				meta: {
				  title: '用户管理'

				}
			  }]

			console.log(asyncRoute)

			this.$router.addRoutes([...asyncRoute])
			let tem=[];
			tem=asyncRoute.map(e=>{
				return {to:e.path,name:e.name}
			})
			console.log(tem)
			this.arr.push(...tem)
			tem=null;
			console.log(this.$router)
		}

	}
</script>
v4版本移除addRoutes方法,可以使用addRoute逐个添加
// 动态添加路由
const categoryRoute = {
  path: "/category",
  component: () => import("../pages/Category.vue")
}

// 添加顶级路由对象
router.addRoute(categoryRoute);

// 添加二级路由对象
router.addRoute("home", {
  path: "moment",
  component: () => import("../pages/HomeMoment.vue")
})
# 动态删除路由表
# vue-router push重复点击bug
this.$router.push("/about")两次触发同样的路由会报错
NavigationDuplicated: Avoided redundant navigation to current location: "/about".
import Vue from 'vue'
import VueRouter from 'vue-router'
Vue.use(VueRouter)
const originalPush = VueRouter.prototype.push
VueRouter.prototype.push = function push(location) {
  return originalPush.call(this, location).catch(err => err)
}
# vue路由缓存 keep-alive
利用keepalive做组件缓存,保留组件状态,提高执行效率,同时为了避免缓存过多,还可以设置上限数量
<keep-alive include="about,home">
	<router-view></router-view>
</keep-alive>
- 使用include或exclude时要给组件设置name
- 两个特别的生命周期:activated、deactivated
- 还可以动态化的控制include和exclude
//最多缓存max个数量,多了的话把前面缓存的替换掉
<keep-alive :include="['about']" max=10>
	<router-view></router-view>
</keep-alive>
# 手写vue-router思路
- 使用vue-router插件,router.js
import Router from 'vue-router'
Vue.use(Router)
- 创建Router实例,router.js
export default new Router({...})
- 在根组件上添加该实例,main.js
import router from './router'
new Vue({
 router,
}).$mount("#app");
- 添加路由视图,App.vue
<router-view></router-view>
- 实现一个插件
- 实现VueRouter类
- 处理路由选项
- 监控url变化,hashchange
- 响应这个变化
- 实现install方法
- $router注册
- 两个全局组件router-link router-view
- 实现VueRouter类
- 路由表展示
import Vue from 'vue'
import VueRouter from './myrouter.js'
import Home from '../views/Home.vue'

Vue.use(VueRouter)

const routes = [
  {
    path: '/',
    name: 'Home',
    component: Home
  },
  {
    path: '/about',
    name: 'About',
    component: () => import(/* webpackChunkName: "about" */ '../views/About.vue')
  }
]

const router = new VueRouter({
  routes
})

export default router
- myrouter配置
let Vue;
class Myrouter{
	constructor(arg) {
	  console.log('2',arg)
	  this.$$options =arg

	   Vue.util.defineReactive(this,'current',window.location.hash.slice(1)||"/")
	   window.addEventListener("hashchange", () => {
	     // #/about => /about
	     this.current = window.location.hash.slice(1);
		 // console.log(this.current)
	   });
	}
	push(v){
		this.current = v || '/'
	}

}

Myrouter.install = function (_vue){
	Vue = _vue
	console.log(1)
	// console.log(Vue)
	Vue.mixin({
		beforeCreate(){
			console.log(5)
			if(this.$options.router){
				Vue.prototype.$router = this.$options.router
			}
		}
	})

	Vue.component('router-link',{
		props:{
			to:{
				type:String,
				require:true
			}
		},
		render(h){
			console.log(3)
			return h('a',{
				attrs:{
					href:"#"+this.to
				}
			},this.$slots.default)
		}
	})

	Vue.component('router-view',{

		render(h){
			console.log(4)
			let component1=null
			const router =this.$router.$$options.routes.find((el)=> el.path === this.$router.current)
			if(router){
				component1 =router.component
			}
			return <component1/>
		}
	})
}

export default Myrouter
# 处理有children情况下的view-router
// 简单实现嵌套路由
// ① 记录当前路由router-view的深度
// ② 路由匹配,得到深度对应的组件

let Vue;

class Router {
  constructor(options) {
    this.$options = options;
    this.routeMap = {};
    // options.routes.forEach((route) => {
    //   this.routeMap[route.path] = route;
    // });
    // Vue.util.defineReactive(this, "current", window.location.hash.slice(1) || "/");
    this.current = window.location.hash.slice(1) || "/";
    window.addEventListener("hashchange", this.onHashchange.bind(this));
    window.addEventListener("load", this.onHashchange.bind(this));
	// 响应式数组
    Vue.util.defineReactive(this, "matched", []);
    this.match();
  }

  onHashchange() {
    this.current = window.location.hash.slice(1);
	// 页面刷新时,需要将matched数组置空,重新匹配路由
    this.matched = [];
    this.match();
  }
  // 通过 this.current 来匹配路由
  match(routes) {
    routes = routes || this.$options.routes;
    for (const route of routes) {
      if (route.path === "/" && this.current === "/") {
        this.matched.push(route);
        return;
      }
      // this.current : /about/info , route.path : /about 、 /about/info
      if (route.path !== "/" && this.current.includes(route.path)) {
        this.matched.push(route);
        if (route.children) {
          this.match(route.children);
        }
		console.log(this.matched)
        return;
      }
    }


  }

  static install(_Vue) {
    Vue = _Vue;
    Vue.mixin({
      beforeCreate() {
        if (this.$options.router) {
          Vue.prototype.$router = this.$options.router;
        }
      },
    });
    Vue.component("router-link", {
      props: {
        to: {
          type: String,
          default: "",
        },
      },
      render(h) {
        return h("a", { attrs: { href: "#" + this.to } }, this.$slots.default);
      },
    });

    Vue.component("router-view", {
      render(h) {
        // const { routeMap, current } = this.$router;
        // console.log(current);
        // const comp = (routeMap[current] && routeMap[current].component) || null;

	// 计算出路由的深度
        this.$vnode.data.routerView = true;
        let depth = 0;
        let parent = this.$parent;
        while (parent) {
          const vnodeData = parent.$vnode && parent.$vnode.data;
          // parent的$vnode.data.routerView存在,即该parent组件也是一个router-view,那么组件的深度就要➕1
          if (vnodeData && vnodeData.routerView) {
            depth++;
          }
          parent = parent.$parent;
        }

        const route = this.$router.matched[depth]
        const comp = route && route.component || null
        return h(comp);
      },
    });
  }
}

export default Router;
路由表中写render
 {
    path: '/about',
    name: 'About',
    component: () => import(/* webpackChunkName: "about" */ '../views/About.vue'),
	children:[{
		path:"t1",
		name:"T1",
		component:{render(){return <div>children1</div>}}
	}]
  }
总结:手写vue路由,首先要有install方法,这个是写入组件的必备方法,同时需要添加route-link和router-view两个组件,在根组件声明时,利用mixin方法在beforecreate时混入$router到vue的原型对象上,同时监听路由的变化,由于路由可以是嵌套的,要做好层级关系,对应匹配,防止内存溢出。