# RAIL测量模型
- response:处理事件50ms以内
- animation:10ms一帧
- idle:空闲,尽可能增加
- load:5s内加载并交互
# 性能测试工具
- chrome devtools
- lighthouse (npm i -g lighthouse)
- webpagetest
# webpagetest
webpagetest.org
# lighthouse
npm i -g lighthouse

# lighthouse http://www.bilibili.com
ctrl shift p调出命令行=>show network request block可以查看哪些请求,并且根据匹配关掉哪些查看是否对页面造成影响
					  =>rendering :绘制查看,有选项配合更好查看回流重绘
# performance 前端性能监控利器
Performance是一个做前端性能监控离不开的API,最好在页面完全加载完成之后再使用,因为很多值必须在页面完全加载之后才能得到。最简单的办法是在window.onload事件中读取各种数据。

// 计算一些关键的性能指标
window.addEventListener('load', (event) => {
    // Time to Interactive
    let timing = performance.getEntriesByType('navigation')[0];
    console.log(timing.domInteractive);
    console.log(timing.fetchStart);
    let diff = timing.domInteractive - timing.fetchStart;
    console.log("TTI: " + diff);
})
// 观察长任务
const observer = new PerformanceObserver((list) => {
    for (const entry of list.getEntries()) {
        console.log(entry)
    }
})

observer.observe({entryTypes: ['longtask']})
// 见面可见性的状态监听
let vEvent = 'visibilitychange';
if (document.webkitHidden != undefined) {
    // webkit prefix detected
    vEvent = 'webkitvisibilitychange';
}

function visibilityChanged() {
    if (document.hidden || document.webkitHidden) {
        console.log("Web page is hidden.")
    } else {
        console.log("Web page is visible.")
    }
}

document.addEventListener(vEvent, visibilityChanged, false);
DNS 解析耗时: domainLookupEnd - domainLookupStart
TCP 连接耗时: connectEnd - connectStart
SSL 安全连接耗时: connectEnd - secureConnectionStart
网络请求耗时 (TTFB): responseStart - requestStart
数据传输耗时: responseEnd - responseStart
DOM 解析耗时: domInteractive - responseEnd
资源加载耗时: loadEventStart - domContentLoadedEventEnd
First Byte时间: responseStart - domainLookupStart
白屏时间: responseEnd - fetchStart
首次可交互时间: domInteractive - fetchStart
DOM Ready 时间: domContentLoadEventEnd - fetchStart
页面完全加载时间: loadEventStart - fetchStart
http 头部大小: transferSize - encodedBodySize
重定向次数:performance.navigation.redirectCount
重定向耗时: redirectEnd - redirectStart
# 浏览器的渲染流程
js=>style=>layout=>paint=>composite
# 布局和绘制
布局(回流):大小和位置,绘制:画出在界面上
# 避免布局抖动
- 避免回流
读写分离fastdom
# fastdom
cnpm i fastdom --save
fastdom.measure(() => {
  console.log('measure');
});

fastdom.mutate(() => {
  console.log('mutate');
});

fastdom.measure(() => {
  console.log('measure');
});

fastdom.mutate(() => {
  console.log('mutate');
});
//measure
//measure
//mutate
//mutate
const read = fastdom.measure(() => {const width = element.clientWidth;});
const write = fastdom.mutate(() => { element.style.width = width + 'px';});

fastdom.clear(read);
fastdom.clear(write);
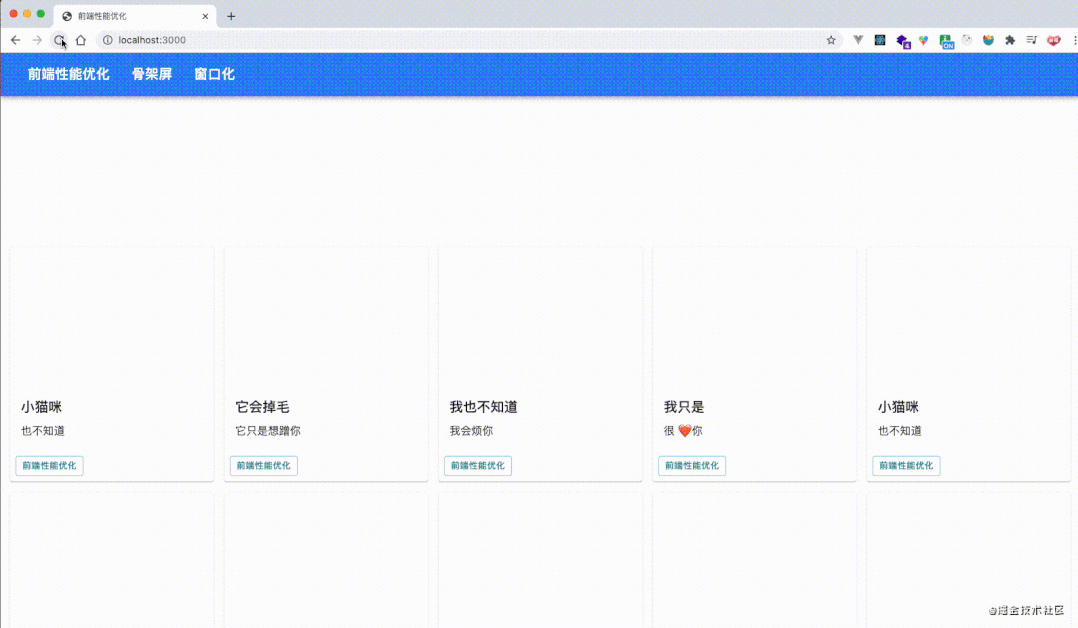
# 业务场景:给页面上的card设置图片宽度。
// 获取所有的卡片
let cards = documentdocument.getElementsByClassName("MuiCardMedia");

// 轮循更新卡片的图片宽度
const update = (timestamp) => {
	for (let i = 0; i < cards.length; i++ ){
		// 获取offsetTop,设置新的width
		cards[i].style.width = ((math.sin(cards[i].offsetTop + timestamp / 1000 ) + 1) * 500) + 'px';
	}

	window.requestAnimationFrame(update);
}
update(1000);
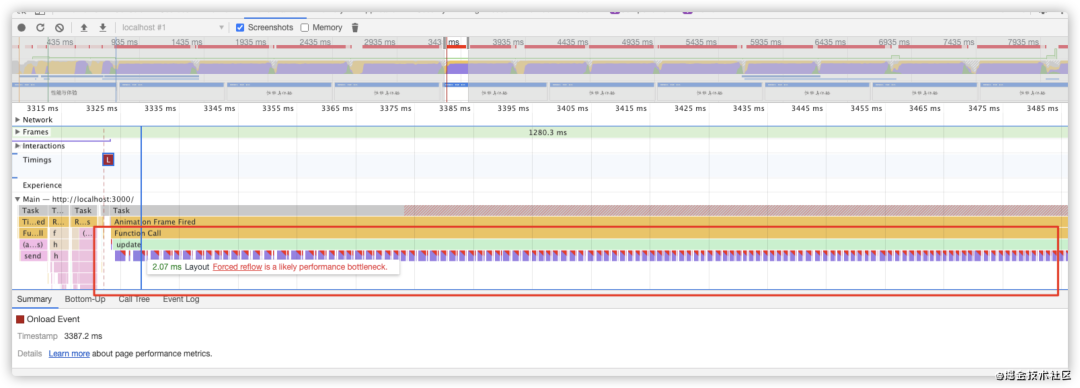
performance分析结果,load事件之后存在大量的回流,并且chrome都给标记了红色,使用fastDom进行优化,将对 dom 的读和写分离,合并
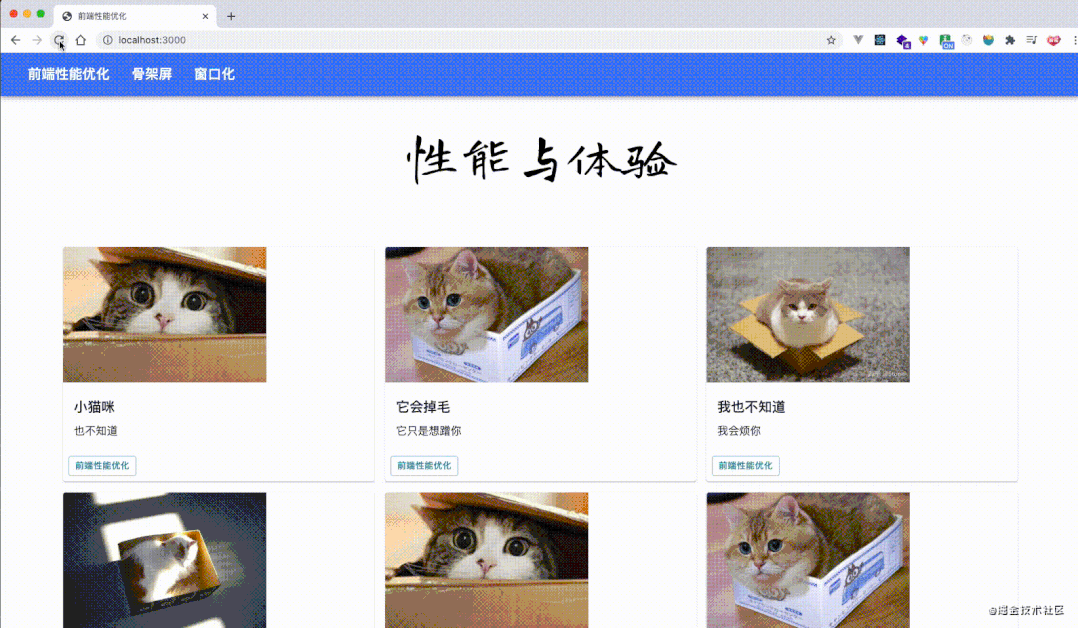
let cards = document.getElementsByClassName("MuiPaper-rounded");
	const update = (timestamp) => {
	for (let i = 0; i < cards.length; i++) {
	  fastdom.measure(() => {
		let top = cards[i].offsetTop;
		fastdom.mutate(() => {
		  cards[i].style.width =
			Math.sin(top + timestamp / 100 + 1) * 500 + "px";
		});
	  });
	}
	window.requestAnimationFrame(update)
}
update(1000);
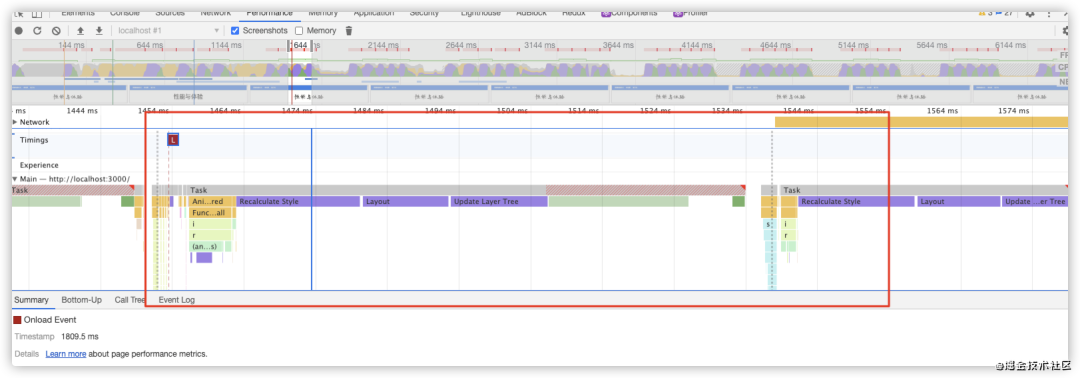
performance分析结果,load 事件之后也没有了那么多的红色标记
# 复合线程
图层复合:将页面拆分图层进行绘制再进行复合; (transform opacity,只影响复合,不影响重绘回流)
will-change创建新图层
# 函数的解析方式
V8引擎默认对js函数进行懒解析(lazy parsing),但是如果函数需要立刻执行,则又会进行饥饿解析(eager parsing)
var add=(()=>{})
 //加上括号告诉解释器这句话需要立刻解析而不是懒解析,但是某些构建工具可能会去掉
 //需要使用optimize-js,不过webpack新版本应该没这个问题
optimize-js可以帮我们把去掉的括号补回来,让函数处于可以饥饿解析状态
cnpm i -g optimize-js
# 对象优化
- 以相同顺序初始化对象成员,避免以隐藏类的调整
- 实例化后避免添加新属性
- 尽量使用array代替array-like 对象,即使将类数组转为数组需要耗时,但整体操作时间反而在V8引擎上还是会优化的
- 避免读取超过数组的长度
- 避免元素类型的转化
/* 1 */
class RectArea { // HC0
    constructor(l, w) {
        this.l = l; // HC1
        this.w = w; // HC2
    }
}

const rect1 = new RectArea(3,4); // 创建了隐藏类HC0, HC1, HC2
const rect2 = new RectArea(5,6); // 相同的对象结构,可复用之前的所有隐藏类


const car1 = {color: 'red'}; // HC0
car1.seats = 4; // HC1

const car2 = {seats: 2}; // 没有可复用的隐藏类,创建HC2
car2.color = 'blue'; // 没有可复用的隐藏类,创建HC3


/* 2 */
const car1 = {color: 'red'}; // In-object 属性
car1.seats = 4; // Normal/Fast 属性,存储在property store里,需要通过描述数组间接查找


/* 3 */
Array.prototype.forEach.call(arrObj, (value, index) => { // 不如在真实数组上效率高
  console.log(`${ index }: ${ value }`);
});

const arr = Array.prototype.slice.call(arrObj, 0); // 转换的代价比影响优化小
arr.forEach((value, index) => {
  console.log(`${ index }: ${ value }`);
});


/* 4 */
function foo(array) {
  for (let i = 0; i <= array.length; i++) { // 越界比较
    if(array[i] > 1000) { // 1.沿原型链的查找 2.造成undefined与数进行比较
        console.log(array[i]); // 业务上无效、出错
    }
  }
}


/* 5 */
const array = [3, 2, 1]; // PACKED_SMI_ELEMENTS

array.push(4.4); // PACKED_DOUBLE_ELEMENTS
# html优化
- 减小iframe(若真的需要,可以延迟加载)
- 压缩空白符
- 避免节点深层次嵌套(节点越多,遍历越慢)
- 避免table布局
- 删除注释 借助构建工具
- css/JS外链
- 删除元素默认属性
<iframe id="a"></iframe>
<script>
	document.getElementById("a").setAttribute("src","xxxx")
</script>
# css优化
- 降低css对渲染的阻塞
- 使用contain属性(兼容性)
- 利用GPU进行完成动画
- 使用font-dsiplay属性
以前的css要简单明了,如 .x{} 比y:nth-child(1)>div效率要高很多,现在随着浏览器的改进,这种差距越来越小,谷歌已把性能优化中使用高效的css选择器这条移除了
css contain 属性允许开发者声明当前元素和它的内容尽可能的独立于 DOM 树的其他部分。这使得浏览器在重新计算布局、样式、绘图或它们的组合的时候,只会影响到有限的 DOM 区域,而不是整个页面。
# 图片
- imagemin插件
- 图片懒加载:verlok/lazyload|yall.js|blazy
<!--原生某些已经支持懒加载了-->
<img src="xxx" loading="lazy"/>
- srcset+Sizes 选择响应式图片
- picture的使用
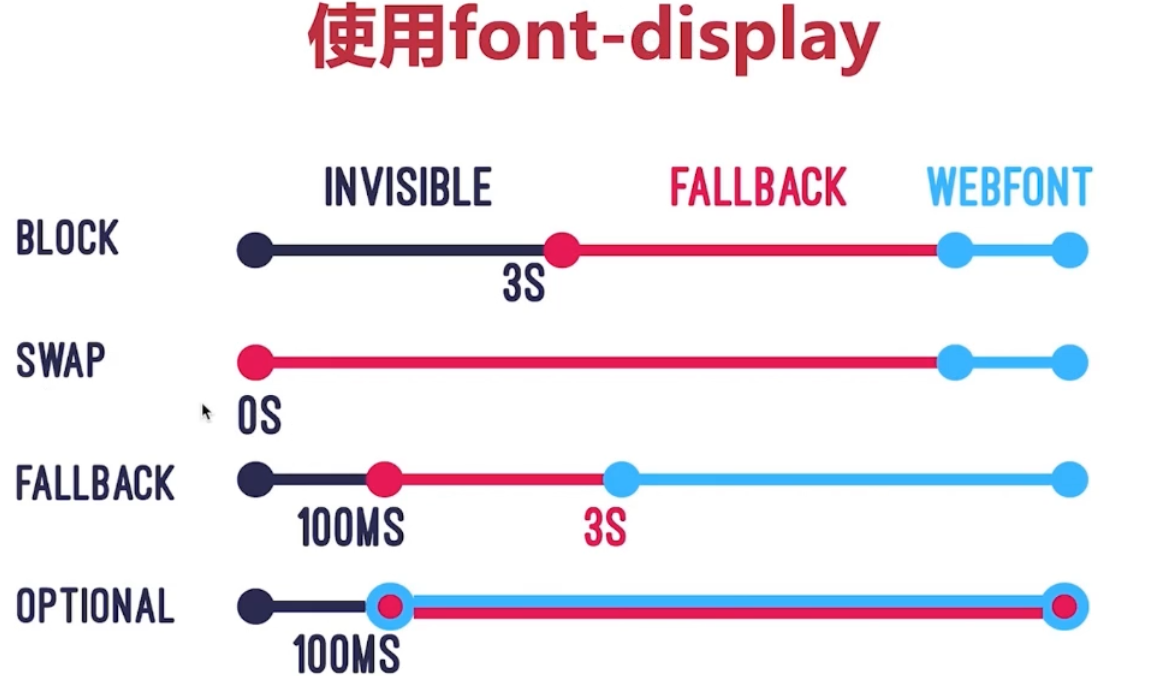
# font-display
优化字体闪烁问题 (IE和edge不支持),可以用@falce-face引入字体
@font-face{
	font-display:xxx;
	src:local('Long Cang Regular'),url(https://xxxx);
	......
}
# 长列表 虚拟列表优化项目
- 方案1:借助scrollTop + slice + 设置好高度 + startIndex + endIndex
<template>
  <div>
    <input type="text" v-model.number="dataLength">条
    <div class="virtual-scroller" @scroll="onScroll" :style="{ height: 600 + 'px' }">
      <div class="phantom" :style="{ height: this.dataLength * itemHeight + 'px' }">
        <ul :style="{ 'margin-top': `${scrollTop}px` }">
          <li v-for="item in visibleList" :key="item.brandId"
            :style="{ height: `${itemHeight}px`, 'line-height': `${itemHeight}px` }">
            <div>
              <div>{{ item.name }}</div>
            </div>
          </li>
        </ul>
      </div>
    </div>
  </div>
</template>

<script>
export default {
  name: "vue-virtual-scroller",
  data() {
    return {
      itemHeight: 60,
      dataLength: 500000, // 总数量
      startIndex: 0,
      endIndex: 10,
      scrollTop: 0
    }
  },
  computed: {
    dataList() {
      const newDataList = [...Array(this.dataLength || 0).keys()].map((v, i) => ({
        brandId: i + 1,
        name: `第${i + 1}项`,
        height: this.itemHeight
      }));
      return newDataList
    },
    visibleList() {
      console.log(this.startIndex)
      return this.dataList.slice(this.startIndex, this.endIndex)
    }
  },
  methods: {
    onScroll(e) {
      const scrollTop = e.target.scrollTop
      this.scrollTop = scrollTop
      console.log('scrollTop', scrollTop)
      this.startIndex = Math.floor(scrollTop / this.itemHeight)
      this.endIndex = this.startIndex + 10
    }
  }
}
</script>

<style scoped>
.virtual-scroller {
  border: solid 1px #eee;
  margin-top: 10px;
  height: 600px;
  overflow: auto
}

.phantom {
  overflow: hidden
}

ul {
  background: #ccc;
  list-style: none;
  padding: 0;
  margin: 0;
}

li {
  outline: solid 1px #fff;
}
</style>