# babylonjs API
# Engine
渲染引擎
// 画布 是否抗锯齿
this.engine = new Engine(canvas, true)

// 保持持续渲染
this.engine.runRenderLoop(() => {
	// 场景渲染
	this.scene.render()
})
# Scene
场景创建
// this.engine = new Engine(canvas, true)
new Scene(this.engine)
# scene中获取某个d对应的mesh
const mesh1 = this.scene.getMeshById(id)
const mesh2 = this.scene.getMeshByName(name)
# scene.beginAnimation
开启动画
//target:any //可以是mesh等
//from:number //定义动画应该从哪个帧开始
//to:number //哪一帧结束
//loop:boolean //是否循环
scene.beginAnimation(tagret, from, to, loop)
BABYLON.SceneLoader.ImportMeshAsync("mesh name", "path to model", "model file", scene).then((result) => {
	//mesh
    var dude = result.meshes[0];
    dude.scaling = new BABYLON.Vector3(0.25, 0.25, 0.25);
	// skeletons 骨架体
    scene.beginAnimation(result.skeletons[0], 0, 100, true, 1.0);
});
# scene.onBeforeRenderObservable 渲染前触发器
可以编写在渲染下一帧之前执行的代码,使用onBeforeRenderObservable处理.
通过这种方式,物体的属性可以逐帧改变.
scene.onBeforeRenderObservable.add(() => {
    //code to execute
});
# scene.onPointerObservable 交互事件
- 每次从渲染画布接收到输入事件时触发的可观察事件
- 注意参数类型PointerInfo
const fountain = MeshBuilder.CreateLathe("fountain",...)
let switched = false;
const pointerDown = (mesh:Mesh) => {
	if (mesh === fountain) {
		switched = !switched;
		if(switched) {
			// Start the particle system
			particleSystem.start();
		}
		else {
			// Stop the particle system
			particleSystem.stop();
		}
	}

}

scene.onPointerObservable.add((pointerInfo) => {
	// 定义与此 PointerInfo 对象相关的拾取信息
	switch (pointerInfo.type) {
		// 事件类型
		case PointerEventTypes.POINTERDOWN:
			// 查看pickInfo是否是hi事件
			if(pointerInfo.pickInfo.hit) {
				// 获取选中的mesh
				pointerDown(pointerInfo.pickInfo.pickedMesh)
			}
			break;
	}
});
# Camera
相机的一些角度控制
- upperBetaLimit
- lowerBetaLimit
- upperAlphaLimit
- lowerAlphaLimit
# ArcRotateCamera
// name alpha beta radius target(定义摄影机目标) ...
const camera = new ArcRotateCamera(name, alpha, beta, r, new Vector3(0, 0, 0));
// 将输入控件附加到特定的dom元素以从中获取输入。
camera.attachControl(canvas, true);
可以根据需求修改相机位置
// 根据场景可重新调整相机的位置
camera.setPosition(new Vector3(0, 2, -5));
# Light
# HemisphericLight
根据传递的方向(Vector3)在场景中创建半球光对象。半球光模拟环境光,因此通过的方向是光反射方向,而不是入射方向。半球光无法投射阴影。
new HemisphericLight("light", new Vector3(0, 1, 0));
# SpotLight
在场景中创建聚光灯对象。聚光灯是一个简单的光定向圆锥体。它可以投射阴影。
const lampLight = new SpotLight(
	"lampLight", //name
	Vector3.Zero(), //原点
	new Vector3(0, -1, 0),//场景中灯光的方向
	Math.PI,//角度
	1, //衰减速度
	scene
);
lampLight.diffuse = Color3.Yellow();
# MeshBuilder
创建Mesh
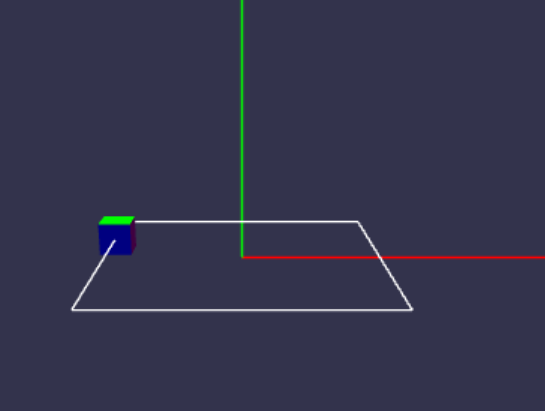
# MeshBuilder.CreateBox
创建立方体
MeshBuilder.CreateBox(name,options?:{
	faceColors?:[], //①设置立方体每个面颜色
	size?:number//设置长宽高的尺寸,默认为1

	/*挨个设置长宽高*/
	width?:number,
	height?:number,
	depth?:number,

	/*设置纹理贴图*/
	faceUV?:[],//②和①的数组类似,只不过内容是对引用的材质纹理坐标的记录,如果不设置,那么纹理会在每一个面完整的呈现而不是需要的那一段
	wrap?:boolean,// 设置为true可避免其中一些局部图像被旋转。
});
①
const faceColors = [];
faceColors[0] = Color3.Blue().toColor4();
faceColors[1] = Color3.Teal().toColor4();
faceColors[2] = Color3.Red().toColor4();
faceColors[3] = Color3.Purple().toColor4();
faceColors[4] = Color3.Green().toColor4();
faceColors[5] = Color3.Yellow().toColor4();
const boxChild = MeshBuilder.CreateBox("Box", {size: 0.5, faceColors:faceColors});
const faceUV = [];
faceUV[0] = new Vector4(0.5, 0.0, 0.75, 1.0); //rear face
faceUV[1] = new Vector4(0.0, 0.0, 0.25, 1.0); //  face
faceUV[2] = new Vector4(0.25, 0, 0.5, 1.0); //right side
faceUV[3] = new Vector4(0.75, 0, 1.0, 1.0); //left side

// 创建物体
const box = MeshBuilder.CreateBox('box', {
	faceUV,
	wrap: true
})

const boxMat = new StandardMaterial('boxMat')
boxMat.diffuseTexture = new Texture('https://assets.babylonjs.com/environments/cubehouse.png')
box.material = boxMat
# MeshBuilder.CreatePlane
创建一个平面
const plane = MeshBuilder.CreatePlane("TextPlane", {size});
# MeshBuilder.CreateGround
创建地面
# MeshBuilder.CreateLines
创建线段
MeshBuilder.CreateLines(name:string,{
	points:Vector3[];
	colors?:Color4[] | undefined;
})
MeshBuilder.CreateLines("axisX", { points: [
            Vector3.Zero(), new Vector3(size, 0, 0), new Vector3(size * 0.95, 0.05 * size, 0),
            new Vector3(size, 0, 0), new Vector3(size * 0.95, -0.05 * size, 0)
        ]});
# MeshBuilder.CreateCylinder
创建圆柱体
圆柱体具有三个表面,顶部、底部和连接它们的管子。对于面选项,面 0 是底部,面 1 是管,面 2 是顶部。
- wheelUV[0] = new BABYLON.Vector4(0, 0, 1, 1);
- wheelUV[1] = new BABYLON.Vector4(0, 0.5, 0, 0.5);
- wheelUV[2] = new BABYLON.Vector4(0, 0, 1, 1)
// name
/**
 * {
 * diameter:number 直径
 * height:number 高度
 * tessellation?:number
 * }
*/
MeshBuilder.CreateCylinder("wheelRB", {
	diameter: 0.125,
	height: 0.05,
	faceUV?:wheelUV
})
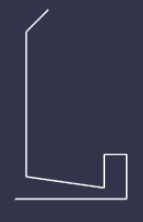
# MeshBuilder.ExtrudePolygon
创建自定义多边形
挤出多边形(extrudePolygon)和多边形网格生成器(PolygonMeshBuilder)都使用耳切(earcut)切片算法。
需要下载earcut
- ExtrudePolygon多边形绘图时绘制了一面给出depth,背面会自动绘制出
- // 设置faceUV 0正面 1 挤压边 2背面底部(正面背面对称)
- const faceUV = [];
- faceUV[0] = new Vector4(0, 0.5, 0.38, 1);
- faceUV[1] = new Vector4(0, 0, 1, 0.5);
- faceUV[2] = new Vector4(0.38, 1, 0, 0.5);
import * as earcut from 'earcut'
(window.earcut =earcut)
// name
/**
 * {
 * shape:Vector3[] 形状
 * depth?:number
 * faceUV:Vector4[]
 * }
*/
MeshBuilder.ExtrudePolygon(name, {
	shape: outline,
	depth?: 0.2,
	faceUV:[]
});
# MeshBuilder.CreateGroundFromHeightMap 高度贴图
从高度贴图创建地面网格
/**
 * name
 * url
 * options:{
 * subdivisions?:number//细分subdivisions^2份呈现
 * minheight:number
 * maxheight:number
 * }
*/
// minHeight 和 maxHeight 这两个属性分别决定了黑色和白色区域的垂直高度,灰色区域的高度也会相应缩放。
 const largeGround = MeshBuilder.CreateGroundFromHeightMap(
	"largeGround",
	"https://assets.babylonjs.com/environments/villageheightmap.png",
	{width:150, height:150, subdivisions: 100, minHeight:0, maxHeight: 10});
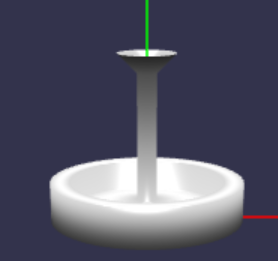
# MeshBuilder.CreateLathe
创建车削网格。车床是一个具有对称轴的形状:二维模型形状围绕该轴旋转以设计车床
const fountainProfile = [
	new Vector3(0, 0, 0),
	new Vector3(10, 0, 0),
	new Vector3(10, 4, 0),
	new Vector3(8, 4, 0),
	new Vector3(8, 1, 0),
	new Vector3(1, 2, 0),
	new Vector3(1, 15, 0),
	new Vector3(3, 17, 0)
];

//Create lathe
/**
 * name:string
 * options:{
 * shape: Vector3[];
 *  radius?: number | undefined;//半径
 *  tessellation?: number | undefined;//细分成都
 *  clip?: number | undefined;//(正整数,默认为0)是在不影响边的一般形状的情况下不创建的边数
 *  arc?: number | undefined;//(正浮动,默认值为1)是车床的比例。例如,0.5构建了半台车床,因此打开了形状
 *  closed?: boolean | undefined;//打开/关闭车床圆周
 *  sideOrientation?:number //侧面定向
 *  ......
 * }
*/


const fountain = MeshBuilder.CreateLathe("fountain", {
	shape: fountainProfile,
	sideOrientation: Mesh.DOUBLESIDE
}, this.scene);
# Mesh
网格实例的属性
- 调整位置position
- 调整角度rotation
- 设定父级parent
boxChild.position.x = 0;
boxChild.position.y = 2;
boxChild.position.z = 0;

boxChild.rotation.x = Math.PI / 4;
boxChild.rotation.y = Math.PI / 4;
boxChild.rotation.z = Math.PI / 4;
# mesh.rotate
围绕给定空间中以弧度表示的传递角度(量)的轴向量旋转网格。Space(默认LOCAL)可以是Space.LOCAL或Space.WORLD。
// axis:Vector3
// amount:以弧度为单位的旋转量
// space?:Space.LOCAL或Space.WORLD
mesh.rotate(Axis.Y, track[p].turn, Space.LOCAL);
 class Slide {
		turn: number
		dist: number
		constructor(turn: number, dist: number) {
			this.turn = turn;
			this.dist = dist;
		}
	}

const track: any[] = [];
track.push(new Slide(Math.PI / 2, 4));
track.push(new Slide(2*Math.PI / 2 , 8));
track.push(new Slide(3*Math.PI / 2, 12));
track.push(new Slide(4*Math.PI / 2, 16));

// ......

sphere.rotation.y = track[p].turn
track.push(new Slide(Math.PI / 2, 4));
track.push(new Slide(Math.PI / 2 , 8));
track.push(new Slide(Math.PI / 2, 12));
track.push(new Slide(Math.PI / 2, 16));
sphere.rotate(Axis.Y, track[p].turn, Space.LOCAL);
想让正方体一直旋转,可以使用改变rotation.y的值,这个是相对于y轴的,要记住角度依次累加
如果使用rotate,旋转多少度。在原有的基础上累加(不需要手动添加之前的值),即旋转了多少角度。又旋转了多少角度,是在原有的基础上在旋转
比如只想让他旋转到多少,用rotation;假如想让他一直转,可以用Rotate
# mesh.movePOV
movePOV(移动视点),它允许相对于网格的视点移动网格。一般情况下,新创建的网格会被认为朝向负 Z 方向,这就是网格的视点方向。要将网格沿视点方向向前移动 6 个单位,可以使用
参数依次是向右、向上和向前移动的距离,一般是网格局部空间中的负 x 轴、正 y 轴和负 z 轴。
mesh.movePOV(0, 0, -6)
# Mesh多个合并为一个整体
// Mesh[]
// disposeSource
// allow32BitsIndices
// meshSubclass
// subdivideWithSubMeshes
// multiMultiMaterials:控制mesh1之后的mesh是否会被mesh1覆盖
// true为不覆盖
const house = Mesh.MergeMeshes([mesh1, mesh2...], true, false, undefined, false, true)!
# Mesh 复制
// Mesh
clonedHouse = houseMesh.clone("clonedHouse")
// InstancedMesh
instanceHouse = houseMesh.createInstance("instanceHouse")
Mesh.MergeMeshes()的第一个参数是Mesh[],此时就推荐使用clone而非创建实例
# Mesh设置 parent setParent
获取或设置节点的父级
// 将传递的节点定义为当前节点的父节点。节点将保持在其所在位置,其位置/旋转将相应更新。
childMesh.setParent(parentMesh)
childMesh.parent = parentMesh
# Mesh.intersectsMesh
检测两个Mesh是否碰撞
在同步代码中一直会显示为true,加了定时器后会显示正确的结果
setTimeout(() => {
	console.log(f1.intersectsMesh(f2),1)
	console.log(box1.intersectsMesh(box2),3)
	console.log(hitBox.intersectsMesh(f1),5)
}, 3000);
console.log(f1.intersectsMesh(f2),2)
console.log(box1.intersectsMesh(box2),4)
console.log(hitBox.intersectsMesh(f1),6)
# AbstractMesh.rotationQuaternion
获取或设置旋转四元数属性
// dude是个AbstractMesh
dude.position = new Vector3(-6, 0, 0);
dude.rotate(Axis.Y, Tools.ToRadians(-95), Space.LOCAL);//②
const startRotation = dude?.rotationQuaternion?.clone();

// 回到原点,因为rotate是累加的,不好处理
// 通过读取初始化记录的rotationQuaternion可以方便处理
// 就不需要在去计算第②行代码现在角度位置了
dude.position = new Vector3(-6, 0, 0);
dude.rotationQuaternion = startRotation.clone();
# Texture
纹理
new Texture(url,?...)
const boxMat = new StandardMaterial('boxMat')
boxMat.diffuseTexture = new Texture('https://xxx')
# DynamicTexture
扩展纹理的一个类,允许在纹理上绘图
new DynamicTexture (
	name: string,
	options: any,
	scene?: Nullable<Scene> | undefined,
	generateMipMaps?: boolean | undefined,
	...
)
使用Mipmap后,贴图会根据摄像机距离的远近,选择使用不同精度的贴图。
- 缺点:会占用内存,因为mipmap会根据摄像机远近不同而生成对应的八个贴图,所以必然占内存!
- 优点:会优化显存带宽,用来减少渲染,因为可以根据实际情况,会选择适合的贴图来渲染,距离摄像机越远,显示的贴图像素越低,反之,像素越高!
MipMap可以用于跑酷类游戏,当角色靠近时,贴图清晰显示,否则模糊显示
const dynamicTexture = new DynamicTexture("DynamicTexture", 50, scene, true);
// 是否透明处理纹理alpha值(可以去掉背景)
dynamicTexture.hasAlpha = true;
dynamicTexture.drawText(text, 5, 40, "bold 36px Arial", color , "transparent", true);
dynamicTexture.drawText(
	text:string,
	x:number|null|undefind,
	y:numberr|null|undefind,
	font:string,
	color:string | null,
	clearColor: string | null,
	invertY?: boolean,// 定义 Y 轴的方向(默认值为 true - y 向下增加,保证字的正向排布)
	update?: boolean//是否立即更新纹理,默认true
);
# CubeTexture
创建用于反射的立方体纹理
天空盒图像通常使用 CubeTexture 加载。CubeTexture 的构造函数接收基本 URL,并(默认情况下)附加"_px.jpg"、"_nx.jpg"、"_py.jpg"、"_ny.jpg"、"_pz.jpg "和"_nz.jpg",以加载立方体的 +x、-x、+y、-y、+z 和 -z 面。
const skybox = MeshBuilder.CreateBox("skyBox", {size:150}, scene);
const skyboxMaterial = new StandardMaterial("skyBox", scene);
skyboxMaterial.backFaceCulling = false;
// url
skyboxMaterial.reflectionTexture = new CubeTexture("textures/skybox", scene);
// 设置天空盒模式
skyboxMaterial.reflectionTexture.coordinatesMode = Texture.SKYBOX_MODE;
skyboxMaterial.diffuseColor = new Color3(0, 0, 0);
skyboxMaterial.specularColor = new Color3(0, 0, 0);
skybox.material = skyboxMaterial;
# Material
材质
- Material.diffuseColor 漫反射颜色
- Material.specularColor 镜面反射颜色
# material.backFaceCulling 消除背面
// 如果不设置的话,转到背面就看不见内容
skyboxMaterial.backFaceCulling = false;
# StandardMaterial
标准材质
new StandardMaterial(name: string, scene?: Scene | undefined):
{
	backFaceCulling?:boolean//  去除背面,设置true后旋转到背面,绘制内容就看不见了
	specularColor?:Color3//  高亮色
	diffuseTexture?:texture// 漫反射纹理 可以是url引入的也可以是借助DynamicTexture动态绘制的
	diffuseColor?:Color3 //漫反射颜色
}
const plane = MeshBuilder.CreatePlane("TextPlane", {size}, scene);
plane.material = new StandardMaterial("TextPlaneMaterial", scene);
plane.material.backFaceCulling = false;
plane.material.specularColor = new Color3(0, 0, 0);
plane.material.diffuseTexture = dynamicTexture;
// plane.material.diffuseColor = new Color3(0,1,0)
# TransformNode
变换节点(TransformNode)是一个未渲染但可用作变换中心的对象。与使用空网格作为父节点相比,这可以减少内存使用量并提高渲染速度,而且比使用枢轴矩阵更简单。
// 创建一个变换节点,将坐标轴的三条线的父级都设为它

const local_origin = new TransformNode("local_origin");
// 不设置的话,那么就会以场景的中心点而不是这个物体为中心去设置
local_axisX.parent = local_origin;
local_axisY.parent = local_origin;
local_axisZ.parent = local_origin;
# SceneLoader
用于使用注册的插件从各种文件格式加载场景
# SceneLoader.ImportMeshAsync
// result: ISceneLoaderAsyncResult
const result = await SceneLoader.ImportMeshAsync('',path,filename)
打印出来的结构
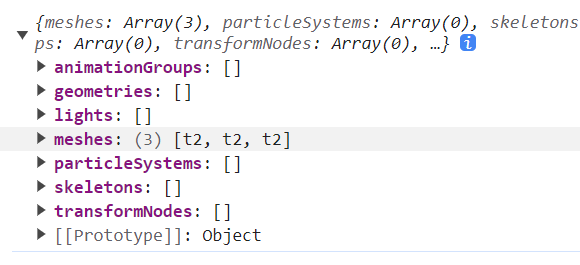
如果是复杂的结构如.glb等,需要安装babylonjs-loaders帮助解析
import 'babylonjs-loaders'
 SceneLoader.ImportMeshAsync(name, path, "village.glb")
	.then(res=>{
        console.log(res)
	})
# babylonjs Animation
- Animation.ANIMATIONLOOPMODE_CYCLE - 从初始值重新开始动画
- Animation.ANIMATIONLOOPMODE_CONSTANT - 在最终值处暂停动画
- Animation.ANIMATIONLOOPMODE_RELATIVE - 使用键值梯度重复动画递增。以这种方使用键值梯度重复动画递增。
/**
 * name:string
 * targetProperty:要设置动画的属性
 * framePerSecond:动画的每秒帧数
 * dataType:number // 动画的数据类型
 * loopMode?:number//循环模式
*/
  const animWheel = new Animation(name, "rotation.y", 30,
        Animation.ANIMATIONTYPE_FLOAT,
		Animation.ANIMATIONLOOPMODE_CYCLE);
# 设置关键帧动画 animation.setKeys
mesh的动画是个数组,所以需要push进去新增的动画实例
const wheelKeys = [];


wheelKeys.push({
	frame: 0,
	value: 0
});
// ......
wheelKeys.push({
	frame: 5,
	value: 2 * Math.PI
});
// Animation
animWheel.setKeys(wheelKeys);

console.log(wheelRB.animations)
wheelRB.animations = [];
wheelRB.animations.push(animWheel);
// 最后在场景中调用动画
scene.beginAnimation(wheelRB, 0, 30, true);
# SpriteManager Sprite
为了保持渲染速度,可以考虑使用精灵。这些都是二维图像,将始终面向摄像机。
Sprite:创建精灵图
// name
// url
// 精灵图数量最大多少
// 定义精灵单元格的大小
// 场景
// ...
 const spriteManagerTrees = new SpriteManager(
	 "treesManager",
	 "https://assets.babylonjs.com/textures/palm.png",
	 2000,
	 {width: 512, height: 1024},
	 scene
 );

for (let i = 0; i < 500; i++) {
	const tree = new Sprite("tree", spriteManagerTrees);
	tree.position.x = Math.random() * (-30);
	tree.position.z = Math.random() * 20 + 8;
	tree.position.y = 0.5;
}
也可以使用精灵贴图中的图像集合来生成动画
# playAnimation
该动画角色是设置由给第一个和最后一个细胞可以使用,无论循环(true)或不和的时间区间框架
 const spriteManagerUFO = new SpriteManager(
 "UFOManager",
 "https://assets.babylonjs.com/environments/ufo.png",
 1,
 {width: 128, height: 76},
 scene);
const ufo = new Sprite("ufo", spriteManagerUFO);

// from to loop delay
ufo.playAnimation(0, 16, true, 125);
ufo.position.y = 5;
ufo.position.z = 0;
ufo.width = 2;
ufo.height = 1;
# ParticleSystem 生成粒子系统
// 创建颗粒系统 name 最大数量 scene/thinEngin
var particleSystem = new ParticleSystem("particles", 10000, scene);
// 纹理贴图
particleSystem.particleTexture = new Texture("textures/flare.png", scene);
// 发射原点
particleSystem.emitter = new Vector3(0, 10, 0); // the starting object, the emitter
// 发射器周围的最小和最大框点。发射器是粒子源的中心,但如果你想让粒子从多个点发射,可进行设置
particleSystem.minEmitBox = new Vector3(-1, 0, 0); // Starting all from
particleSystem.maxEmitBox = new Vector3(1, 0, 0); // To...
// 粒子渐变色
particleSystem.color1 = new Color4(0.7, 0.8, 1.0, 1.0);
particleSystem.color2 = new Color4(0.2, 0.5, 1.0, 1.0);
// 粒子消亡前的颜色
particleSystem.colorDead = new Color4(0, 0, 1, 1);
// 粒子最大最小值
particleSystem.minSize = 0.1;
particleSystem.maxSize = 0.5;
// 粒子最大最小生命周期
particleSystem.minLifeTime = 2;
particleSystem.maxLifeTime = 3.5;
// 每帧要发射的最大粒子数
particleSystem.emitRate = 1500;
// 混合模式用于渲染粒子
// Blend mode :
// BLENDMODE_ONEONE:是默认值,如果没有手动设置,blendMode的值将会是这个。 设置颜色不会影响到粒子的alpha(透明部分)
// BLENDMODE_STANDARD:使用粒子的alpha(即颜色(1-alpha)+ particleColor alpha)添加颜色。
// particleSystem.blendMode = ParticleSystem.BLENDMODE_ONEONE;
// 设置重力
particleSystem.gravity = new Vector3(0, -9.81, 0);
// 设置方向区间
particleSystem.direction1 = new Vector3(-2, 8, 2);
particleSystem.direction2 = new Vector3(2, 8, -2);
// Angular speed, in radians
particleSystem.minAngularSpeed = 0;
particleSystem.maxAngularSpeed = Math.PI;
// Speed
particleSystem.minEmitPower = 0.8;
particleSystem.maxEmitPower = 3;
particleSystem.updateSpeed = 0.035;
// Start the particle system
particleSystem.start();
// // Stop the particle system
// particleSystem.stop();
# Tools
# Tools.ToRadians
角度制转弧度制
import { Tools } from "babylonjs";

ground.position.y = -.5
// 角度制
box.rotation.y =Tools.ToRadians(45)
// 弧度制
box.rotation.y = Math.PI/4
# babylonjs其他API
# Vector3
用于存储(x,y,z)矢量表示的类Vector3是3D几何中使用的主要对象。它可以表示空间中某个点的坐标
new Vector3(x,y,z)
// 默认(0,0,0)点创建
Vector3.Zero()
# Vector4
左下角右上角定位坐标
# Color3
颜色相关
// 静态方法方柏霓创建不同颜色
// toColor4转rgba形式
Color3.Blue().toColor4()