# cesium API
- Camera 相机
- camera.pickEllipsoid 选择椭圆
- camera.flyTo 飞行
- camera.lookAt
- flyToBoundingSphere
- HeadingPitchRoll航向、俯仰、滚动
- ScreenSpaceCameraController(scene)
- Cartesian2
- Cartesian3 笛卡尔坐标
- Cartesian3.fromDegreesArray经纬度转笛卡尔坐标[静态]
- Cartesian3.fromDegreesArrayHeights
- Cartesian3.fromDegrees单个经纬度转笛卡尔坐标
- Cartesian3.clamp
- Cartesian3.lerp插值
- Cartesian3.magnitude
- Viewer 视图
- viewer.flytTo
- viewer.entities实体
- viewer.baseLayer 图层
- viewer.extend
- resolutionScale渲染分辨率的缩放因子
- selectedEntity
- selectedEntityChanged
- Primitive 图元
- PolygonGeometry 描述几何体
- PolygonGeometry.createGeometry定义计算几何体[静态]
- polygonHierarchy
- PerInstanceColorAppearance
- PolylineCollection 线段集合
- GeometryInstance 几何实例化
- ColorGeometryInstanceAttribute颜色附着几何体
- ColorGeometryInstanceAttribute.fromColor根据color设置
- ColorGeometryInstanceAttribute.toValue颜色转换为可分配颜色属性
- ShowGeometryInstanceAttribute几何体实例是否可见
- Scene 场景
- pick
- Primitive 图元
- geometryInstances
- VoxelPrimitive[非标准]
- debugShowFramesPerSecond
- specularEnvironmentMapsSupported是否镜面环境贴图支持
- skyBox 天空盒
- globe 地球本身
- scene.postProcessStages 渲染的后处理效果
- ScreenSpaceCameraController用户操作交互
Global全局 设置全局属性和方法
defaultValue 默认值。
// 使用 Cesium.defaultValue 来获取 'color',如果未定义则使用 '#FFFFFF'(白色)
var color = Cesium.defaultValue(options.color, '#FFFFFF');
Camera 相机 相机由位置、方向和视图截头体定义。
方向与视图形成标准正交基,向上和向右=视图x向上单位向量。
观察截头体由6个平面定义。 每个平面由一个Cartesian4对象表示,其中x、y和z分量 定义垂直于平面的单位向量,w组件是 从原点/相机位置的平面。
- camera.frustum.near:相机近裁剪面距离
// Create a camera looking down the negative z-axis, positioned at the origin,
// with a field of view of 60 degrees, and 1:1 aspect ratio.
const camera = new Cesium.Camera(scene);
camera.position = new Cesium.Cartesian3();
camera.direction = Cesium.Cartesian3.negate(Cesium.Cartesian3.UNIT_Z, new Cesium.Cartesian3());
camera.up = Cesium.Cartesian3.clone(Cesium.Cartesian3.UNIT_Y);
camera.frustum.fov = Cesium.Math.PI_OVER_THREE;
camera.frustum.near = 1.0;
camera.frustum.far = 2.0;
| Name | Type | Default | Description |
|---|---|---|---|
| windowPosition | Cartesian2 | - | The x and y coordinates of a pixel. |
| ellipsoid | Ellipsoid | Ellipsoid.default | optional The ellipsoid to pick. |
| result | Cartesian3 | - | optional The object onto which to store the result. |
选择一个椭球或地图。如果选择了椭球体或地图,则返回世界坐标(笛卡尔/空间直角坐标)中椭球体或地图表面的点。如果未选择椭球体或地图,则返回undefined。
const result = viewer.camera.pickEllipsoid(center, ellipsoid);
import { Cartesian3, Math } from "cesium";

viewer.camera.flyTo({
    // 目的地
    destination: Cartesian3.fromDegrees(120.47, 36.3, 350000),
    // 姿态
    orientation: {
        heading: Math.toRadians(100),
        pitch: Math.toRadians(-90),
        roll: 0.0,
    },
	// 或者
	orientation: {
	  //表示相机应该面向的方向
	  direction: cameraTransform.direction,
	  //表示相机上方应该指向的方向。这通常用于定义相机的垂直方向,以确保相机不会翻滚或倾斜到不期望的角度。
	  up: cameraTransform.up,
	},
    // 持续时间
    duration:3,
	//定义了相机飞行过程中的缓动效果。
	easingFunction:Cesium.EasingFunction.QUADRATIC_IN_OUT
    //......
	endTransform:Cesium.Matrix4.IDENTITY//表示飞行完成时相机将处于的参考帧的变换矩阵。
});
// 1. Fly to a position with a top-down view 飞到有自上而下视野的位置
viewer.camera.flyTo({
    destination : Cesium.Cartesian3.fromDegrees(-117.16, 32.71, 15000.0)
});

// 2. Fly to a Rectangle with a top-down view 飞到有自上而下视野的位置
viewer.camera.flyTo({
    destination : Cesium.Rectangle.fromDegrees(west, south, east, north)
});

// 3. Fly to a position with an orientation using unit vectors. 使用单位向量飞到具有方向的位置
viewer.camera.flyTo({
    destination : Cesium.Cartesian3.fromDegrees(-122.19, 46.25, 5000.0),
    orientation : {
        direction : new Cesium.Cartesian3(-0.04231243104240401, -0.20123236049443421, -0.97862924300734),
        up : new Cesium.Cartesian3(-0.47934589305293746, -0.8553216253114552, 0.1966022179118339)
    }
});

// 4. Fly to a position with an orientation using heading, pitch and roll. 使用航向、俯仰和滚动飞到一个有方向的位置
viewer.camera.flyTo({
    destination : Cesium.Cartesian3.fromDegrees(-122.19, 46.25, 5000.0),
    orientation : {
        heading : Cesium.Math.toRadians(175.0),
        pitch : Cesium.Math.toRadians(-35.0),
        roll : 0.0
    }
});
//offset: Cartesian3 | HeadingPitchRange
lookAt(target, offset)
camera.lookAt(
	//这是摄像机要指向的目标点的位置。这里,目标点是某个模型(model)的外接球体(bounding sphere)的中心。
	model.boundingSphere.center,
	new Cesium.HeadingPitchRange(heading, pitch, radius * 2.0)
);
功能:将摄像机的视角设置为指向一个特定的目标点,并且调整摄像机的朝向(heading)、倾斜角度(pitch)和与目标的距离(range)。
- 特点:
- 摄像机视角会锁定在目标点上,但用户仍然可以围绕目标点旋转视角。
- 适用于需要固定视角在特定目标上,同时允许用户进行视角旋转的场景。
flyToBoundingSphere 将相机飞到当前视图包含提供的边界球的位置。
 const voxelPrimitive = viewer.scene.primitives.add(
	new Cesium.VoxelPrimitive({
	  provider: provider,
	  customShader: customShader,
	  modelMatrix: modelMatrix,
	})
  );
// voxelPrimitive.boundingSphere:获取边界球
viewer.camera.flyToBoundingSphere(voxelPrimitive.boundingSphere, {
	//duration属性被设置为0.0,意味着相机将立即跳转到目标位置,而不是在一段时间内平滑过渡。
	duration: 0.0,
});
HeadingPitchRoll航向、俯仰、滚动 表示为航向、俯仰和滚动的旋转。航向是绕负z轴的旋转。音高是绕负y轴的旋转。滚动是绕正x轴的旋转。
//参数为弧度制
const hpr = new Cesium.HeadingPitchRoll(heading, pitch, roll);
const orientation = Cesium.Transforms.headingPitchRollQuaternion(
    position,
    hpr
);
ScreenSpaceCameraController(scene) 根据鼠标输入到画布修改相机位置和方向。
new Cesium.BoundingSphere(center, radius)
| Name | Type | Default | Description |
|---|---|---|---|
| center | Cartesian3 | Cartesian3.ZERO | optional The center of the bounding sphere. |
| radius | number | 0.0 | optional The radius of the bounding sphere. |
- Cesium.BoundingSphere.fromPoints(positions, result) → BoundingSphere 计算一个紧密贴合的包围一系列三维笛卡尔坐标点的包围球。这个包围球是通过运行两种算法来计算的,一种是朴素算法,另一种是里特算法。使用两个球中较小的那个以确保紧密贴合。
// 让文字出现在多边形的内容范围内
 var polygonCenter = Cesium.BoundingSphere.fromPoints(outputArray).center;
  viewer.entities.add({
  name:"SgJeevesLine",
  id:el.moduleId,
  position: polygonCenter,
  label: {
	text: el.moduleDeviceName, // 文字描述
	fillColor: Cesium.Color.WHITE,
	outlineColor:  Cesium.Color.fromBytes(255,255,255),
	outlineWidth: 1,
	style: Cesium.LabelStyle.FILL_AND_OUTLINE,
	pixelOffset: new Cesium.Cartesian2(0, -20), // 文字偏移量
	distanceDisplayCondition:new Cesium.DistanceDisplayCondition(0, 3000),
	disableDepthTestDistance: Number.POSITIVE_INFINITY,
  },
  polygon: {
	hierarchy: Cesium.Cartesian3.fromDegreesArray(temArr),
	material: el.status == 0 ? blueColor : redColor,
	outline: true,
	outlineColor: new Cesium.Color(102/255,204/255,1,1)
  }
})
Ellipsoid 由方程定义的笛卡尔坐标的二次曲面 (x / a)^2 + (y / b)^2 + (z / c)^2 = 1。主要使用 由铯来代表行星体的形状。 不是直接构造这个对象,而是提供的 通常使用常量。
- 将相机的当前位置转换为地理坐标(Cartographic)
var cartographic = Cesium.Ellipsoid.WGS84.cartesianToCartographic(viewer.camera.position);
// 从地理坐标中提取经度和纬度,并转换为度数
var longitude = Cesium.Math.toDegrees(cartographic.longitude);
var latitude = Cesium.Math.toDegrees(cartographic.latitude);
console.warn(longitude,latitude)
- Cesium.Ellipsoid.WGS84:定义的一个地球椭球体,它基于WGS 84大地水准面模型,Cesium.Ellipsoid.WGS84.maximumRadius是这个椭球体的最大半径
light 光源 光源。这种类型描述了一个接口,不打算直接实例化。color和intensity一起产生高动态范围的光颜色。intensity也可以单独用于在不改变色调的情况下使光变暗或变亮。
- scene.light.intensity = 7.0;//强度控制光的强度。intensity的最小值为0.0,没有最大值。
- scene.light.color = xxx;
scene.light = new Cesium.DirectionalLight({
  direction: new Cesium.Cartesian3(
	0.2454278300540191,
	0.8842635425193919,
	0.39729481195458805
  ),
  intensity: 0.0,
});
ImageBasedLighting 用于管理图块集和模型上基于图像的照明的属性。还管理必要的资源和纹理。
- luminanceAtZenith:
- 这个参数指定了天顶(即头顶正上方的点,在球坐标系中对应于极点的方向)的亮度。
- 亮度值通常是一个介于0和1之间的浮点数,其中0表示完全黑暗,1表示最大亮度。
- 在代码中,它被设置为0.7,这意味着天顶处的亮度是最大亮度的70%。
- sphericalHarmonicCoefficients:
- 这个参数是一个数组,包含了用于计算全局光照的球谐系数。
- 球谐光照是一种技术,它使用球谐函数来近似场景中的全局光照。
- 这些系数通常是通过预处理步骤从HDR环境贴图中计算出来的。
- specularEnvironmentMaps:
- 这个参数指定了用于镜面反射的环境贴图的URL。
- 环境贴图是一种图像,它包含了场景中所有方向上的光照信息。
- 在渲染过程中,这个贴图被用来计算物体表面的镜面反射高光。
- imageBasedLightingFactor:增加了来自地球、天空、大气和恒星天空盒的照
- 这个笛卡尔用于将这些光源的最终漫射和镜面照明贡献缩放到最终颜色。0.0的值将禁用这些光源。
- 默认值: Cartesian2(1.0, 1.0)
imageBasedLighting.imageBasedLightingFactor = Cesium.Cartesian2.ONE;
const L00 =...
//...
const L22 = new Cesium.Cartesian3(
	  -0.052426788955927,
	  -0.048315055668354,
	  -0.041973855346441
	);
        const coefficients = [L00, L1_1, L10, L11, L2_2, L2_1, L20, L21, L22];

        const imageBasedLighting = new Cesium.ImageBasedLighting({
          luminanceAtZenith: 0.7,
          sphericalHarmonicCoefficients: coefficients,
          specularEnvironmentMaps: url,
        });
- Cesium.IonResource.fromAssetId(assetId, options):通过 fromAssetId 方法,你可以根据资源的唯一资产ID(Asset ID)来获取该资源的 URL 或直接获取一个 Cesium.IonResource 对象,这个对象封装了与资源相关的元数据和网络请求信息。
const resource = await Cesium.IonResource.fromAssetId(ionAssetId);
	model = await Cesium.Model.fromGltfAsync({
	  url: resource,
	  modelMatrix: modelMatrix,
	  imageBasedLighting,
	});

	scene.primitives.add(model);
Cesium3DTileset瓦片集 tileset,即瓦片集,是由一组瓦片(Tile)按照某种空间数据结构(如树状结构)组织而成的集合。
- maximumScreenSpaceError:属性用于控制3D瓦片集的细节层次(LOD,Level of Detail)。这个值越大,Cesium在渲染时就会使用更少的瓦片来代表tileset,
从而降低渲染质量但提高性能。这个值需要根据tileset的复杂度和场景的需求来调整。
用于流式传输海量异构3D地理空间数据集。此对象通常不直接实例化,请使用Cesium3DTileset.fromUrl。
try {
  const tileset = await Cesium.Cesium3DTileset.fromUrl(
     "http://localhost:8002/tilesets/Seattle/tileset.json"
  );
  tileset.maximumScreenSpaceError = 8.0;
  scene.primitives.add(tileset);
} catch (error) {
  console.error(`Error creating tileset: ${error}`);
}
cesium内部模型id(可以把自己的模型转换后上传cesium云端使用)
// Load a Cesium3DTileset with a Cesium ion asset ID of 124624234
try {
  const tileset = await Cesium.Cesium3DTileset.fromIonAssetId(124624234);
  scene.primitives.add(tileset);
} catch (error) {
  console.error(`Error creating tileset: ${error}`);
}
v.1.99支持这种写法,不知道新版本还支不支持
// tilesetOption
// {url: 'http://183.252.50.230:50001/3d/xdp_3d_v3/tileset.json',
//  skipLevelOfDetail: true,
//   baseScreenSpaceError: 1024,
//   skipScreenSpaceErrorFactor: 16000,
//   skipLevels: 1, …}
     tilesetObjArr.push(new Cesium.Cesium3DTileset(tilesetOption));
          tilesetObjArr[tilesetObjArr.length - 1].readyPromise.then(function (
            tileset
          ) {
            // if(titleArr.length === 0){
            callVueFun("mainView", {}); //vueFlyAround飞入效果,mainView到主视图
            // }
            viewer.scene.primitives.add(tileset, 0);
            console.warn(viewer.flyTo === viewer.camera.flyTo, "195");

            // viewer.flyTo(tileset);

            viewer.camera.flyTo({
              destination: Cesium.Cartesian3.fromDegrees(
                120.559563,
                40.330925,
                2868.257627384771
              ),
              orientation: {
                heading: 5.800168655043299,
                pitch: -0.877669300487109,
                roll: 0.00006451130178319886
              }
            });

            //效果
            // 更换模型颜色
            tileset.readyPromise.then(function (tileset) {
              // callVueFun('initModel',{}) // 注释
              if (item.modelColor) {
                tileset.style = new Cesium.Cesium3DTileStyle({
                  color: {
                    conditions: [
                      ["true", "color('" + item.modelColor + "',1)"],
                    ],
                  },
                });
              } else {
                item.modelColor = "rgb(57,103,255)";
              }
              var boundingSphere = tileset.boundingSphere;
              // 获取模型中心点的笛卡尔坐标
              var center = boundingSphere.center;
              // 将笛卡尔坐标转换为地理坐标
              var cartographic = Cesium.Cartographic.fromCartesian(center);
              // 获取经纬度
              var longitude = Cesium.Math.toDegrees(cartographic.longitude);
              var latitude = Cesium.Math.toDegrees(cartographic.latitude);
            });
          });
Cesium3DTileStyle 应用于Cesium3DTileset.
计算使用定义的表达式 3D瓷砖样式语言。
const buildingsTileset = await Cesium.Cesium3DTileset.fromIonAssetId(2389064, {
    maximumScreenSpaceError: 12,
});
viewer.scene.primitives.add(buildingsTileset);

// 条件表达式用于判断 HGT(假设代表建筑物的高度)的值,颜色值则是根据条件满足时应用于建筑物的颜色。

// 当 HGT 不为 undefined 且小于 5 时,建筑物被着色为黄色(#f5fd2d)。
// 当 HGT 不为 undefined 且在 5 到 10 之间(包括 5,不包括 10)时,建筑物被着色为浅棕色(#d3a34a)。
// 当 HGT 不为 undefined 且在 10 到 15 之间(包括 10,不包括 15)时,建筑物被着色为深灰色(#947e75)。
// 当 HGT 不为 undefined 且在 15 到 20 之间(包括 15,不包括 20)时,建筑物被着色为深蓝色(#565a9f)。
// 当 HGT 不为 undefined 且大于或等于 20 时,建筑物被着色为深蓝色(#223bc3)。
// 如果以上条件都不满足(即 HGT 为 undefined 或不满足任何高度条件),建筑物被着色为白色(color('white'))。这里的 "true" 条件是一个兜底条件,确保所有建筑物都能被着色。

const buildingStyle = new Cesium.Cesium3DTileStyle({
  color: {
    conditions: [
      ["${HGT} !== undefined && ${HGT} < 5", "color('#f5fd2d')"],
      ["${HGT} !== undefined && ${HGT} >= 5 && ${HGT} < 10", "color('#d3a34a')"],
      ["${HGT} !== undefined && ${HGT} >= 10 && ${HGT} < 15", "color('#947e75')"],
      ["${HGT} !== undefined && ${HGT} >= 15 && ${HGT} < 20", "color('#565a9f')"],
      ["${HGT} !== undefined && ${HGT} > 20", "color('#223bc3')"],
      ["true", "color('white')"],
    ],
  },
});

buildingsTileset.style = buildingStyle;
Transforms转换 包含将位置转换为各种参考帧的函数。
- Cesium.Transforms.headingPitchRollQuaternion:从以提供的原点为中心的航向-俯仰-滚动角计算轴的参考帧计算四元数。航向是从当地东方向的旋转,其中正角向东增加。俯仰是从当地东-北平面的旋转。正俯仰角在平面上方。负俯仰角在平面下方。滚动是第一次绕当地东轴旋转。
const orientation = Cesium.Transforms.headingPitchRollQuaternion(
	position,
	hpr
);
- headingPitchRollToFixedFrame
const modelMatrix = Cesium.Transforms.headingPitchRollToFixedFrame(
  origin,
  hpr
);
console.warn(Cesium.Cartesian2.ZERO,Cesium.Cartesian2.ONE)
//Cartesian2 {x: 0, y: 0} Cartesian2 {x: 1, y: 1}
// xyz :number
new Cesium.Cartesian3(x, y, z)
- Cesium.Cartesian3.fromElements:从x、y和z坐标创建Cartesian3实例。
// f1 和 f2 在实际应用中是可以互换使用的,没有实质性的区别
const f1 = Cesium.Cartesian3.fromElements(
	Cesium.Ellipsoid.WGS84.maximumRadius,
	Cesium.Ellipsoid.WGS84.maximumRadius,
	Cesium.Ellipsoid.WGS84.maximumRadius
  )
const f2 = new Cesium.Cartesian3( Cesium.Ellipsoid.WGS84.maximumRadius,
	Cesium.Ellipsoid.WGS84.maximumRadius,
	Cesium.Ellipsoid.WGS84.maximumRadius)
console.warn(f1)

console.warn(f2)
给定以度为单位的经度和纬度值数组,返回Cartesian3位置数组。
  const positions = Cesium.Cartesian3.fromDegreesArray([-115.0, 37.0, -107.0, 33.0]);

    console.warn(positions)
    // [
    // {
    //     x: -2155350.226166898,
    //     y: -4622163.476136757,
    //     z: 3817393.160348164
    // },
    // {
    //     x: -1565496.9213366297,
    //     y: -5120509.704382778,
    //     z: 3453958.6411778987
    // }
    // ]
Cartesian3.fromDegreesArrayHeights 用于将包含经度、纬度和高度的数组转换为一个 Cartesian3 对象数组。每个 Cartesian3 对象代表地球上的一个点,在三维笛卡尔坐标系中的位置。
Cesium.Cartesian3.fromDegreesArrayHeights(coordinates, ellipsoid, result)
//ellipsoid:(可选)一个表示地球椭球体的 Ellipsoid 对象。如果未指定,则默认使用 WGS84 椭球体。
//result:(可选)一个用于存储结果的数组。如果提供了这个参数,那么结果将被存储在这个数组中,而不是创建一个新的数组。
Cartesian3.fromDegrees单个经纬度转笛卡尔坐标
let point = new Cartesian3.fromDegrees(lon, lat, h);
Cartesian3.clamp 限制一个值位于两个值之间。
Cesium.Cartesian3.clamp(cartesian, min, max, result)
 coordGlobal = Cesium.Cartesian3.clamp(
  Cesium.Cartesian3.fromElements(
	tileX * dimensions.x + (x - paddingBefore.x),
	tileY * dimensions.y + (y - paddingBefore.y),
	tileZ * dimensions.z + (z - paddingBefore.z),
	coordGlobal
  ),
  minimumGlobalCoord,
  maximumGlobalCoord,
  coordGlobal
);
Cartesian3.lerp插值 使用提供的笛卡尔函数计算t处的线性插值或外推。
这行代码使用CesiumJS的Cartesian3.lerp函数来计算startPosition和endPosition之间的一个线性插值点。startPosition和endPosition都是Cesium.Cartesian3实例,代表3D空间中的点。locationFactor(之前计算得到的)决定了插值点的位置,介于0(完全在startPosition)和1(完全在endPosition)之间。最后一个参数是一个新创建的Cesium.Cartesian3()实例,用于存储计算结果。
 const location = Cesium.Cartesian3.lerp(
	startPosition,
	endPosition,
	locationFactor,
	new Cesium.Cartesian3()
  );
Cartesian3.magnitude 计算笛卡尔的大小(长度)。
// 取模长度
const metersPerSecond = Cesium.Cartesian3.magnitude(velocityVector);
Quaternion四元数 new Cesium.Quaternion(x, y, z, w):用于表示3维空间中旋转的一组4维坐标。
- Cesium.Quaternion.fromAxisAngle(axis, angle, result) → Quaternion:计算表示绕轴旋转的四元数。
return Cesium.Quaternion.fromAxisAngle(
  Cesium.Cartesian3.UNIT_X, // 旋转轴
  wheelAngleProperty.getValue(time), // 旋转角度
  result // 存储结果的四元数对象
);
new Cesium.Cartographic(longitude, latitude, height)
由经度、纬度和高度定义的位置。
Cartographic.fromCartesian 笛卡尔坐标转弧度[静态方法]
从笛卡尔坐标创建一个新的制图实例。结果对象中的值将以弧度为单位。
| Name | Type | Default | Description |
|---|---|---|---|
| cartesian | Cartesian3 | - | The Cartesian position to convert to cartographic representation. |
| ellipsoid | Ellipsoid | Ellipsoid.default | optional The ellipsoid on which the position lies. |
| result | Cartographic | - | optional The object onto which to store the result. |
Cesium.Cartographic.fromCartesian(cartesian3, ellipsoid, result)
Cartographic.fromDegrees 笛卡尔位置转弧度[静态方法]
  // 转换为笛卡尔坐标
  const cartesian1 = Cesium.Cartesian3.fromDegrees(110, 20, 20);
  const cartesian2 = Cesium.Cartesian3.fromDegrees(110, 20, 30);

  // 转为弧度制
  let cartographic = Cesium.Cartographic.fromCartesian(cartesian1);
  // 角度制
  let lon = Cesium.Math.toDegrees(cartographic.longitude);
  let lat = Cesium.Math.toDegrees(cartographic.latitude);

  console.log("笛卡尔坐标:",cartesian1, cartesian2);
  console.log("弧度制",cartographic);
  console.log('经纬度',lon, lat);

//   笛卡尔坐标: Je {x: -2050703.247253584, y: 5634260.865831492, z: 2167703.6282316237}
//   Je {x: -2050706.4611916323, y: 5634269.696053707, z: 2167707.0484330566}

//  弧度制 Fr {longitude: 1.9198621771937627, latitude: 0.34906585039886584, height: 19.999999999848896}

//  经纬度 110.00000000000001 19.999999999999996
用于构建应用程序的基本小部件。它将所有标准cesium小部件组合到一个可重用的包中。小部件始终可以通过使用mixins进行扩展,这增加了对各种应用程序有用的功能。
new Cesium.Viewer(container, options)//(容器、选项)
// viewer中可以解构出很多对象
const { scene, camera, clock } = viewer;
// Initialize the viewer widget with several custom options and mixins.
try {
  const viewer = new Cesium.Viewer("cesiumContainer", {
    // Start in Columbus Viewer
    sceneMode: Cesium.SceneMode.COLUMBUS_VIEW,
    // Use Cesium World Terrain
    terrain: Cesium.Terrain.fromWorldTerrain(),
    // Hide the base layer picker
    baseLayerPicker: false,
    // Use OpenStreetMaps
    baseLayer: new Cesium.ImageryLayer(new Cesium.OpenStreetMapImageryProvider({
      url: "https://tile.openstreetmap.org/"
    })),
    skyBox: new Cesium.SkyBox({
      sources: {
        positiveX: "stars/TychoSkymapII.t3_08192x04096_80_px.jpg",
        negativeX: "stars/TychoSkymapII.t3_08192x04096_80_mx.jpg",
        positiveY: "stars/TychoSkymapII.t3_08192x04096_80_py.jpg",
        negativeY: "stars/TychoSkymapII.t3_08192x04096_80_my.jpg",
        positiveZ: "stars/TychoSkymapII.t3_08192x04096_80_pz.jpg",
        negativeZ: "stars/TychoSkymapII.t3_08192x04096_80_mz.jpg"
      }
    }),
    // Show Columbus View map with Web Mercator projection
    mapProjection: new Cesium.WebMercatorProjection()
  });
} catch (error) {
  console.log(error);
}

// Add basic drag and drop functionality
viewer.extend(Cesium.viewerDragDropMixin);

// Show a pop-up alert if we encounter an error when processing a dropped file
viewer.dropError.addEventListener(function(dropHandler, name, error) {
  console.log(error);
  window.alert(error);
});
const viewer = new Cesium.Viewer("cesiumContainer", {
  infoBox: true,// 开启后点击到的模型提示信息
  selectionIndicator: false,//开启后选中模型会有选中框
  shadows: true,//开启后有阴影
  shouldAnimate: true,//允许动画
  orderIndependentTranslucency:false,//表示禁用Cesium Viewer中的顺序无关透明(Order Independent Translucency)功能。
  //OIT是一种技术,用于改善场景中半透明对象(如玻璃、烟雾等)的渲染效果,使它们看起来更加真实,
  //即使它们相互重叠。禁用此功能可能会降低半透明对象的渲染质量,但可能会提高渲染性能。
  terrain: Cesium.Terrain.fromWorldTerrain(), //表示使用Cesium的世界地形数据作为场景的地形层。
  timeline: false,// 时间轴
	//这个选项决定了Cesium是否应该使用浏览器推荐的分辨率进行渲染。
	//当设置为true时,Cesium会尝试使用高分辨率渲染(如设备像素比率大于1时的视网膜显示),
	//这可能会提高视觉质量,但也可能增加GPU的负担。将其设置为false意味着Cesium将使用默认的、
	//可能较低的分辨率进行渲染,这有助于在性能较低的设备上保持流畅的体验。
	useBrowserRecommendedResolution: false,
    geocoder: false,  /【放大镜搜索按钮】/ 禁用地理编码器控件。地理编码器允许用户通过输入地址或地名来定位地图。
	baseLayerPicker: false,// 底图切换按钮
	baseLayer:new Cesium.ImageryLayer(new Cesium.OpenStreetMapImageryProvider({
      url: "https://tile.openstreetmap.org/"
    })),//应用于地球仪的最底部图像层。如果设置为false,则不会添加图像提供程序。此值仅在'baseLayerPicker'设置为false时有效。
	showRenderLoopErrors: false,//这个选项设置为false意味着在渲染循环中出现错误时,不会显示错误信息。
	//将这个选项设置为false可以避免在控制台看到这些错误信息,但不推荐这样做,错误信息可以帮助开发者诊断问题。
});
它通常用于将视图(包括地图、3D 地球等)平滑地飞行到指定的目标位置、缩放级别或视角。
它可以接受一个目标对象(如 Cesium.Cartesian3 表示的地理坐标),也可以接受一个包含目标位置、持续时间、完成回调等参数的配置对象。
viewer.flyTo(tileset);
- 添加实体方法add
// 创建多线段
this.viewer.entities.add({
	id: `odLine_${index}_${i}`,
	polyline: {
		width,
		positions: _siglePositions,
	}
});
  const entity = viewer.entities.add({
    name: url,
    position: position, //位置
    orientation: orientation,//实体的方向.四元数
    model: {
      uri: url, //模型地址
      minimumPixelSize: 128,//定义了模型在屏幕上显示的最小像素尺寸。即使模型在地理上远离视口,它也会保持至少这个尺寸,有助于在缩放或远离模型时保持其可见性。
      maximumScale: 20000,//定义了模型可以缩放的最大比例。这有助于防止模型在接近视口时变得过大。
    },
  });
const videoElement = document.getElementById("trailer");//一个video标签
const sphere = viewer.entities.add({
    position: Cesium.Cartesian3.fromDegrees(-79, 39, 1000),
    ellipsoid: {
	  //椭圆球半径
      radii: new Cesium.Cartesian3(1000, 1000, 1000),
      material: videoElement,
    },
  });
- 删除所有实体removeAll
//将当前viewer场景中的所有实体全部移除
viewer.entities.removeAll();
- trackedEntity:获取或设置摄像机当前正在跟踪的Entity实例。
Cesium的视图就会自动调整,以确保这个实体始终保持在视图中。
// 创建Cesium Viewer实例
var viewer = new Cesium.Viewer('cesiumContainer');

// 添加一个实体到场景
var entity = viewer.entities.add({
    name : 'A sample entity',
    position : Cesium.Cartesian3.fromDegrees(-75.59777, 40.03883),
    point : {
        pixelSize : 10,
        color : Cesium.Color.RED
    }
});

// 设置trackedEntity为刚才添加的实体
viewer.trackedEntity = entity;
- model:实体模型的部分属性
// 创建一个实体并添加到viewer的实体集合中
var entity = viewer.entities.add({
    name: 'My Model',
    position: Cesium.Cartesian3.fromDegrees(-123.0744619, 44.0503706, 5000.0),
    model: {
        uri: 'path/to/your/model.gltf',
        minimumPixelSize: 128,
        maximumScale: 20000,
        color: Cesium.Color.WHITE.withAlpha(0.5), // 初始颜色,带透明度
        // 注意:在创建实体时,你也可以直接设置colorBlendMode,但这里我们留空
    }
});
entity.model.colorBlendMode = Cesium.ColorBlendMode.MIX; // 设置为MIX混合模式
entity.model.color
基础图层,通常有new Cesium.ImageryLayer(imageryProvider, options)提供
- Cesium.ImageryLayer.fromProviderAsync(imageryProviderPromise, options)【静态方法】:从异步图像提供程序创建一个新的图像层。该层将处理任何异步加载或错误,并在准备好后开始渲染图像层。
- imageryProviderPromise: Promise.
<ImageryProvider> - Cesium.buildModuleUrl("Assets/Textures/NaturalEarthII") // 给相对url返回绝对url
- TileMapServiceImageryProvider.fromUrl:从指定的url创建TileMapServiceImageryProvider。
- imageryProviderPromise: Promise.
const viewer = new Cesium.Viewer("cesiumContainer", {
  baseLayer: Cesium.ImageryLayer.fromProviderAsync(
	Cesium.TileMapServiceImageryProvider.fromUrl(
	  Cesium.buildModuleUrl("Assets/Textures/NaturalEarthII")
	)
  )
})
const viewer = new Cesium.Viewer("cesiumContainer", {
  baseLayer: Cesium.ImageryLayer.fromProviderAsync(Cesium.IonImageryProvider.fromAssetId(3812));
});
- new Cesium.ImageryLayer:添加图层其他方案
const viewer = new Cesium.Viewer("cesiumContainer", {
	baseLayer: new Cesium.ImageryLayer(new Cesium.OpenStreetMapImageryProvider({
	  url: "https://tile.openstreetmap.org/"
	}))
});
// Add Cesium ion's default world imagery layer
const imageryLayer = Cesium.ImageryLayer.fromWorldImagery();
scene.imageryLayers.add(imageryLayer);
- 继续添加其他图层
const provider = new Cesium.WebMapTileServiceImageryProvider({
	  url:
		"https://gibs.earthdata.nasa.gov/wmts/epsg4326/best/MODIS_Terra_CorrectedReflectance_TrueColor/default/{Time}/{TileMatrixSet}/{TileMatrix}/{TileRow}/{TileCol}.jpg",
	  layer: "MODIS_Terra_CorrectedReflectance_TrueColor",//指定要获取的影像图层名称
	  style: "default",//设置影像的样式为默认样式。
	  tileMatrixSetID: "250m",//指定瓦片矩阵集的 ID,表示瓦片的分辨率级别。
	  maximumLevel: 5,//设置最大的瓦片级别。
	  format: "image/jpeg",//指定影像的格式为 JPEG。
	  clock: viewer.clock,//将 viewer 对象的时钟(clock)传递给影像服务提供者,可能用于与时间相关的动态影像显示。
	  times: times,//传递之前创建的时间间隔集合 times,用于获取特定时间段内的影像数据。
	  credit: "NASA Global Imagery Browse Services for EOSDIS",//设置影像数据的来源说明。
	});

        const layer = new Cesium.ImageryLayer(provider);
viewer.imageryLayers.add(layer)
viewer.extend 使用提供的mixin扩展基本查看器功能。mixin可以向提供的查看器实例添加附加属性、函数或其他行为。
extend(mixin, options)
viewer.extend(Cesium.viewerVoxelInspectorMixin);
获取或设置渲染分辨率的缩放因子。小于1.0的值可以提高功能较弱设备的性能,而大于1.0的值将以更高的分辨率渲染,然后缩放,从而提高视觉保真度。例如,如果小部件以640x480的大小布局,将此值设置为0.5将导致场景以320x240渲染,然后在将其设置为2.0时进行缩放,将导致场景以1280x960渲染,然后进行缩放。
viewer.resolutionScale 默认为1,可根据需求调整
viewer.resolutionScale = window.devicePixelRatio //设备的物理像素分辨率与CSS像素分辨率之间的比率
selectedEntity selectedEntity 是当前在视图中被选中的实体(例如,一个点、线、多边形或自定义对象)
 tableHtmlScratch +=
      "<tr><th colspan='4'><i style='font-size:10px'>Hover on a row for description</i></th></tr></tbody></table>";
viewer.selectedEntity.description = tableHtmlScratch;
selectedEntityChanged 用于监听当前选中实体发生变化的事件。当用户在视图中选中不同的实体时,这个事件会被触发。
// 假设您已经创建了一个 CesiumViewer 实例,并命名为 viewer
var viewer = new Cesium.Viewer('cesiumContainer');

// 监听 selectedEntityChanged 事件
viewer.selectedEntityChanged.addEventListener(function(newSelectedEntity) {
    // 检查是否有新的选中实体
    if (Cesium.defined(newSelectedEntity)) {
        // 打印选中实体的名称(如果实体有 name 属性)
        console.log('Selected entity name:', newSelectedEntity.name);
    } else {
        // 如果没有选中实体,打印提示信息
        console.log('No entity selected.');
    }
});

// 为了演示,我们可以添加一些实体到场景中
var entities = viewer.entities;

// 添加第一个实体
entities.add({
    name: 'Entity 1',
    position: Cesium.Cartesian3.fromDegrees(-75.59777, 40.03883)
});

// 添加第二个实体
entities.add({
    name: 'Entity 2',
    position: Cesium.Cartesian3.fromDegrees(-122.1958, 37.4078)
});

// ... 可以继续添加更多实体

// 在实际应用中,用户会通过点击或其他交互方式来选中实体
// 在这个示例中,我们可以直接设置 selectedEntity 来模拟选中过程
// 注意:在实际应用中,您通常不会这样做,而是让用户通过交互来选中实体
setTimeout(function() {
    // 选中第一个实体
    viewer.selectedEntity = entities.values[0]; // 这将触发 selectedEntityChanged 事件
    setTimeout(function() {
        // 一段时间后,选中第二个实体
        viewer.selectedEntity = entities.values[1]; // 这将再次触发 selectedEntityChanged 事件
    }, 3000); // 延迟3秒
}, 3000); // 初始延迟3秒,以便用户有时间看到场景加载
viewer.selectedEntity也可以通过点击事件自动切换
To construct a Model, call Model.fromGltfAsync. Do not call the constructor directly.
- colorBlendAmount:当colorBlendMode为MIX时,用于确定颜色强度的值。0.0的值会导致模型呈现的颜色,而1.0的值会导致纯色,中间的任何值都会导致两者的混合。 ( Default Value: 0.5 )
entityxxx.model.colorBlendMode = number;
- silhouetteColor:剪影颜色,轮廓颜色, 默认值: Color.RED
entity.model.silhouetteColor = xxx
- silhouetteSize:轮廓尺寸,(以像素为单位),默认0.0
- color
- uri: //模型地址
- minimumPixelSize: number,//定义了模型在屏幕上显示的最小像素尺寸。即使模型在地理上远离视口,它也会保持至少这个尺寸,有助于在缩放或远离模型时保持其可见性。
- maximumScale: number,//定义了模型可以缩放的最大比例。这有助于防止模型在接近视口时变得过大。
Model.fromGltfAsync 从glTF资产异步创建模型。此函数返回一个Promise,当模型准备好渲染时,即下载外部二进制、图像和着色器文件并创建WebGL资源时,该Promise会解析。
 const resource = await Cesium.IonResource.fromAssetId(ionAssetId);
	// console.warn(resource)
	model = await Cesium.Model.fromGltfAsync({
	  url: resource,
	  modelMatrix: modelMatrix,
	  imageBasedLighting,
	});

	scene.primitives.removeAll();
	scene.primitives.add(model);
model.readyEvent 这是一个Cesium中3D模型对象的事件属性。当模型完全加载并准备好在场景中显示时,这个事件会被触发。
model.readyEvent.addEventListener(() => {
  // do something
});
// 获取球体半径
 let { radius } = model.boundingSphere;
| 名称 | 类型 | 描述 |
|---|---|---|
| BOX | STRING | 盒子形状。 |
| ELLIPSOID | STRING | 椭球形状。 |
| CYLINDER | STRING | 圆柱体形状。 |
Cesium.VoxelShapeType.BOX
此功能不是最终的,可能会在没有cesium标准弃用策略的情况下进行更改。
还提供了三个函数
- getMaxBounds: function getMaxBounds(shapeType)
- getMinBounds: function getMinBounds(shapeType)
- getShapeConstructor: function
| 名称 | 类型 | 描述 |
|---|---|---|
| SCALAR | 字符串 | 单个分量 |
| VEC2 | 字符串 | 具有两个分量的向量 |
| VEC3 | 字符串 | 具有三个分量的向量 |
| VEC4 | 字符串 | 具有四个分量的向量 |
| MAT2 | 字符串 | 2x2矩阵,以列主要格式存储。 |
| MAT3 | 字符串 | 3x3矩阵,以列主要格式存储。 |
| MAT4 | 字符串 | 4x4矩阵,以列主要格式存储。 |
| BOOLEAN | 字符串 | 布尔值(真/假) |
| STRING | 字符串 | UTF-8编码字符串值 |
| ENUM | 字符串 | 枚举值。这种类型与MetadataEnum结合使用来描述有效值。 |
const channelCount = Cesium.MetadataType.getComponentCount(
	this.types[0]
);
MetadataComponentType元数据组件枚举[非标准]
| 名称 | 类型 | 描述 |
|---|---|---|
| INT8 | 字符串 | 8位有符号整数 |
| UINT8 | 字符串 | 8位无符号整数 |
| INT16 | 字符串 | 16位有符号整数 |
| UINT16 | 字符串 | 16位无符号整数 |
| INT32 | 字符串 | 32位有符号整数 |
| UINT32 | 字符串 | 32位无符号整数 |
| INT64 | 字符串 | 64位有符号整数。此类型需要BigInt支持。 |
| UINT64 | 字符串 | 64位有符号整数。此类型需要BigInt支持 |
| FLOAT32 | 字符串 | 32位(单精度)浮点数 |
| FLOAT64 | 字符串 | 64位(双精度)浮点数 |
this.componentTypes = [Cesium.MetadataComponentType.FLOAT32];
WebMapTileServiceImageryProvider 用于加载 Web 地图服务 (WMS) 或 Web 地图瓦片服务 (WMTS) 图像层的一个类
      const provider = new Cesium.WebMapTileServiceImageryProvider({
          url:
            "https://gibs.earthdata.nasa.gov/wmts/epsg4326/best/MODIS_Terra_CorrectedReflectance_TrueColor/default/{Time}/{TileMatrixSet}/{TileMatrix}/{TileRow}/{TileCol}.jpg",
          layer: "MODIS_Terra_CorrectedReflectance_TrueColor",//指定要获取的影像图层名称
          style: "default",//设置影像的样式为默认样式。
          tileMatrixSetID: "250m",//指定瓦片矩阵集的 ID,表示瓦片的分辨率级别。
          maximumLevel: 5,//设置最大的瓦片级别。
          format: "image/jpeg",//指定影像的格式为 JPEG。
          clock: viewer.clock,//将 viewer 对象的时钟(clock)传递给影像服务提供者,可能用于与时间相关的动态影像显示。
          times: times,//传递之前创建的时间间隔集合 times,用于获取特定时间段内的影像数据。
          credit: "NASA Global Imagery Browse Services for EOSDIS",//设置影像数据的来源说明。
        });
        //创建一个常量 layer,并使用 Cesium.ImageryLayer 构造函数创建一个影像图层对象,
        //将之前创建的影像服务提供者 provider 作为参数传入,这样这个影像图层就可以使用 provider 提供的影像数据。
        const layer = new Cesium.ImageryLayer(provider);

        // Make the weather layer semi-transparent to see the underlying geography.
        layer.alpha = 0.5
        //将创建的影像图层 layer 添加到 viewer 对象的影像图层集合中,
        //这样在 Cesium 可视化界面中就可以显示这个影像图层了。
        viewer.imageryLayers.add(layer);
用于管理地形提供程序的异步操作的提供者。
- Cesium.Terrain.fromWorldTerrain:创建一个Terrain实例为cesium世界地形。使用此地形数据可以使场景中的地形更加真实
// Create Cesium World Terrain with default settings
const viewer = new Cesium.Viewer("cesiumContainer", {
  terrain: Cesium.Terrain.fromWorldTerrain()
});
// Create
const viewer = new Cesium.Viewer("cesiumContainer", {
  terrain: new Cesium.Terrain(Cesium.CesiumTerrainProvider.fromUrl("https://myTestTerrain.com"));
});
// 合并单个geometry,提高渲染效率
areaPrimitive = new Primitive({
    // 这个属性决定了在渲染完成后是否释放geometryInstances。设置为false意味着这些实例将在Primitive的整个生命周期内保持活动状态,
    //这有助于在需要时重新渲染或更新这些实例。如果设置为true,则Cesium可能会在渲染完成后释放这些实例,以节省内存。
    releaseGeometryInstances: true,
    geometryInstances: instances,// instances实例化集合
    appearance: new PerInstanceColorAppearance({
        translucent: true, // 当 true 时,几何体应该是半透明的,因此 PerInstanceColorAppearance#renderState 启用了 alpha 混合。
        closed: false, // 当 true 时,几何体应该是关闭的,因此 PerInstanceColorAppearance#renderState 启用了背面剔除。
    }),
    // 这个属性决定了Primitive的加载和渲染是否是异步的。设置为false意味着这些几何体将同步加载和渲染,
    // 即它们将在调用创建Primitive的代码之后立即被处理和渲染。
    //如果设置为true,Cesium可能会延迟这些几何体的加载和渲染,直到它认为这样做更合适(例如,在更新视图或资源可用时)。
    asynchronous: false,
});
this.#areaPrimitive = this.viewer.scene.primitives.add(areaPrimitive);
// 添加到scene
 this.#areaPrimitive  = this.viewer.scene.primitives.add(areaPrimitive);
//从场景中移除
 this.#areaPrimitive && this.viewer.scene.primitives.remove(this.#areaPrimitive);
Array.<GeometryInstance> | GeometryInstance
要渲染的几何实例-或单个几何实例。
- new Cesium.GeometryInstance(options):几何实例化允许一个Geometry对象在多个位置 不同的位置和独特的颜色。例如,一个BoxGeometry可以 被实例化几次,每次都有不同的modelMatrix来改变 它的位置、旋转和比例。
| 名称 | 类型 | 默认 | 说明 |
|---|---|---|---|
| geometry | 几何 | 几何工厂 | 要实例化的几何。 |
| modelMatrix | Matrix4 | Matrix4.IDENTITY | 可选 转换以将几何从模型转换为世界坐标的模型矩阵。 |
| id | 对象 | 可选 选择实例时要返回的用户定义对象Scene#pick或获取/设置每个实例的属性Primitive#getGeometryInstanceAttributes. | |
| attributes | 对象 | 可选 每个实例的属性,如下面示例中显示的show或color属性。 |
const boxPrimitive = new Primitive({
	geometryInstances: new GeometryInstance({
		geometry: BoxGeometry.fromDimensions({
			dimensions: new Cartesian3(1000, 1000, 1000)
		}),
		modelMatrix: Transforms.eastNorthUpToFixedFrame(Cartesian3.fromDegrees(114.005, 25.02, 1000))
	}),
	appearance:xxx
})
- BoxGeometry:描述以原点为中心的多维数据集。
- BoxGeometry.fromDimensions:在给定尺寸的情况下,创建一个以原点为中心的多维数据集
- modelMatrix: Transforms.eastNorthUpToFixedFrame(Cartesian3.fromDegrees(114.005, 25.02, 1000)):Transforms.northUpEastToFixedFrame 方法接受一个经纬度点(和一个可选的高程),并返回一个变换矩阵,该矩阵将局部北-上-东(NUE)坐标系变换到地球固定坐标系。这个变换矩阵是 modelMatrix 所需要的,以便将几何体放置在地球上的正确位置。
const polygonPrimitive = new Primitive({
	geometryInstances: new GeometryInstance({
		geometry: new PolygonGeometry({
			polygonHierarchy: new PolygonHierarchy(Cartesian3.fromDegreesArray([
				114, 25,
				114.01, 25,
				114.01, 25.01,
				114, 25.01,
			])),
			height: 1000
		})
	}),
	appearance
})
- new Cesium.PolygonGeometry(options):用于创建多边形的几何形状。
- new Cesium.PolygonHierarchy(positions, holes):定义多边形及其孔的线性环的层次结构。孔本身也可能有嵌套内部多边形的孔。
const polylinePrimitive = new Primitive({
	geometryInstances: new GeometryInstance({
		geometry: new PolylineGeometry({
			positions: Cartesian3.fromDegreesArrayHeights([
				114.02, 25.02, 1000,
				114.05, 25.02, 1000
			]),
			width: 2,
		})
	}),
	appearance: polylineAppearance
})
- PolylineGeometry 创建一条线段,positions位置+width:宽度
const ellipsoidPrimitive = new Primitive({
	geometryInstances: new GeometryInstance({
		geometry: new EllipsoidGeometry({
			radii: new Cartesian3(1000, 1000, 1000),
		}),
		modelMatrix: Transforms.eastNorthUpToFixedFrame(Cartesian3.fromDegrees(114.03, 25.005, 1000))
	}),
	appearance
})
- EllipsoidGeometry创建球体
VoxelPrimitive[非标准] 从VoxelProvider呈现体素数据的原语。
| 名称 | 类型 | 默认 | 说明 |
|---|---|---|---|
| provider | VoxelProvider | 可选 为基元提供磁贴数据的体素提供程序。 | |
| modelMatrix | Matrix4 | Matrix4.IDENTITY | 可选 用于转换基元的模型矩阵。 |
| customShader | 自定义着色器 | 可选 用于设置基元样式的自定义着色器。 | |
| clock | 时钟 | 可选 用于控制时间动态行为的时钟。 |
- Cesium.VoxelProvider():提供体素数据。旨在与VoxelPrimitive一起使用。 此类型描述了一个接口,不直接实例化。
 function ProceduralSingleTileVoxelProvider(shape) {
  // VoxelProvider所需要的参数
  this.shape = shape;
  // 获取最小边框并且复制
  this.minBounds = Cesium.VoxelShapeType.getMinBounds(shape).clone();
  // 获取最大边框范围并且复制
  this.maxBounds = Cesium.VoxelShapeType.getMaxBounds(shape).clone();
  this.dimensions = new Cesium.Cartesian3(8, 8, 8);
  this.names = ["color"];
  this.types = [Cesium.MetadataType.VEC4];//VEC4
  this.componentTypes = [Cesium.MetadataComponentType.FLOAT32];
}

const primitive = createPrimitive(
	provider,
	customShaderColor,
	modelMatrix
);

function createPrimitive(provider, customShader, modelMatrix) {
  viewer.scene.primitives.removeAll();

  const voxelPrimitive = viewer.scene.primitives.add(
	new Cesium.VoxelPrimitive({
	  provider: provider,
	  customShader: customShader,
	  modelMatrix: modelMatrix,
	})
  );
  ......
}
voxelPrimitive.maxBounds.x =0.5 调整参数时可参照VoxelPrimitive的属性去适配
- Cesium.Cesium3DTilesVoxelProvider(options)[非标准]:VoxelProvider从3D Tiles tileset获取体素数据。 此对象通常不直接实例化,请使用Cesium3DTilesVoxelProvider.fromUrl。
通常用于加载大规模的3D地形数据或建筑物模型,这些数据以体素的形式表示。体素是一种三维像素,它们可以组合起来表示复杂的3D形状。这种方法特别适用于需要高精度3D渲染的地理空间应用,如城市规划、地形分析、虚拟现实等。
 const provider = await Cesium.Cesium3DTilesVoxelProvider.fromUrl(
	"../../SampleData/Cesium3DTiles/Voxel/VoxelEllipsoid3DTiles/tileset.json"
  );
  // 自定义函数,同上个案例
  const primitive = createPrimitive(
	provider,
	customShaderWhite,
	// 初始化为单位矩阵的不可变Matrix4实例。
	Cesium.Matrix4.IDENTITY
  );
- requestData:请求给定磁贴的数据。数据是一个扁平的3D数组,按X、Y、Z排序。 在VoxelProvider#ready返回true之前不应调用此函数。 返回值为
Promise.<Array.<Array>>|undefined
requestData(options) → Promise.<Array.<Array>>|undefined
| 名称 | 类型 | 默认 | 说明 |
|---|---|---|---|
| tileLevel | 数 | 0 | 可选 瓷砖的水平。 |
| tileX | 数 | 0 | 可选 磁贴的X坐标。 |
| tileY | 数 | 0 | 可选 瓷砖的Y坐标。 |
| tileZ | 数 | 0 |
椭球面上多边形的描述。多边形由多边形层次结构定义。多边形几何可以使用Primitive和GroundPrimitive渲染。
- 基础形状:定义你要创建的几何体类型。 new PolygonGeometry
- 渲染准备:将定义的几何体转换成可渲染的形式。 PolygonGeometry.createGeometry
- 实例与属性:为每个几何体创建实例并附加特定属性。 new GeometryInstance
- 组合展示:将所有几何体实例组合成一个 Primitive 并设置其外观。new Primitive
- 添加到场景:将组合后的 Primitive 添加到场景中。viewer.scene.primitives.add(areaPrimitive);
import {
    PolygonGeometry,
    PolygonHierarchy,
    PerInstanceColorAppearance,
    Cartesian3,
    ColorGeometryInstanceAttribute,
    GeometryInstance,
    Color,
    ShowGeometryInstanceAttribute,
    Primitive,
    ScreenSpaceEventType,
    defined,
} from "cesium";
const instances = [];
// 创建基础几何体,这一步是定义几何体的形状,比如多边形。你需要传递参数(如顶点、高度等)来指定多边形的具体形状。
const polygon = new PolygonGeometry({
    polygonHierarchy: new PolygonHierarchy(Cartesian3.fromDegreesArray(polygonArray)),
    // 设置顶点格式,不设置的话,在这里会让青岛各区的地图有些颜色偏差,不影响功能
    vertexFormat: PerInstanceColorAppearance.VERTEX_FORMAT,
    // 设置面的拉伸高度
    extrudedHeight: 300,
});
// 这一步是将定义的几何体转换成 Cesium 可以渲染的形式。createGeometry 方法处理了几何体的计算和优化。
const geometry = PolygonGeometry.createGeometry(polygon);
instances.push(
    //  创建几何体实例并添加属性,这一步是为每个要渲染的几何体创建一个实例,并可以附加特定的属性(如颜色、是否显示等)。
    new GeometryInstance({
        id: `polygon-${i}`,
        geometry: geometry,
        attributes: {
            color: ColorGeometryInstanceAttribute.fromColor(Color.fromAlpha(Color[colorArrs[i]], 0.5)),
            show: new ShowGeometryInstanceAttribute(true),
        },
    })
);
// 合并单个geometry,提高渲染效率
// 创建并配置 Primitive
areaPrimitive = new Primitive({
    releaseGeometryInstances: false,
    geometryInstances: instances,
    appearance: new PerInstanceColorAppearance({
        translucent: true,
        closed: false,
    }),
    asynchronous: false,
});
const somevalue = this.viewer.scene.primitives.add(areaPrimitive);
PolygonGeometry.createGeometry定义计算几何体[静态]
计算多边形的几何表示形式,包括其顶点、索引和边界球。
// 把描述的几何体创建起来
const geometry = PolygonGeometry.createGeometry(polygon);
polygonHierarchy 定义形状 定义多边形及其孔的线性环的层次结构。孔本身也可能有嵌套内部多边形的孔。
// polygonArray: [一维数字数组]
const polygon = new PolygonGeometry({
    // 经纬度转换为笛卡尔坐标
    polygonHierarchy: new PolygonHierarchy(Cartesian3.fromDegreesArray(polygonArray))
    //......
});
具有颜色属性的GeometryInstance实例的外观。 这允许多个几何实例,每个实例都有不同的颜色
const polygon = new PolygonGeometry({
    vertexFormat: PerInstanceColorAppearance.VERTEX_FORMAT,
});
Cesium.PerInstanceColorAppearance.FLAT_VERTEX_FORMAT

当使用 Cesium.PerInstanceColorAppearance 并且需要更详细的顶点信息时,比如位置和法线信息,

应使用此顶点格式。这允许在着色器中更精确地处理光照和其他视觉效果。

Cesium.PerInstanceColorAppearance.VERTEX_FORMAT
当使用 Cesium.PerInstanceColorAppearance 并且开启平面着色(flat shading)时,应使用此顶点格式。

平面着色意味着不考虑光照的复杂变化,每个面以单一颜色渲染,这可以简化着色过程并提高性能。

(适用于大量简单几何体的渲染,或者当光照效果不是主要关注点时。)
外观配置参数
areaPrimitive = new Primitive({
    appearance: new PerInstanceColorAppearance({
        translucent: true, // 当 true 时,几何体应该是半透明的,因此 PerInstanceColorAppearance#renderState 启用了 alpha 混合。
        closed: false, // 当 true 时,几何体应该是关闭的,因此 PerInstanceColorAppearance#renderState 启用了背面剔除。
        flat :ture//flat 属性是一个布尔值,用于控制渲染时是否使用平面着色(flat shading)或平滑着色(smooth shading,也称为 Gouraud shading)。
    }),
});
var polylines = viewer.scene.primitives.add(new Cesium.PolylineCollection());
	polylines.add({
		positions: positions,
		width: 5,
		// 注意material的颜色写法
		material: this.Cesium.Material.fromType('Color', {
		  color: Cesium.Color.BLUE
		})
});
	var polylines = scene.primitives.add(new Cesium.PolylineCollection());

    // A simple polyline with two points.
	  var polyline = polylines.add({
	            positions : Cesium.Cartesian3.fromDegreesArray([120.5433995391585, 40.33896083294376,
	            120.5514492298681, 40.33862378228239,]),
	            material : Cesium.Material.fromType('Color', {
	                color : new Cesium.Color(1.0, 0.3, 0.3, 1.0)
	            })
	 });
	[120.554569,40.329352,120.554569,40.329352,120.554569,40.329352]
      var polyline2 = polylines.add({
	//Cesium.PolylinePipeline.generateCartesianArc 是 CesiumJS 库中的一个函数,
	//生成一个沿着大圆弧线的笛卡尔坐标点数组。
	//这个函数特别适用于在地球表面绘制一条精确的、沿着最短路径(即大圆路径)的折线时。
          positions : Cesium.PolylinePipeline.generateCartesianArc({
              positions : Cesium.Cartesian3.fromDegreesArray([120.6433995391585, 40.53896083294376,
              120.5614492298681, 40.34862378228239,120.5614493398681, 40.34863478228239])
          }),
          material : Cesium.Material.fromType('Color', {
              color : new Cesium.Color(0.7, 1.0, 0.4, 1.0)
          })
      });

      var polylines1 = scene.primitives.add(new Cesium.PolylineCollection());

    // A simple polyline with two points.
      var polyline1 = polylines1.add({
          positions : Cesium.PolylinePipeline.generateCartesianArc({
              positions : Cesium.Cartesian3.fromDegreesArray([120.5333995391575, 40.33896083294366,
              120.5514492298581, 40.34362678228229,])
          }),
          material : Cesium.Material.fromType('Color', {
              color : new Cesium.Color(1.0, 0.7, 1.0, 1.0)
          })
      });


      setTimeout(() => {
		//只销毁其中一个集合的折线
        polylines.removeAll()
      }, 30000);
几何实例化允许一个Geometry对象在多个位置 不同的位置和独特的颜色。例如,一个BoxGeometry可以 被实例化几次,每次都有不同的modelMatrix来改变 它的位置、旋转和比例。
// Create geometry for a box, and two instances that refer to it.
// One instance positions the box on the bottom and colored aqua.
// The other instance positions the box on the top and color white.
const geometry = Cesium.BoxGeometry.fromDimensions({
  vertexFormat : Cesium.VertexFormat.POSITION_AND_NORMAL,
  dimensions : new Cesium.Cartesian3(1000000.0, 1000000.0, 500000.0)
});
const instanceBottom = new Cesium.GeometryInstance({
  geometry : geometry,
  modelMatrix : Cesium.Matrix4.multiplyByTranslation(Cesium.Transforms.eastNorthUpToFixedFrame(
    Cesium.Cartesian3.fromDegrees(-75.59777, 40.03883)), new Cesium.Cartesian3(0.0, 0.0, 1000000.0), new Cesium.Matrix4()),
  attributes : {
    color : Cesium.ColorGeometryInstanceAttribute.fromColor(Cesium.Color.AQUA)
  },
  id : 'bottom'
});
const instanceTop = new Cesium.GeometryInstance({
  geometry : geometry,
  modelMatrix : Cesium.Matrix4.multiplyByTranslation(Cesium.Transforms.eastNorthUpToFixedFrame(
    Cesium.Cartesian3.fromDegrees(-75.59777, 40.03883)), new Cesium.Cartesian3(0.0, 0.0, 3000000.0), new Cesium.Matrix4()),
  attributes : {
    color : Cesium.ColorGeometryInstanceAttribute.fromColor(Cesium.Color.AQUA)
  },
  id : 'top'
});
ColorGeometryInstanceAttribute颜色附着几何体
每个实例的几何颜色的值和类型信息。
const instance = new Cesium.GeometryInstance({
  geometry : Cesium.BoxGeometry.fromDimensions({
    dimensions : new Cesium.Cartesian3(1000000.0, 1000000.0, 500000.0)
  }),
  modelMatrix : Cesium.Matrix4.multiplyByTranslation(Cesium.Transforms.eastNorthUpToFixedFrame(
    Cesium.Cartesian3.fromDegrees(0.0, 0.0)), new Cesium.Cartesian3(0.0, 0.0, 1000000.0), new Cesium.Matrix4()),
  id : 'box',
  attributes : {
    color : new Cesium.ColorGeometryInstanceAttribute(red, green, blue, alpha)
  }
});
ColorGeometryInstanceAttribute.fromColor根据color设置
根据提供的Color创建一个新的ColorGeometryInstanceAttribute实例。
应用场景:新的ColorGeometryInstanceAttribute实例。
Cesium.ColorGeometryInstanceAttribute.fromColor(Cesium.Color.CORNFLOWERBLUE)
ColorGeometryInstanceAttribute.toValue颜色转换为可分配颜色属性
将颜色转换为可用于分配颜色属性的类型化数组。
应用场景:修改后的结果参数或新实例(如果结果未定义)。
attributes.color = ColorGeometryInstanceAttribute.toValue(Color.AQUA);
ShowGeometryInstanceAttribute几何体实例是否可见
确定是否显示几何实例的每个实例几何属性的值和类型信息。
const instance = new Cesium.GeometryInstance({
 //...
  attributes : {
    show : new Cesium.ShowGeometryInstanceAttribute(false)
  }
});
材质通过漫反射、高光、法线、发射和alpha组件的组合来定义表面外观,材质可以是几何对象表面的任一一种着色,可以是贴在其表面的一张图片、也可以是一个纹理或图案。cesium中也提供了一些材质,比如颜色、图片,棋盘、虚线,箭头线等。
Material是用于修改几何对象材质的一个类,在添加几何图形的时候,将设置material属于,用于设置几何对象的材质。如给绘制的线条设置一个颜色,可以使用颜色材质,如下所示:
let line = new Cesium.Entity({
	polyline:new Cesium.PolylineGraphics({
		positions : positions,
		material:Cesium.Color.RED.withAlpha(0.5),
		width:5,
	})
});
Cesium提供了很多现成的Material类型,可通过Material.fromType方法和Fabric两种方式去获取并设置几何对象材质。如下是通过Material类的两种方式实现着色的示例:
polygon.material = Cesium.Material.fromType('Color');
polygon.material.uniforms.color = new Cesium.Color(1.0, 1.0, 0.0, 1.0);
//Fabric
polygon.material = new Cesium.Material({
    fabric : {
        type : 'Color',
        uniforms : {
            color : new Cesium.Color(1.0, 1.0, 0.0, 1.0)
        }
    }
});
const material = Cesium.Material.fromType('Color', {
  color: new Cesium.Color(1.0, 0.0, 0.0, 1.0)
});
// 修改颜色
polygon.appearance.material.uniforms.color = Cesium.Color.WHITE
- diffuse:材质的散射光通道,使用vec3定义了光在所有方向的散射值 。
- specular:材质的高光属性,定个定义了材质的反射强度。
- shininess:高反射的锐度,值 越大创建一个更小的高亮光斑。
- normal:材质的法向属性,使用vec3定义了在视点空间的表面法向量,一般在法向贴图上使用,默认是表面法向量。
- emission:材质的自发光属性,使用vec3定义了所有方向上灯光发出的颜色。
- alpha:材质的透明度,使用一个float值 定义。
- 自定义材质
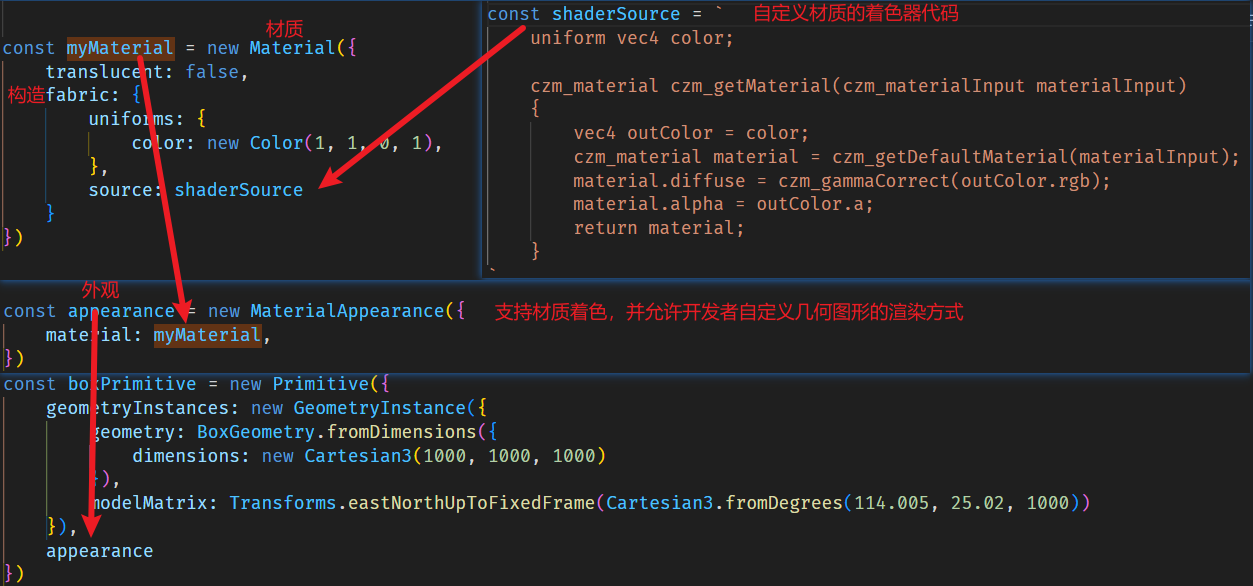
appearance 可以是CesiumJS提供的多种Appearance类型之一,包括但不限于:
- MaterialAppearance:适用于所有Geometry类型的材质外观,支持传入自定义的Material对象。Material对象可以定义各种材质属性,如颜色、纹理、光照模型等。
- EllipsoidSurfaceAppearance:专门用于与
地球表面平行的几何类型,如PolygonGeometry、RectangleGeometry等。它可以在计算大量顶点属性时节省内存,并且自动适应地球的曲率。 - PerInstanceColorAppearance:用于实例化几何的材质外观。当使用实例化几何显示大量几何实体时,可以通过PerInstanceColorAppearance为每个几何实体指定不同的颜色。
- PolylineMaterialAppearance 和 PolylineColorAppearance:专门用于线的材质外观和顶点颜色外观。PolylineGeometry支持根据顶点颜色进行着色,可以结合这两类Appearance使用。
MaterialAppearance
- material:用于确定片元颜色的材质。这是MaterialAppearance的核心属性,它允许开发者传入一个Cesium.Material对象来定义自定义的材质效果。
- flat:一个布尔值,当设置为true时,在片段着色器中使用了平面着色,这意味着没有考虑到光照效果。这可以用于实现一些简单的、不需要光照模型的视觉效果。
- closed:一个布尔值,当设置为true时,几何图形将被视为封闭,因此MaterialAppearance的渲染状态会启用背面剔除。这通常用于那些应该只显示一面的几何图形,如墙壁或地板。
- translucent:一个布尔值,当设置为true时,几何图形应该是半透明的。这会影响渲染时的混合状态,使得几何图形可以与其他半透明对象正确混合。
- faceForward:一个布尔值,当设置为true时,片段着色器会根据需要翻转表面法线,以确保法线面对观察者,避免出现黑斑。这对于双面着色或需要确保法线正确显示的几何图形很有用。
- vertexShaderSource和fragmentShaderSource:这两个属性允许开发者提供自定义的顶点着色器和片段着色器源代码,以替代CesiumJS默认的着色器。这提供了极大的灵活性,允许开发者实现自定义的渲染效果。
- renderState:一个可选的渲染状态对象,用于覆盖MaterialAppearance的默认渲染状态。开发者可以通过这个属性来定制渲染时的各种状态,如深度测试、混合模式等。
所有属性的接口,表示可以选择随时间变化的值。此类型定义了一个接口,不能直接实例化。
- Property.getValueOrDefault:用于获取特定时间的属性值,如果没有值可以获取,则返回默认值
// 用于获取特定时间的属性值,如果没有值可以获取,则返回默认值。
result.color = Property.getValueOrDefault(this._color, time, Color.RED, result.color);
- Property.equals:此属性与提供的属性进行比较并返回 true如果相等,否则false。
Property.equals(this._color, other._color)
Event 事件 用于管理特定事件的订阅者的通用实用程序类。此类通常在容器类中实例化,并作为属性公开供其他人订阅。
MyObject.prototype.myListener = function(arg1, arg2) {
    this.myArg1Copy = arg1;
    this.myArg2Copy = arg2;
}

const myObjectInstance = new MyObject();
const evt = new Cesium.Event();
evt.addEventListener(MyObject.prototype.myListener, myObjectInstance);
evt.raiseEvent('1', '2');
evt.removeEventListener(MyObject.prototype.myListener);
处理用户输入事件。可以添加自定义函数以在用户输入输入时执行。
const handler = new Cesium.ScreenSpaceEventHandler(window.__viewer.scene.canvas);
handler.setInputAction((e) => {
const clickPosition = window.__viewer.camera.pickEllipsoid(e.position);
console.log("Cartesian世界坐标", clickPosition);
const randiansPos = Cesium.Cartographic.fromCartesian(clickPosition);
console.log(
    "经度:" + Cesium.Math.toDegrees(randiansPos.longitude) + ", 纬度:" + Cesium.Math.toDegrees(randiansPos.latitude)
);
}, Cesium.ScreenSpaceEventType.LEFT_CLICK);
setInputAction(action, type, modifier)
// 输入事件发生时要执行的函数。 // 	输入事件的ScreenSpaceEventType。 // 可选的类型
ScreenSpaceEventTyp鼠标枚举 此枚举类型用于对鼠标事件进行分类:向下、向上、单击、双击、移动和按住按钮时移动。
| 名称 | 类型 | 描述 |
|---|---|---|
| LEFT_DOWN | 数字 | 表示鼠标左键向下事件。 |
| LEFT_UP | 数字 | 表示鼠标左键向上事件。 |
| LEFT_CLICK | 数字 | 表示鼠标左键单击事件。 |
| LEFT_DOUBLE_CLICK | 数字 | 表示鼠标左键双击事件。 |
| RIGHT_DOWN | 数字 | 表示鼠标左键向下事件。 |
| RIGHT_UP | 数字 | 表示鼠标右键向上事件。 |
| RIGHT_CLICK | 数字 | 表示鼠标右键单击事件。 |
| MIDDLE_DOWN | 数字 | 表示鼠标中键向下事件。 |
| MIDDLE_UP | 数字 | 表示鼠标中键向上事件。 |
| MIDDLE_CLICK | 数字 | 表示鼠标中键单击事件。 |
| MOUSE_MOVE | 数字 | 表示鼠标移动事件。 |
| WHEEL | 数字 | 表示鼠标滚轮事件。 |
| PINCH_START | 数字 | 表示两个手指的开始 |
| PINCH_END | 数字 | 表示触摸表面上两指事件的结束。 |
| PINCH_MOVE | 数字 | 表示触摸表面上两指事件的变化。 |
虚拟场景中所有3D图形对象和状态的容器。一般来说, 场景不是直接创建的;相反,它是由CesiumWidget隐式创建的。
- pickTranslucentDepth属性是一个布尔值,用于控制Cesium场景是否应该考虑半透明对象的深度信息。当设置为true时,Cesium在尝试“拾取”(即获取用户点击的对象信息)时会考虑
半透明对象的深度,这有助于更准确地确定用户点击的是哪个对象。这在处理重叠的半透明对象时特别有用。
scene.pickTranslucentDepth = true;
- debugShowFramesPerSecond显示帧率
// 显示帧率
window.__viewer.scene.debugShowFramesPerSecond = true;
pick(windowPosition, width, height)
// On mouse over, color the feature yellow.
handler.setInputAction(function(movement) {
    const feature = scene.pick(movement.endPosition);
    if (feature instanceof Cesium.Cesium3DTileFeature) {
        feature.color = Cesium.Color.YELLOW;
    }
}, Cesium.ScreenSpaceEventType.MOUSE_MOVE);
// 显示帧率
window.__viewer.scene.debugShowFramesPerSecond = true;
specularEnvironmentMapsSupported是否镜面环境贴图支持
/**
 * 它用于检查当前浏览器是否支持镜面环境贴图(Specular Environment Maps)。
 * 镜面环境贴图是一种图形技术,用于模拟物体表面反射周围环境光的效果,从而增加场景的真实感和视觉深度。
*/
if (!scene.specularEnvironmentMapsSupported) {
  window.alert(
	"This browser does not support specular environment maps."
  );
}
import {SkyBox} from 'cesium'
viewer.scene.skyBox = new SkyBox({
    sources: {
      positiveX: '/images/skybox1/tycho2t3_80_px.jpg',
      negativeX: '/images/skybox1/tycho2t3_80_mx.jpg',
      positiveY: '/images/skybox1/tycho2t3_80_py.jpg',
      negativeY: '/images/skybox1/tycho2t3_80_my.jpg',
      positiveZ: '/images/skybox1/tycho2t3_80_pz.jpg',
      negativeZ: '/images/skybox1/tycho2t3_80_mz.jpg'
    }
})
scene.postProcessStages 渲染的后处理效果
// 开启抗锯齿化
viewer.scene.postProcessStages.fxaa.enabled = true;
ScreenSpaceCameraController用户操作交互 ScreenSpaceCameraController对象,它允许用户通过鼠标和键盘与场景进行交互,包括平移、缩放和旋转视图。
new Cesium.ScreenSpaceCameraController(scene)
 const controller = scene.screenSpaceCameraController;
 // 这行代码设置了相机控制器的最小缩放距离,即相机可以离模型多近。这里使用了相机的近裁剪面距离作为最小缩放距离。
  controller.minimumZoomDistance = camera.frustum.near;
  // 设置最小旋转速率,一般不建议修改
  controller._minimumRotateRate = 1.0;
- 获取或设置深度测试椭球。
// 启用光照
this.viewer.scene.globe.enableLighting = true;
- depthTestAgainstTerrain:如果诸如广告牌、折线、标签等原语应该针对地形表面进行深度测试,则为true,如果此类原语应该始终绘制在地形顶部,除非它们在地球的另一边,则为false。针对地形的深度测试原语的缺点是轻微的数字噪声或地形详细级别的切换有时会使应该在表面上的原语消失在它下面。
viewer.scene.globe.depthTestAgainstTerrain = true;
当 viewer.scene.globe.depthTestAgainstTerrain = true; 时:
- 遮挡处理:场景中的对象会根据它们与地形的相对高度进行遮挡处理。如果某个对象应该被地形遮挡(比如,它位于地形的下方或完全在地形的背面),那么这个对象在渲染时就不会被显示,或者其可见部分会被裁剪。
- 视觉真实性:这种设置增加了场景的视觉真实性,因为用户不再会看到悬浮在地形上方的虚假对象,或者在地形内部“穿越”的物体。
- 性能影响:启用深度测试可能会稍微增加渲染的负担,因为 Cesium 需要进行更多的计算来确定对象的可见性。然而,对于大多数应用来说,这种性能影响是可以接受的。
如果没有设置或设置为 false:
- 无遮挡处理:对象不会根据地形的高度进行遮挡处理。即使对象在逻辑上应该被地形遮挡,它们也可能仍然会显示出来,这会导致视觉上的不真实感。
- 简化渲染:由于没有进行深度测试,Cesium 在渲染时可能会更快一些,因为它不需要计算对象与地形之间的遮挡关系。
- W限制用途:对于需要高度精确表示地形与对象之间关系的场景(如模拟飞行、军事训练、虚拟现实等),不启用深度测试可能会极大地限制应用的用途和用户体验。
- globe.undergroundColorAlphaByDistance:获取或设置将Globe#undergroundColor与全局颜色混合的远近距离。
 //设置了“近距离”的阈值。nearDistance 表示从地球仪表面开始计算,地下部分颜色透明度开始变化的距离。
globe.undergroundColorAlphaByDistance.near = nearDistance;
//“远距离”的阈值。farDistance 表示从地球仪表面开始计算,地下部分颜色透明度变化结束的距离。
globe.undergroundColorAlphaByDistance.far = farDistance;
//在近距离(nearDistance)处的透明度值。nearAlpha 表示在这个距离上的颜色透明度
globe.undergroundColorAlphaByDistance.nearValue = nearAlpha;
//在远距离(farDistance)处的透明度值。farAlpha 表示在这个距离上的颜色透明度,同样是一个0到1之间的数值。
globe.undergroundColorAlphaByDistance.farValue = farAlpha;
启用场景光源照明地球仪,默认false
// 启用光照
this.viewer.scene.globe.enableLighting = true;
scene.light.intensity = 8.0 //灯光亮度
CallbackProperty(callback, isConstant)属性回调函数
Cesium.CallbackProperty:这是一个Cesium提供的属性类型,它允许您通过回调函数动态计算属性值。每次需要属性值(例如,在渲染循环中)时,Cesium都会调用提供的回调函数,并传入当前时间和一个用于存储结果的参数。
sphere.ellipsoid.material.repeat = new Cesium.CallbackProperty(
//time是当前的时间(通常是Cesium的时钟时间),而result是一个用于存储回调计算结果的Cesium.Cartesian2对象。
  function (time, result) {
	if (!Cesium.defined(result)) {
	  result = new Cesium.Cartesian2();
	}
	// isRepeating外部参数,用来控制是否重复
	if (isRepeating) {
	  result.x = 8;
	  result.y = 8;
	} else {
	  result.x = 1;
	  result.y = 1;
	}
	return result;
  },
  false// true当回调函数每次返回相同的值时,false如果值会改变。
);
Cesium SampledPositionProperty是Cesium开源地理可视化库中的一个重要功能,它用于在地理位置中定义和控制实体的运动轨迹,这个功能在很多地理可视化应用中非常有用,比如飞行模拟、移动物体的路径追踪等。
SampledPositionProperty可以通过一系列的位置样本点来描述实体的运动轨迹,每个样本点都包含了位置信息和对应的时间标记,通过这些样本点,Cesium可以按照指定的时间间隔生成平滑的过渡效果,使实体的运动看起来更加自然。
 // Create a path for our vehicle by lerping between two positions.
const position = new Cesium.SampledPositionProperty();

const startPosition = new Cesium.Cartesian3(
  -2379556.799372864,
  -4665528.205030263,
  3628013.106599678
);
const endPosition = new Cesium.Cartesian3(
  -2379603.7074103747,
  -4665623.48990283,
  3627860.82704567
);
// A velocity vector property will give us the entity's speed and direction at any given time.
const velocityVectorProperty = new Cesium.VelocityVectorProperty(
  position,
  false
);
- addSample(time, position, derivatives):添加一个新示例。
const position = new Cesium.SampledPositionProperty();
......

//这行代码将之前计算得到的时间(time)和位置(location)添加到一个名为position的对象中
position.addSample(time, location);
- getValue(time, result) → Cartesian3:获取属性在提供时间的值。
const velocityVectorProperty = new Cesium.VelocityVectorProperty(
	  position,
	  false
	);
	.......
velocityVectorProperty.getValue(time, velocityVector);
new Cesium.VelocityVectorProperty(position, normalize):一个Cartesian3,计算为一个Property向量 基于提供的PositionProperty的速度。
这个对象能够计算出在给定的时间点上实体的速度和方向。
SampledProperty取样 一个Property,其值在给定时间内从 提供了一组样本和指定的插值算法和程度。
NodeTransformationProperty 生成TranslationRotationScale数据的Property。 用于表示一个节点的变换属性,包括位置、旋转和缩放。
// 创建一个新的Cesium.NodeTransformationProperty对象
const wheelTransformation = new Cesium.NodeTransformationProperty({
  // 指定旋转属性
  rotation: rotationProperty,
});
设置颜色
// 不传默认都是1.0
new Cesium.Color(red, green, blue, alpha)
创建一个新颜色,该颜色具有指定颜色的相同红色、绿色和蓝色分量,但具有指定的alpha值。
Cesium.Color.fromAlpha(color, alpha, result)
Color.fromAlpha(Color[colorArrs[i]], 0.5)
Color.fromHsl 从色调、饱和度和明度创建Color实例。
const h = hue + lerperX * 0.5 - lerperY * 0.3 + lerperZ * 0.2;
const s = 1.0 - lerperY * 0.2;
const v = 0.5 + 2.0 * (lerperZ - 0.5) * 0.2;
const color = Cesium.Color.fromHsl(h, s, v, 1.0, scratchColor);
Color.clone 用于创建给定颜色的克隆(副本)
// 假设有一个已存在的颜色对象
var originalColor = new Cesium.Color(1.0, 0.0, 0.0, 1.0); // 完全不透明的红色

// 使用 clone 方法创建该颜色的克隆
var clonedColor = Cesium.Color.clone(originalColor);

// 此时 clonedColor 和 originalColor 的颜色值相同,但它们是不同的对象
console.log(clonedColor.equals(originalColor)); // 输出 true
console.log(clonedColor === originalColor);     // 输出 false,因为它们是两个不同的实例
Cesium.Color.AZURE
Cesium.Color.BLACK
//。。。。。。
一个枚举接口,它定义了材料颜色混合时的混合模式
定义用于在目标颜色和基元的源颜色之间混合的不同模式。HIGHLIGHT将源颜色乘以目标颜色REPLACE将源颜色替换为目标颜色MIX将源颜色和目标颜色混合在一起
Cesium.ColorBlendMode提供了多种混合模式,以下是几种常见的混合模式:
- HIGHLIGHT:当内部材料的透明度(alpha)小于1.0时,在其上方显示外部材料颜色(blendingColor)。这种模式通常用于高亮显示某些部分。
- MIX:对内部材料和外部材料进行平均值混合。这意味着两种颜色的RGB值将按照一定比例进行混合,生成新的颜色。
- REPLACE:用外部材料颜色完全替换内部材料颜色。这是一种简单的替换模式,不考虑内部材料的颜色。
Math cesium提供的部分数学函数
- Cesium.Math.toRadians(degrees):角度转弧度制
const heading = Cesium.Math.toRadians(135);
- Cesium.Math.toDegrees(radians):弧度制转角度制
Cesium.Math.toDegrees(viewer.camera.pitch)
Cesium.Math.setRandomNumberSeed(seed)//seed:number 在CesiumMath#nextR随机数字中设置随机数生成器使用的种子
Cesium.Math.nextRandomNumber() 使用Mersenne扭曲器生成[0.0,1.0)范围内的随机浮点数。setRandomNumberSeed和它共同作用于随机数生成的过程
 // 这两行代码设置了一个基于体素块维度的随机数种子,以确保每次生成的数据都是可预测的(对于相同的输入,将产生相同的输出)。
const randomSeed = dimensions.y * dimensions.x + dimensions.x;
Cesium.Math.setRandomNumberSeed(randomSeed);
//生成一个随机的色调值
const hue = Cesium.Math.nextRandomNumber();
- Matrix4 一个4x4矩阵,可索引为列主序数组。为了代码易读性,构造函数参数按行主序排列。
 tileset = await Cesium.Cesium3DTileset.fromIonAssetId(2333904);

 // x值(-1.398521324920626)表示在x轴方向上的平移量。
 // y值(0.7823052871729486)表示在y轴方向上的平移量。
 // z值(0.7015244410592609)表示在z轴方向上的平移量。
  const translation = new Cesium.Cartesian3(
    -1.398521324920626,
    0.7823052871729486,
    0.7015244410592609,
  );

  tileset.modelMatrix = Cesium.Matrix4.fromTranslation(translation);
- Cesium.Matrix4.fromScale:该方法用于生成一个表示缩放变换的 4x4 矩阵
const modelMatrix = Cesium.Matrix4.fromScale(
  Cesium.Cartesian3.fromElements(
	Cesium.Ellipsoid.WGS84.maximumRadius,
	Cesium.Ellipsoid.WGS84.maximumRadius,
	Cesium.Ellipsoid.WGS84.maximumRadius
  )
);
- Cesium.Matrix4.multiplyByUniformScale(matrix, scale, result)
let { radius } = model.boundingSphere;
const scale = 10.0 / radius;
//Cesium的Matrix4.multiplyByUniformScale函数来缩放模型。这个函数会就地(in-place)修改model.modelMatrix,即它会直接更新模型的模型矩阵,使其按照给定的比例缩放。
Cesium.Matrix4.multiplyByUniformScale(
  model.modelMatrix,
  scale,
  model.modelMatrix
);
如果定义了对象,则返回true,否则返回false。
this.viewer.screenSpaceEventHandler.setInputAction((event) => {
        // 点击事件,获取点击是否在 实体上
        const pick = this.viewer.scene.pick(event.position);
        console.log(pick, defined(pick));
        if (defined(pick)) {
            // 图层点击高亮
        }
    }, ScreenSpaceEventType.LEFT_CLICK);
Cesium3DTileFeature Cesium.Cesium3DTileFeature 是 CesiumJS 库中用于表示单个 3D 瓦片特征(feature)的类。
- 关键属性
- id:特征的唯一标识符。
- tile:包含该特征的 3D 瓦片实例。
- properties:一个对象,包含从瓦片集中读取的特征属性。这些属性可以是数字、字符串或其他类型,具体取决于瓦片集的元数据和数据结构。
- 方法
- getProperty(name):根据名称获取特征的属性。
- setProperty(name, value):设置特征的属性。
- hasProperty(name):检查特征是否具有指定的属性。
- getPropertyIds(results):它用于获取特征的所有属性ID。这个方法返回的是一个数组,您可以通过遍历这个数组来访问每个属性的名称。
const feature = scene.pick(movement.position);
const featurePicked = feature instanceof Cesium.Cesium3DTileFeature;
const isBuildingFeature = featurePicked && feature.hasProperty("HGT");
FeatureDetection 特性检测 一组检测当前浏览器是否支持各种功能的功能。
FeatureDetection.supportsImageRenderingPixelated[静态]
用于检测当前浏览器是否支持 CSS 属性 image-rendering: pixelated。这个 CSS 属性允许图像以像素化的方式渲染,而不是进行平滑处理,这在处理像素艺术或需要精确像素渲染的场景时非常有用。
/**
 * 开启抗锯齿
 */
import * as Cesium from "cesium";

const disableSawtooth = (viewer) => {
    // 是否支持图像渲染像素化处理
    if (Cesium.FeatureDetection.supportsImageRenderingPixelated()) {
        viewer.resolutionScale = window.devicePixelRatio;
    }

    // 开启抗锯齿
    viewer.scene.postProcessStages.fxaa.enabled = true;
};

export default disableSawtooth;
| 类型 | 中文 | 说明 |
|---|---|---|
| attribute | 属性 | 主要是顶点着色器用来从缓冲(Buffer)中获取数据 |
| uniform | 统一值 | 在每一次渲染中全局有效且不变的值 |
| texture | 纹理 | 一个数据序列,大多数情况下可以理解为图像数据 |
| varying | 可变量 | 顶点着色器向片元着色器传值的方式,并且会以插值的形式传递 |
| 函数名(参数) | 说明 |
|---|---|
| pow(x,y) | x的y次方。如果x小于0,结果是未定义的。同样,如果x=0并且y<=0,结果也是未定义的。 |
| sqrt(x) | 计算x的开方。如果x小于0,结果是未定义的。 |
| fract(x) | 返回x-floor(x),即返回x的小数部分 |
| step(edge, x) | 如果x < edge,返回0.0,否则返回1.0 |
| smoothstep(edge0, edge1, x) | 如果x <= edge0,返回0.0 ;如果x >= edge1 返回1.0;如果edge0 < x < edge1,则执行0~1之间的平滑埃尔米特差值。如果edge0 >= edge1,结果是未定义的。 |
| distance(a,b) | 计算a,b两点间的距离,二维三维都可以 |
cesium所需的材质shader具体来说就是需要写一个 czm_getMaterial 函数。然后这个函数返回一个czm_material类型的结构体(结构体可以类比为JS中的对象)。这个结构体最好通过 czm_getDefaultMaterial 函数获得,再在此基础上修改。
可以在这个函数上方声明一些uniform来从JS中获取一些数据,比如这个最简单的示例就从JS中获取颜色值,并赋予 czm_material 类型的结构体的diffuse属性。
czm_material czm_getMaterial(czm_materialInput materialInput)
{
    return czm_getDefaultMaterial(materialInput);
}
- czm_materialInput 结构体说明
czm_materialInput 类型的结构体是 czm_getMaterial 函数的参数,cesium会在几何体的片元着色器中调用 czm_getMaterial ,并将参数传递给该函数。
| 属性名 | 类型 | 说明 |
|---|---|---|
| s | float | 一维纹理坐标 |
| st | vec2 | 二维纹理坐标 |
| str | vec3 | 三维纹理坐标 |
| normalEC | vec3 | 眼坐标系中的未扰动表面法线 |
| tangentToEyeMatrix | mat3 | 将切线空间法线转换为眼空间的矩阵 |
| positionToEyeEC | vec3 | 从片段到眼睛的向量(在眼坐标系中)。其大小为片段到眼睛的距离(以米为单位) |
czm_material结构体说明:保存可用于照明的材质信息。由所有 czm_getMaterial 函数返回。
可以了解到该结构体不仅仅保存着材质信息,并且该结构体还可以被用于光照(cesium使用的冯氏光照模型第二个参数就是该结构体)。
| 属性名 | 类型 | 说明 |
|---|---|---|
| diffuse | vec3 | 向各个方向均匀散射的入射光,默认值vec3(0.0)。(漫反射颜色) |
| specular | float | 沿单个方向反射的入射光的强度,默认值0.0。(镜面高光强度) |
| shininess | float | 镜面反射的清晰度。值越高,创建的镜面高光越小、越聚焦。默认值1.0 |
| normal | vec3 | 表面的法线在眼睛坐标中。它用于法线贴图等效果。默认值为曲面的未修改法线。(就是normalEC) |
| emission | vec3 | 材质在所有方向上均匀发射的光。默认值为 vec3(0.0),它不发光。 |
| alpha | float | 此材质的不透明度。0.0 是完全透明的;1.0 是完全不透明的。默认值1.0 |
- 渐变:渐变的产生大多需要借助纹理坐标,在webgl中,cesium纹理坐标设置大多都是完全覆盖面的。假如绘制了一个正方形,那左下角为纹理坐标的原点,右上角坐标则为(1,1)。不管实际上物体是正方形还是长方形还是什么形状,纹理坐标右上角就是(1,1)。利用好这一点就可以产生渐变效果了
const shaderSource = `
	uniform vec4 color;

	czm_material czm_getMaterial(czm_materialInput materialInput)
	{
		vec4 outColor = color;
		czm_material material = czm_getDefaultMaterial(materialInput);

		vec2 st = materialInput.st;
		outColor.r = st.s;
		// outColor.r = st.t;

		material.diffuse = czm_gammaCorrect(outColor.rgb);
		material.alpha = outColor.a;
		return material;
	}
`
因为纹理坐标都是0-1的,而rgba四个值也都是0-1之间的,如果想要在横坐标生成3个渐变效果,是不是应该需要3个0-1之间的值,这怎么得到呢。很简单,只需要将st的s乘以3,那么s就在0-3之间波动了,这时候再取其小数部分,因为小数部分就是在 [0 - 1) 之间的,这样就得到三个0-1了。可以将需要生成的数量通过uniform来传递(不要忘记在js中传递uniform值)。
const shaderSource = `
	uniform vec4 color;
uniform float gradationNumber;

czm_material czm_getMaterial(czm_materialInput materialInput) {
	vec4 outColor = color;
	czm_material material = czm_getDefaultMaterial(materialInput);

	vec2 st = materialInput.st;
	// outColor.r = st.s;
	// outColor.r = st.t;
	// outColor.a = st.s;
	// outColor.a = st.t;
	outColor.a = fract(st.s * gradationNumber);

	material.diffuse = czm_gammaCorrect(outColor.rgb);
	material.alpha = outColor.a;
	return material;
}
`
- 让线动起来:cesium中的材质动画离不开cesium的一个自动uniform,那就是czm_frameNumber,这个uniform表示当前处于cesium的第几帧绘制,从0开始,每次绘制cesium都会将其递增1。
现在假设cesium帧率为60,那么使用 czm_frameNumber / 60.0 。这样得到的结果如果只看整数部分那就是每秒钟递增1,只看小数部分那就是一直在 [0,1) 之间循环,循环时间为1秒。那假如我们将这个结果赋予alpha值,是不是就是物体透明的不断地从0-1变化,循环时间为1秒。那怎么通过这个让线动起来呢,我们知道纹理坐标的值也是0-1之间的,那如果我们将这个值赋予作为线的位置呢(我们之前线的位置为0.5),让我们试试看吧。
/**
 * 流动线材质属性
 */

import { Event, Material, Property, Color, defined, createPropertyDescriptor } from "cesium";
export default class LineFlowMaterialProperty {
    constructor(options) {
       //。。。。。。
    }
    getType(time) {
        return Material.LineFlowMaterialType;
    }
    getValue(time, result) {
        if (!defined(result)) {
            result = {};
        }
        return result;
    }
}

Material.LineFlowMaterialProperty = "LineFlowMaterialProperty";
Material.LineFlowMaterialType = "LineFlowMaterialType";
Material.LineFlowMaterialSource = `
  czm_material czm_getMaterial(czm_materialInput materialInput){
    czm_material material = czm_getDefaultMaterial(materialInput);
	//...
	return material
  }
  `;

Material._materialCache.addMaterial(Material.LineFlowMaterialType, {
    fabric: {
        type: Material.LineFlowMaterialType,
        uniforms: {
          //......
        },
        source: Material.LineFlowMaterialSource,
    },
});
getType和getValue方法需要定义不可缺失,否则无法呈现
Cesium.CustomShader自定义着色器[非标准]
fragmentShaderText:作为GLSL代码字符串的自定义片段着色器。它必须包含一个名为片段主的GLSL函数。有关预期签名的示例,请参阅示例。如果未指定,自定义片段着色器步骤将在计算片段着色器中跳过。FragmentInput: 这是一个结构体(或类似结构体的类型),它包含了从顶点着色器传递到片段着色器的各种数据。这些数据通常包括顶点位置、法线、纹理坐标等,以及CesiumJS自动注入的一些额外信息,如颜色、光照信息等。fsInput: 这是传递给 fragmentMain 函数的 FragmentInput 类型变量的名称。可以通过 fsInput 访问传递给片段着色器的所有数据。inout: 这是GLSL中的一个关键字,用于指定函数参数是输入-输出参数。这意味着可以在函数内部修改这个参数的值,并且修改后的值将在函数返回后保留。这对于着色器来说非常有用,可以根据计算的结果更新材质属性。czm_modelMaterial: 这是CesiumJS定义的一个结构体类型,用于表示材质的属性。它包含了多个字段,如漫反射颜色(diffuse)、镜面反射颜色(specular)、光泽度(shininess)、透明度(alpha)等。material: 这是传递给 fragmentMain 函数的 czm_modelMaterial 类型变量的名称(带有 inout 修饰符)。可以通过 material 访问和修改材质的属性。
 const customShaderColor = new Cesium.CustomShader({
  fragmentShaderText:
  `void fragmentMain(FragmentInput fsInput, inout czm_modelMaterial material)
	{
		material.diffuse = fsInput.metadata.color.rgb;
		float transparency = 1.0 - fsInput.metadata.color.a;

		// To mimic light scattering, use exponential decay
		float thickness = fsInput.voxel.travelDistance * 16.0;
		material.alpha = 1.0 - pow(transparency, thickness);
	}`,
});

const customShaderWhite = new Cesium.CustomShader({
  fragmentShaderText:
  `void fragmentMain(FragmentInput fsInput, inout czm_modelMaterial material)
	{
		material.diffuse = vec3(1.0);
		material.alpha = 1.0;
	}`,
});

function createPrimitive(provider, customShader, modelMatrix) {
  viewer.scene.primitives.removeAll();

  const voxelPrimitive = viewer.scene.primitives.add(
	new Cesium.VoxelPrimitive({
	  provider: provider,
	  customShader: customShader,
	  modelMatrix: modelMatrix,
	})
  );
  ......
}

// createPrimitive自定义函数,非官方函数
const primitive = createPrimitive(
	provider,
	customShaderColor,
	modelMatrix
);
- normalize 函数用于归一化向量
- max 函数用于取两个值中的较大值
- dot 函数用于计算两个向量的点积(在点积运算中,第一个向量投影到第二个向量上(这里,向量的顺序是不重要的,点积运算是可交换的),然后通过除以它们的标量长度来“标准化”。这样,这个分数一定是小于等于1的,可以简单地转化成一个角度值。)
- int tileIndex = fsInput.voxel.tileIndex 和 int sampleIndex = fsInput.voxel.sampleIndex:获取体素的瓦片索引和采样索引。int 表示整数类型。
- mix(cellColor, vec3(1.0), 0.5) 函数将计算得到的体素颜色和白色进行混合
- Cesium.UniformType.INT(整数类型)
       const customShader = new Cesium.CustomShader({
          fragmentShaderText:
      `void fragmentMain(FragmentInput fsInput, inout czm_modelMaterial material)
        {
		  // 归一化
          vec3 voxelNormal = normalize(czm_normal * fsInput.voxel.surfaceNormal);
          float diffuse = max(0.0, dot(voxelNormal, czm_lightDirectionEC));
          float lighting = 0.5 + 0.5 * diffuse;

          int tileIndex = fsInput.voxel.tileIndex;
          int sampleIndex = fsInput.voxel.sampleIndex;
		  //根据元数据的颜色和光照强度计算体素颜色。
          vec3 cellColor = fsInput.metadata.color.rgb * lighting;
          if (tileIndex == u_selectedTile && sampleIndex == u_selectedSample) {
            material.diffuse = mix(cellColor, vec3(1.0), 0.5);
            material.alpha = fsInput.metadata.color.a;
          } else {
            material.diffuse = cellColor;
            material.alpha = fsInput.metadata.color.a;
          }
        }`,
          uniforms: {
            u_selectedTile: {
              type: Cesium.UniformType.INT,
              value: -1.0,
            },
            u_selectedSample: {
              type: Cesium.UniformType.INT,
              value: -1.0,
            },
          },
        });
需求获取infobox中的ID信息,非自定义的infobox,图元类型拿不到id,最后采取这种方案,同时注意infobox是iframe嵌入的,所以要异步处理
 const pick = viewer.scene.pick(click.position);
 // pick点击无法获取对应的需要的id

 setTimeout(()=>{
		const str = viewer.infoBox.viewModel.description
	  // 创建一个临时的DOM元素来包含这个HTML字符串
		const tempDiv = document.createElement('div');
		tempDiv.innerHTML = str;

		// 查询所有的<th>元素
		const thElements = tempDiv.querySelectorAll('th');

		let idValue = null;

		// 遍历<th>元素,找到内容为"ID"的<th>,然后获取其后面的<td>
		thElements.forEach(th => {
		  if (th.textContent.trim() === 'ID') {
			const nextTd = th.nextElementSibling;
			if (nextTd && nextTd.tagName === 'TD') {
			  idValue = nextTd.textContent;
			}
		  }
		});

		callVueFun('UnderNetFun',idValue)

	  })
- viewer.clock.currentTime 属性用于设置或获取当前的时间,这个时间通常用于动画、时间控制或者模拟特定时间点的场景。
- viewer.clock.startTime 时钟的开始时间。
- viewer.clock.stopTime 时钟的停止时间。
- viewer.clock.multiplier 用于控制时间的流逝速度
- viewer.clock.clockRange 定义时钟的行为范围
viewer.clock.currentTime = Cesium.JulianDate.fromIso8601(
  "2021-11-09T07:27:37.016064475348684937Z"
);
将一个标准的JavaScript日期时间(2018年12月12日15时)转换为Cesium的JulianDate格式,然后在这个时间基础上增加10秒,得到一个新的JulianDate对象作为结束时间。这在需要精确处理时间和进行天文计算时非常有用,因为Cesium的JulianDate提供了对时间的高精度表示和操作能力。
const start = Cesium.JulianDate.fromDate(new Date(2018, 11, 12, 15));
const totalSeconds = 10;
const stop = Cesium.JulianDate.addSeconds(
  start,
  totalSeconds,
  new Cesium.JulianDate()
);
//设置Cesium Viewer的时钟开始时间为start时间的克隆。
//克隆是必要的,因为JulianDate对象是不可变的,直接赋值会丢失原始时间点的引用。
viewer.clock.startTime = start.clone();
viewer.clock.stopTime = stop.clone();
viewer.clock.currentTime = start.clone();
viewer.clock.clockRange = Cesium.ClockRange.LOOP_STOP;
viewer.timeline.zoomTo(start, stop);
- Cesium.JulianDate 是一个表示儒略日的类,它用于在Cesium中处理高精度的时间
- Cesium.JulianDate.fromDate(new Date(2018, 11, 12, 15)) :从JavaScript Date创建一个新实例。
- Cesium.JulianDate.addSeconds(julianDate, seconds, result) → JulianDate:将提供的秒数添加到提供的日期实例。
- Cesium.ClockRange:用于确定行为的Clock#tick常量当Clock#startTime或Clock#endTime到达时。
- LOOP_STOP,这意味着时间将从startTime运行到stopTime,然后停止,但不会自动重新开始
- UNBOUNDED(无限制地向前运行)
- CLAMPED(在startTime和stopTime之间循环,但不会超出这个范围)
TimeIntervalCollection 用于管理和存储一系列的时间间隔(TimeInterval)。每个时间间隔表示一个开始时间和结束时间之间的时间段。TimeIntervalCollection 提供了一系列的方法和属性来操作这些时间间隔,比如添加、移除、查找以及遍历时间间隔等。
使用场景
Cesium.TimeIntervalCollection 通常用于需要管理一系列时间相关事件或数据的场景,比如:
- 在 3D 地球仪上可视化特定时间段内的数据。
- 实现基于时间的动画或交互。
- 根据时间间隔来过滤或选择数据。
 function dataCallback(interval, index) {
  let time;
  if (index === 0) {
	// leading
	time = Cesium.JulianDate.toIso8601(interval.stop);
  } else {
	time = Cesium.JulianDate.toIso8601(interval.start);
  }

  return {
	Time: time,
  };
}

const times = Cesium.TimeIntervalCollection.fromIso8601({
  iso8601: "2015-07-30/2017-06-16/P1D",
  leadingInterval: true,
  trailingInterval: true,
  isStopIncluded: false, // We want stop time to be part of the trailing interval
  dataCallback: dataCallback,
  });
- TimeIntervalCollection.fromIso8601DateArray:从ISO 8601日期数组创建新实例。
 const dates = [
	  "2018-07-19T15:18:00Z",
	  "2018-07-19T15:18:00.5Z",
	  "2018-07-19T15:18:01Z",
	  "2018-07-19T15:18:01.5Z",
	  "2018-07-19T15:18:02Z",
	  "2018-07-19T15:18:02.5Z",
	];

	const uris = [
	  "../../SampleData/Cesium3DTiles/PointCloud/PointCloudTimeDynamic/0.pnts",
	  "../../SampleData/Cesium3DTiles/PointCloud/PointCloudTimeDynamic/1.pnts",
	  "../../SampleData/Cesium3DTiles/PointCloud/PointCloudTimeDynamic/2.pnts",
	  "../../SampleData/Cesium3DTiles/PointCloud/PointCloudTimeDynamic/3.pnts",
	  "../../SampleData/Cesium3DTiles/PointCloud/PointCloudTimeDynamic/4.pnts",
	];

	function dataCallback(interval, index) {
	  return {
		uri: uris[index],
	  };
	}

	const timeIntervalCollection = Cesium.TimeIntervalCollection.fromIso8601DateArray(
	  {
		iso8601Dates: dates,
		dataCallback: dataCallback,
	  }
	);
- viewer.timeline.zoomTo: 这个方法将 Cesium Viewer 的时间线缩放到指定的开始和结束时间之间。这通常用于在时间动态数据中快速定位到特定的时间段。
start, stop: 使用 Cesium.JulianDate.fromIso8601 方法从 ISO 8601 格式的字符串创建了开始和结束时间的 Cesium.JulianDate 实例。
const start = Cesium.JulianDate.fromIso8601("2015-07-30");
const stop = Cesium.JulianDate.fromIso8601("2017-06-17");
viewer.timeline.zoomTo(start, stop);
  if (Cesium.defined(synchronizer)) {
	synchronizer = synchronizer.destroy();
	videoElement.playbackRate = 1.0;
	return;
  }

  synchronizer = new Cesium.VideoSynchronizer({
	clock: viewer.clock,
	element: videoElement,
  });
Cesium.knockout允许将HTML控件与CesiumJS中的数据模型进行绑定。
当HTML控件的值发生变化时,可以实时更新CesiumJS中的数据模型,从而改变地图或图层的属性。
<html>
<div id="toolbar">
	 <td>
	<!-- data-bind="options: colorBlendModes, value: colorBlendMode": 这是KnockoutJS的数据绑定表达式。 -->
	  <select
		data-bind="options: colorBlendModes, value: colorBlendMode"
	  ></select>
	</td>
</div>
</html>
<script>
	  const viewModel = {
	           color: "Red",
	           colors: ["White", "Red", "Green", "Blue", "Yellow", "Gray"],
	           alpha: 1.0,
	           colorBlendMode: "Highlight",
	           colorBlendModes: ["Highlight", "Replace", "Mix"],
	         };

	 // Convert the viewModel members into knockout observables.
	 // 将ViewModel成员转换为knockout可观察对象。
	 Cesium.knockout.track(viewModel);

	 // Bind the viewModel to the DOM elements of the UI that call for it.
	 // 将ViewModel成员绑定到调用它的DOM元素的界面元素。
	 const toolbar = document.getElementById("toolbar");
	 Cesium.knockout.applyBindings(viewModel, toolbar);

	 Cesium.knockout
	  .getObservable(viewModel, "colorBlendMode")
	  .subscribe(function (newValue) {
		const colorBlendMode = getColorBlendMode(newValue);
		entity.model.colorBlendMode = colorBlendMode;
		viewModel.colorBlendAmountEnabled =
		  colorBlendMode === Cesium.ColorBlendMode.MIX;
	  });
</script>
const viewer = new Cesium.Viewer("cesiumContainer", {
});

let entity;

function getColor(colorName, alpha) {
  const color = Cesium.Color[colorName.toUpperCase()];
  return Cesium.Color.fromAlpha(color, parseFloat(alpha));
}

// The viewModel tracks the state of our mini application.
const viewModel = {
  color: "Red",
  //...
};

// Convert the viewModel members into knockout observables.
Cesium.knockout.track(viewModel);

// Bind the viewModel to the DOM elements of the UI that call for it.
const toolbar = document.getElementById("toolbar");
Cesium.knockout.applyBindings(viewModel, toolbar);

Cesium.knockout
  .getObservable(viewModel, "color")
  .subscribe(function (newValue) {
    entity.model.color = getColor(newValue, viewModel.alpha);
  });

function createModel(url, height) {
  viewer.entities.removeAll();
  const position = Cesium.Cartesian3.fromDegrees(
    -123.0744619,
    44.0503706,
    height
  );
  const heading = Cesium.Math.toRadians(135);
  const pitch = 0;
  const roll = 0;
  const hpr = new Cesium.HeadingPitchRoll(heading, pitch, roll);
  const orientation = Cesium.Transforms.headingPitchRollQuaternion(
    position,
    hpr
  );
  entity = viewer.entities.add({
    name: url,
    position: position,
    orientation: orientation,
    model: {
      uri: url,
      color: getColor(viewModel.color, viewModel.alpha),
    },
  });
  viewer.trackedEntity = entity;
}

const options = [
  {
    text: "Aircraft",
    onselect: function () {
      createModel(
        "../SampleData/models/CesiumAir/Cesium_Air.glb",
        5000.0
      );
    },
  },
  //。。。
];

Sandcastle.addToolbarMenu(options);

Sandcastle.addToggleButton("Shadows", viewer.shadows, function (
  checked
) {
  viewer.shadows = checked;
});
viewerCesium3DTilesInspectorMixin 将Cesium3DTilesInspector小部件添加到Viewer小部件的mixin。 这个函数不是直接调用,而是通常传递为 参数Viewer#extend
var viewer = new Cesium.Viewer('cesiumContainer');
viewer.extend(Cesium.viewerCesiumInspectorMixin);
VoxelInspector 帮助调试体素的检查器小部件
- VoxelInspector.viewModel 获取模型视图
- VoxelInspector.viewModel.voxelPrimitive 获取或设置视图模型的原语
将voxelPrimitive(一个代表体素数据的Cesium原始对象)设置为Cesium Viewer的体素检查器(voxelInspector)的视图模型(viewModel)中的voxelPrimitive属性。通过体素检查器来分析和可视化这个体素原始对象。
viewer.voxelInspector.viewModel.voxelPrimitive = voxelPrimitive;