# vue3+ts项目
# EditorConfig编辑配置
让不同电脑系统不同编译器保证代码风格一致。 官网 (opens new window)
配置.editorconfig文件,编辑器会自动读取,不过vscode需要安装插件:EditorConfig for VS Code
root = true

[*] # 表示所有文件适用
charset = utf-8 # 设置文件字符集为 utf-8
indent_style = space # 缩进风格(tab | space)
indent_size = 2 # 缩进大小
end_of_line = lf # 控制换行类型(lf | cr | crlf)
trim_trailing_whitespace = true # 去除行首的任意空白字符
insert_final_newline = true # 始终在文件末尾插入一个新行

[*.md] # 表示仅 md 文件适用以下规则
max_line_length = off
trim_trailing_whitespace = false
# 使用prettier工具
vscode 安装插件 Prettier - Code formatter
Prettier 是一款强大的代码格式化工具,支持 JavaScript、CSS、Vue、GraphQL、JSON、Markdown 等语言,基本上前端能用到的文件格式它都可以搞定。
- 安装prettier
npm install prettier -D
- 配置.prettierrc文件:
- useTabs:使用tab缩进还是空格缩进,选择false;
- tabWidth:tab是空格的情况下,是几个空格,选择2个;
- printWidth:当行字符的长度,推荐80,也有人喜欢100或者120;
- singleQuote:使用单引号还是双引号,选择true,使用单引号;
- trailingComma:在多行输入的尾逗号是否添加,设置为
none; - semi:语句末尾是否要加分号,默认值true,选择false表示不加;
{
  "useTabs": false,
  "tabWidth": 2,
  "printWidth": 80,
  "singleQuote": true,
  "trailingComma": "none",
  "semi": false
}
- 创建.prettierignore忽略文件
/dist/*
.local
.output.js
/node_modules/**

**/*.svg
**/*.sh

/public/*
- 测试prettier是否生效
- 测试一:在代码中保存代码;
- 测试二:配置一次性修改的命令;
在package.json中配置一个scripts:
"prettier": "prettier --write ."
# 使用ESLint检测
- VSCode需要安装ESLint插件:
- 解决eslint和prettier冲突的问题:
安装插件:(vue在创建项目时,如果选择prettier,那么这两个插件会自动安装)
npm i eslint-plugin-prettier eslint-config-prettier -D
添加prettier插件:
  extends: [
    "plugin:vue/vue3-essential",
    "eslint:recommended",
    "@vue/typescript/recommended",
    "@vue/prettier",
    "@vue/prettier/@typescript-eslint",
    'plugin:prettier/recommended'
  ],
# git Husky和eslint
虽然已经要求项目使用eslint了,但是不能保证组员提交代码之前都将eslint中的问题解决掉了:
也就是我们希望保证代码仓库中的代码都是符合eslint规范的;
那么我们需要在组员执行
git commit命令的时候对其进行校验,如果不符合eslint规范,那么自动通过规范进行修复;
那么如何做到这一点呢?可以通过Husky工具:
- husky是一个git hook工具,可以帮助我们触发git提交的各个阶段:pre-commit、commit-msg、pre-push
如何使用husky呢?
这里可以使用自动配置命令:
npx husky-init
npm install
这里会做三件事:
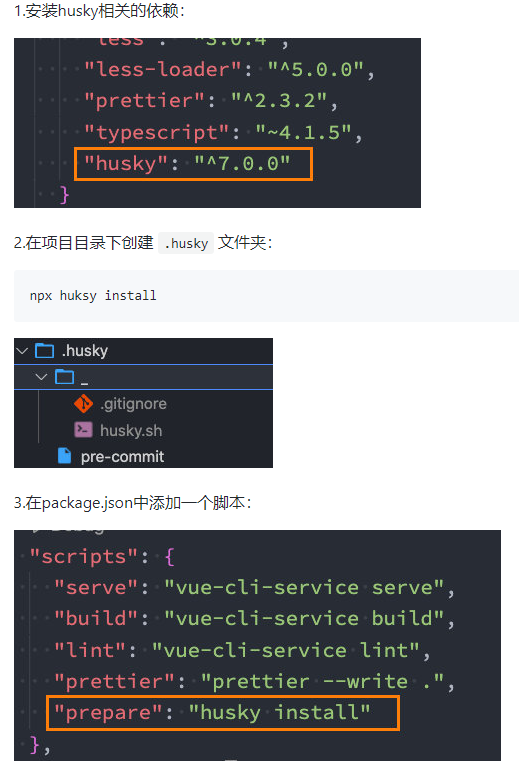
接下来,需要去完成一个操作:在进行commit时,执行lint脚本:
  "scripts": {
    "lint": "vue-cli-service lint --fix",
    "prepare": "husky install"
  },
.husky>pre-commit
#!/usr/bin/env sh
. "$(dirname -- "$0")/_/husky.sh"
npm run lint
# git commit规范 Commitizen
- Commitizen
cnpm install commitizen -D
- 安装cz-conventional-changelog,并且初始化cz-conventional-changelog:
npx commitizen init cz-conventional-changelog --save-dev --save-exact
这个命令会帮助安装cz-conventional-changelog:
并且在package.json中进行配置:
{
  "scripts": {
    "serve": "vue-cli-service serve",
    "build": "vue-cli-service build",
    "lint": "vue-cli-service lint --fix",
    "prettier": "prettier --write . ",
    "prepare": "husky install"
  },
  "dependencies": {
    "core-js": "^3.6.5",
    "vue": "^3.0.0"
  },
  "devDependencies": {
    "commitizen": "^4.2.5",
    "cz-conventional-changelog": "^3.3.0",
  },
  "config": {
    "commitizen": {
      "path": "./node_modules/cz-conventional-changelog"
    }
  }
}
这个时候提交代码需要使用 npx cz:
| Type | 作用 |
|---|---|
| feat | 新增特性 (feature) |
| fix | 修复 Bug(bug fix) |
| docs | 修改文档 (documentation) |
| style | 代码格式修改(white-space, formatting, missing semi colons, etc) |
| refactor | 代码重构(refactor) |
| perf | 改善性能(A code change that improves performance) |
| test | 测试(when adding missing tests) |
| build | 变更项目构建或外部依赖(例如 scopes: webpack、gulp、npm 等) |
| ci | 更改持续集成软件的配置文件和 package 中的 scripts 命令,例如 scopes: Travis, Circle 等 |
| chore | 变更构建流程或辅助工具(比如更改测试环境) |
| revert | 代码回退 |
# 代码提交验证
如果按照cz来规范了提交风格,但是依然有同事通过 git commit 按照不规范的格式提交应该怎么办呢?
可以通过commitlint来限制提交;
- 安装 @commitlint/config-conventional 和 @commitlint/cli
cnpm i @commitlint/config-conventional @commitlint/cli -D
- 在根目录创建commitlint.config.js文件,配置commitlint
module.exports = {
  extends: ['@commitlint/config-conventional']
}
- 使用husky生成commit-msg文件,验证提交信息:
npx husky add .husky/commit-msg "npx --no-install commitlint --edit $1"
因为这条语句里包含着$1,它是在shell命令中代表的是参数。而Windows系统的cmd是没有$1这种操作符。
首先要搞明白这条命令做了什么事情:
- 添加一个文件commit-msg
- 然后再commit-msg中填充该npx指令
解决:直接把步骤分开执行就可以解决
- 添加一个文件commit-msg在.husky文件夹下, 执行下面命令
npx husky add .husky/commit-msg
- 在创建后的文件夹commit-msg文件里直接填充你的指令即可:npx --no-install commitlint
# 项目中eslint.js其他配置
module.exports = {
  root: true,
  env: {
    node: true
  },
  extends: [
    'plugin:vue/vue3-essential',
    'eslint:recommended',
    '@vue/typescript/recommended',
    '@vue/prettier',
    '@vue/prettier/@typescript-eslint',
    'plugin:prettier/recommended'
  ],
  parserOptions: {
    ecmaVersion: 2020
  },
  rules: {
    'no-console': process.env.NODE_ENV === 'production' ? 'warn' : 'off',
    'no-debugger': process.env.NODE_ENV === 'production' ? 'warn' : 'off',
    '@typescript-eslint/no-var-requires': 'off',//项目中有使用require,eslint想要统一成import,会报红色警告,可以配置关闭
    '@typescript-eslint/no-explicit-any': 'off'
  }
}
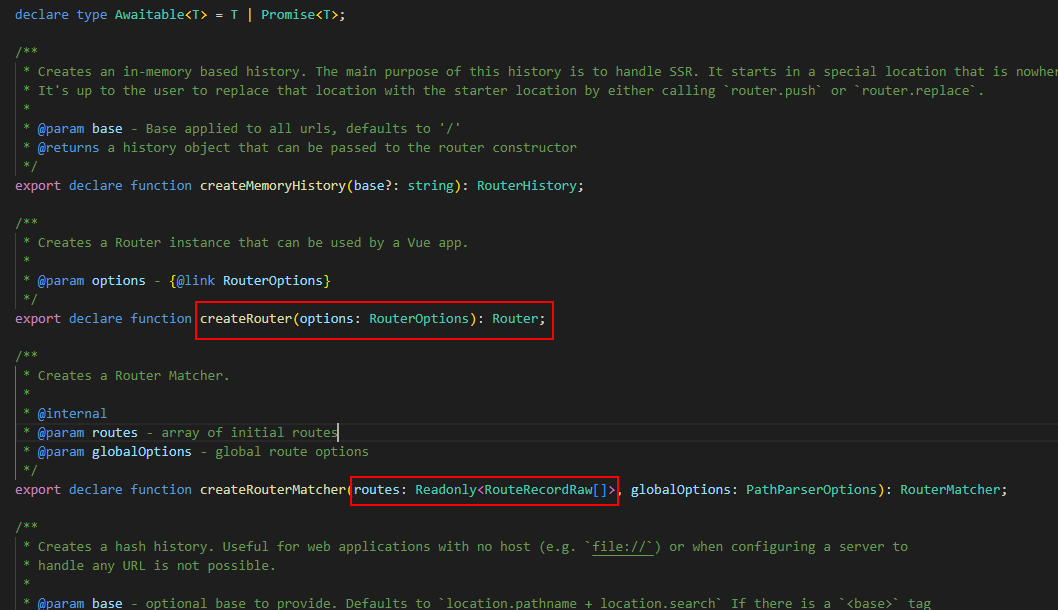
# ts中创建路由
import { createRouter, createWebHashHistory } from 'vue-router'
import type { RouteRecordRaw } from 'vue-router'// 这是vue-router内部定义好的
// 加上type表示这是类型而不是函数等,type可以省略

const routes: RouteRecordRaw[] = [
  {
    path: '/',
    redirect: '/login'
  },
  {
    path: '/login',
    component: () => import('@/views/login/login.vue')
  },
  {
    path: '/main',
    component: () => import('@/views/main/main.vue')
  }
]

const router = createRouter({
  routes,
  history: createWebHashHistory()
})

export default router
# shims-vue.d.ts
配置了某些插件,在template中直接使用$store会报红,需要在这里声明配置一下
/* eslint-disable */
declare module '*.vue' {
  import type { DefineComponent } from 'vue'
  const component: DefineComponent<{}, {}, any>
  export default component
}

declare let $store: any
# ts封装axios
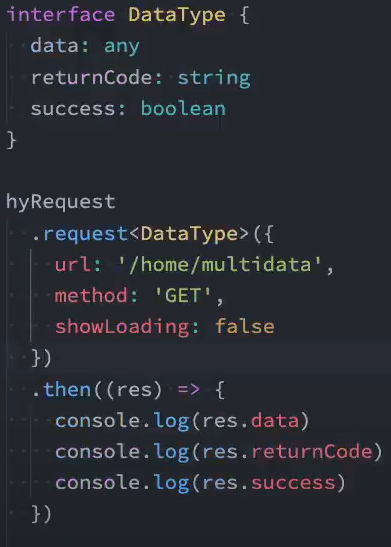
实现目标:
- 返回值约束,比如res.date时报错,避免代码写错
- 传入约束
// 请求出口
import HYRequest from './request'
// 基本配置根据不同的环境返回不同的url timeout
import { BASE_URL, TIME_OUT } from './request/config'

const hyRequest = new HYRequest({
  baseURL: BASE_URL,
  timeout: TIME_OUT,
  interceptors: {
    requestInterceptor: (config) => {
      // 携带token的拦截
      const token = ''
      if (token) {
        config.headers.Authorization = `Bearer ${token}`
      }

      console.log('请求成功的拦截')
      return config
    },
    requestInterceptorCatch: (err) => {
      console.log('请求失败的拦截')
      return err
    },
    responseInterceptor: (res) => {
      console.log('响应成功的拦截')
      return res
    },
    responseInterceptorCatch: (err) => {
      console.log('响应失败的拦截')
      return err
    }
  }
})

export default hyRequest
- request/index.ts
import axios from 'axios'
import type { AxiosInstance } from 'axios'
//type
import type { HYRequestInterceptors, HYRequestConfig } from './type'

import { ElLoading } from 'element-plus'
import { ILoadingInstance } from 'element-plus/lib/el-loading/src/loading.type'

const DEAFULT_LOADING = true

class HYRequest {
  instance: AxiosInstance
  interceptors?: HYRequestInterceptors
  showLoading: boolean
  loading?: ILoadingInstance

  constructor(config: HYRequestConfig) {
    // 创建axios实例
    this.instance = axios.create(config)

    // 保存基本信息
    this.showLoading = config.showLoading ?? DEAFULT_LOADING
    this.interceptors = config.interceptors

    // 使用拦截器
    // 1.从config中取出的拦截器是对应的实例的拦截器
    this.instance.interceptors.request.use(
      this.interceptors?.requestInterceptor,
      this.interceptors?.requestInterceptorCatch
    )
    this.instance.interceptors.response.use(
      this.interceptors?.responseInterceptor,
      this.interceptors?.responseInterceptorCatch
    )

    // 2.添加所有的实例都有的拦截器
    this.instance.interceptors.request.use(
      (config) => {
        console.log('所有的实例都有的拦截器: 请求成功拦截')

        if (this.showLoading) {
          this.loading = ElLoading.service({
            lock: true,
            text: '正在请求数据....',
            background: 'rgba(0, 0, 0, 0.5)'
          })
        }
        return config
      },
      (err) => {
        console.log('所有的实例都有的拦截器: 请求失败拦截')
        return err
      }
    )

    this.instance.interceptors.response.use(
      (res) => {
        console.log('所有的实例都有的拦截器: 响应成功拦截')

        // 将loading移除
        this.loading?.close()

        const data = res.data
        if (data.returnCode === '-1001') {
          console.log('请求失败~, 错误信息')
        } else {
          return data
        }
      },
      (err) => {
        console.log('所有的实例都有的拦截器: 响应失败拦截')
        // 将loading移除
        this.loading?.close()

        // 例子: 判断不同的HttpErrorCode显示不同的错误信息
        if (err.response.status === 404) {
          console.log('404的错误~')
        }
        return err
      }
    )
  }

  request<T>(config: HYRequestConfig<T>): Promise<T> {
    return new Promise((resolve, reject) => {
      // 1.单个请求对请求config的处理
      if (config.interceptors?.requestInterceptor) {
        config = config.interceptors.requestInterceptor(config)
      }

      // 2.判断是否需要显示loading
      if (config.showLoading === false) {
        this.showLoading = config.showLoading
      }

      this.instance
        .request<any, T>(config)
        .then((res) => {
          // 1.单个请求对数据的处理
          if (config.interceptors?.responseInterceptor) {
            res = config.interceptors.responseInterceptor(res)
          }
          // 2.将showLoading设置true, 这样不会影响下一个请求
          this.showLoading = DEAFULT_LOADING

          // 3.将结果resolve返回出去
          resolve(res)
        })
        .catch((err) => {
          // 将showLoading设置true, 这样不会影响下一个请求
          this.showLoading = DEAFULT_LOADING
          reject(err)
          return err
        })
    })
  }

  get<T>(config: HYRequestConfig<T>): Promise<T> {
    return this.request<T>({ ...config, method: 'GET' })
  }

  post<T>(config: HYRequestConfig<T>): Promise<T> {
    return this.request<T>({ ...config, method: 'POST' })
  }

  delete<T>(config: HYRequestConfig<T>): Promise<T> {
    return this.request<T>({ ...config, method: 'DELETE' })
  }

  patch<T>(config: HYRequestConfig<T>): Promise<T> {
    return this.request<T>({ ...config, method: 'PATCH' })
  }
}

export default HYRequest
- type.ts
import type { AxiosRequestConfig, AxiosResponse } from 'axios'

export interface HYRequestInterceptors<T = AxiosResponse> {
  requestInterceptor?: (config: AxiosRequestConfig) => AxiosRequestConfig
  requestInterceptorCatch?: (error: any) => any
  responseInterceptor?: (res: T) => T
  responseInterceptorCatch?: (error: any) => any
}

export interface HYRequestConfig<T = AxiosResponse> extends AxiosRequestConfig {
  interceptors?: HYRequestInterceptors<T>
  showLoading?: boolean
}
# tsconfig.json
{
  "compilerOptions": {
    // 目标代码(ts -> js(es5/6/7))
    "target": "esnext",
    // 目标代码需要使用的模块化方案(commonjs require/module.exports/es module import/export)
    "module": "esnext",
    // 严格一些严格的检查(any)
    "strict": true,
    // 对jsx进行怎么样的处理
    "jsx": "preserve",
    // 辅助的导入功能
    "importHelpers": true,
    // 按照node的方式去解析模块 import "/index.node"
    "moduleResolution": "node",
    // 跳过一些库的类型检测 (axios -> 类型/ lodash -> @types/lodash / 其他的第三方)
    // import { Person } from 'axios'
    "skipLibCheck": true,
    // export default/module.exports = {}
    // es module 和 commonjs
    "esModuleInterop": true,
    "allowSyntheticDefaultImports": true,
    // 要不要生成映射文件(ts -> js)
    "sourceMap": true,
    // 文件路径在解析时, 基本url
    "baseUrl": ".",
    // 指定具体要解析使用的类型
    "types": ["webpack-env"],
    // 路径解析(类似于webpack alias)
    "paths": {
      "@/*": ["src/*"],
      "components/*": ["src/components/*"]
    },
    // 可以指定在项目中可以使用哪里库的类型(Proxy/Window/Document)
    "lib": ["esnext", "dom", "dom.iterable", "scripthost"]
  },
  "include": [
    "src/**/*.ts",
    "src/**/*.tsx",
    "src/**/*.vue",
    "tests/**/*.ts",
    "tests/**/*.tsx"
  ],
  "exclude": ["node_modules"]
}
# ts+vue3 获取子组件的实例
- 读取子组件的属性内容:
ref<InstanceType<typeof LoginAccount>>(),因为是没赋值,所以调用子组件的方法时accountRef.value?.loginAction()加问号表示不存在时短路
<template>
  <div class="login-panel">
      <template >
        <span>账号登录</span>
        <login-account ref="accountRef" />
      </template>
    <el-button  @click="handleLoginClick"
      >立即登录</el-button
    >
  </div>
</template>
<script lang="ts">
import { defineComponent, ref } from 'vue'
import LoginAccount from './login-account.vue'
export default defineComponent({
  components: {
    LoginAccount
  },
  setup() {
    //InstanceType<typeof LoginAccount> === 获取了LoginAccount的实例
    const accountRef = ref<InstanceType<typeof LoginAccount>>()
    const handleLoginClick = () => {
      accountRef.value?.loginAction()
    }
    return {
      handleLoginClick,
      accountRef
    }
  }
})
</script>
当然也可以应用在elementplus的组件上
const formRef = ref<InstanceType<typeof ElForm>>()

    const loginAction = () => {
      formRef.value?.validate((valid) => {
        if (valid) {
          console.log('真正执行登录逻辑')
        }
      })
    }
# ts+vue3使用vuex
- IRootState接口
export interface IRootState {
  name: string
  age: number,
}
- Vuex
import { createStore } from 'vuex'

import login from './login/login'

import { IRootState } from './types'
// createStore可以传入泛型约束state,那么就更好的控制
const store = createStore<IRootState>({
  state() {
    return {
      name: 'coderwhy',
      age: 18,
      love:'ll'//这边不会报错
    }
  },
  mutations: {
    af(state){
      // console.log(state.love)
      //类型“IRootState”上不存在属性“love”。
    }
  },
  getters: {},
  actions: {},
  modules: {
    login
  }
})

export function setupStore() {
  store.dispatch('login/loadLocalLogin')
}

export default store
- Login.ts
// 引入Module,ts对vuex的支持还是需要更多的人为操作
import { Module } from 'vuex'

import {
  accountLoginRequest,
  requestUserInfoById,
  requestUserMenusByRoleId
} from '@/service/login/login'
import localCache from '@/utils/cache'
import router from '@/router'

import { IAccount } from '@/service/login/type'
import { ILoginState } from './types'
import { IRootState } from '../types'
// 子模块需要支持自己的state和根模块的state
const loginModule: Module<ILoginState, IRootState> = {
  namespaced: true,
  state() {
    return {
      token: '',
      userInfo: {},
      userMenus: []
    }
  },
  getters: {},
  mutations: {
    changeToken(state, token: string) {
      state.token = token
    },
    changeUserInfo(state, userInfo: any) {
      state.userInfo = userInfo
    },
    changeUserMenus(state, userMenus: any) {
      state.userMenus = userMenus
    }
  },
  actions: {
    async accountLoginAction({ commit }, payload: IAccount) {
      // 1.实现登录逻辑
      const loginResult = await accountLoginRequest(payload)
      const { id, token } = loginResult.data
      commit('changeToken', token)
      localCache.setCache('token', token)

      // 2.请求用户信息
      const userInfoResult = await requestUserInfoById(id)
      const userInfo = userInfoResult.data
      commit('changeUserInfo', userInfo)
      localCache.setCache('userInfo', userInfo)

      // 3.请求用户菜单
      const userMenusResult = await requestUserMenusByRoleId(userInfo.role.id)
      const userMenus = userMenusResult.data
      commit('changeUserMenus', userMenus)
      localCache.setCache('userMenus', userMenus)

      // 4.跳到首页
      router.push('/main')
    },
    loadLocalLogin({ commit }) {
      const token = localCache.getCache('token')
      if (token) {
        commit('changeToken', token)
      }
      const userInfo = localCache.getCache('userInfo')
      if (userInfo) {
        commit('changeUserInfo', userInfo)
      }
      const userMenus = localCache.getCache('userMenus')
      if (userMenus) {
        commit('changeUserMenus', userMenus)
      }
    }
  }
}

export default loginModule
# vuex使用useStore的类型检测
- /login/types
export interface ILoginState {
  token: string
  userInfo: any
  userMenus: any
}
- 所有的接口类型交叉之后导出给useStore方法使用
import { ILoginState } from './login/types'

export interface IRootState {
  name: string
  age: number
}

export interface IRootWithModule {
  // 这里可以继续增加其他模块所需要的属性
  login: ILoginState
}
//交叉类型进行处理
export type IStoreType = IRootState & IRootWithModule
import { createStore, Store, useStore as useVuexStore } from 'vuex'

import login from './login/login'

import { IRootState, IStoreType } from './types'

const store = createStore<IRootState>({
  state() {
    return {
      name: 'coderwhy',
      age: 18
    }
  },
  modules: {
    login
  }
})

export function setupStore() {
  store.dispatch('login/loadLocalLogin')
}
//使用自己的useStore
export function useStore(): Store<IStoreType> {
  return useVuexStore()
}
export default store
import { defineComponent, computed } from 'vue'
// 使用自己已经处理过的useStore那样就会增加类型检测了
import { useStore } from '@/store'
 setup() {
    const store = useStore()
    const userMenus = computed(() => store.state.login.userMenus)
    return {
      userMenus
    }
  }
# ts+vue3请求接口的封装
export interface IAccount {
  name: string
  password: string
}

export interface ILoginResult {
  id: number
  name: string
  token: string
}

export interface IDataType<T = any> {
  code: number
  data: T
}
import hyRequest from '../index'

import { IAccount, IDataType, ILoginResult } from './type'

enum LoginAPI {
  AccountLogin = '/login',
  LoginUserInfo = '/users/', // 用法: /users/1
}

export function accountLoginRequest(account: IAccount) {
  //泛型嵌套
  return hyRequest.post<IDataType<ILoginResult>>({
    url: LoginAPI.AccountLogin,
    data: account
  })
}

export function requestUserInfoById(id: number) {
  return hyRequest.get<IDataType>({
    url: LoginAPI.LoginUserInfo + id,
    showLoading: false
  })
}
  //post<IDataType<ILoginResult>>这里的T就是上面get/post后跟的T,就是为了约束返回值data的类型
  post<T>(config: HYRequestConfig<T>): Promise<T> {
    return this.request<T>({ ...config, method: 'POST' })
  }
# ts+vue3 PropType: props增加具体对象数组限制
利用propType,它可以通过泛型进行对父组件传过来的格式进行约束。
import { defineComponent, PropType } from 'vue'
type IFormType = 'input' | 'password' | 'select' | 'datepicker'

export interface IFormItem {
  type: IFormType
  label: string
  rules?: any[]
  placeholder?: any
  // 针对select
  options?: any[]
  // 针对特殊的属性
  otherOptions?: any
}

export default defineComponent({
  props: {
    formItems: {
      type: Array as PropType<IFormItem[]>,
      default: () => []
    }
  },
  setup() {
    return {}
  }
})
# ts+vue3 table封装
export const contentTableConfig = {
  title: '用户列表',
  propList: [
    { prop: 'name', label: '用户名', minWidth: '100' },
    { prop: 'realname', label: '真实姓名', minWidth: '100' },
    { prop: 'cellphone', label: '手机号码', minWidth: '100' },
    { prop: 'enable', label: '状态', minWidth: '100', slotName: 'status' },
    {
      prop: 'createAt',
      label: '创建时间',
      minWidth: '250',
      slotName: 'createAt'
    },
    {
      prop: 'updateAt',
      label: '更新时间',
      minWidth: '250',
      slotName: 'updateAt'
    },
    { label: '操作', minWidth: '120', slotName: 'handler' }
  ],
  showIndexColumn: true,
  showSelectColumn: true
}
<template>
  <div class="hy-table">

    <el-table
      :data="listData"
      border
      style="width: 100%"
      @selection-change="handleSelectionChange"
    >
      <el-table-column
        v-if="showSelectColumn"
        type="selection"
        align="center"
        width="60"
      ></el-table-column>
      <el-table-column
        v-if="showIndexColumn"
        type="index"
        label="序号"
        align="center"
        width="80"
      ></el-table-column>
      <template v-for="propItem in propList" :key="propItem.prop">
        <el-table-column v-bind="propItem" align="center">
          <template #default="scope">
            <slot :name="propItem.slotName" :row="scope.row">
              {{ scope.row[propItem.prop] }}
            </slot>
          </template>
        </el-table-column>
      </template>
    </el-table>
  </div>
</template>

<script lang="ts">
import { defineComponent } from 'vue'

export default defineComponent({
  props: {
    title: {
      type: String,
      default: ''
    },
    listData: {
      type: Array,
      required: true
    },
    propList: {
      type: Array,
      required: true
    },
    showIndexColumn: {
      type: Boolean,
      default: false
    },
    showSelectColumn: {
      type: Boolean,
      default: false
    }
  },
  emits: ['selectionChange'],
  setup(props, { emit }) {
    const handleSelectionChange = (value: any) => {
      emit('selectionChange', value)
    }

    return {
      handleSelectionChange
    }
  }
})
</script>
 <hy-table :listData="dataList" v-bind="contentTableConfig">
      <!--列中的插槽 -->
      <template #status="scope">
        <el-button
          plain
          size="mini"
          :type="scope.row.enable ? 'success' : 'danger'"
        >
          {{ scope.row.enable ? '启用' : '禁用' }}
        </el-button>
      </template>
      <template #createAt="scope">
        <span>{{ $filters.formatTime(scope.row.createAt) }}</span>
      </template>
      <template #updateAt="scope">
        <span>{{ $filters.formatTime(scope.row.updateAt) }}</span>
      </template>
      <template #handler>
        <div class="handle-btns">
          <el-button icon="el-icon-edit" size="mini" type="text"
            >编辑</el-button
          >
          <el-button icon="el-icon-delete" size="mini" type="text"
            >删除</el-button
          >
        </div>
      </template>
    </hy-table>

props: {
	    contentTableConfig: {
	      type: Object,
	      require: true
	    }
},
# ts+vue3 对象表单的双向绑定处理
# 子组件v-model变化通知父组件更新
+ 子组件
<template>
    <el-form :label-width="labelWidth">
			<el-input
			  :placeholder="item.placeholder"
			  v-bind="item.otherOptions"
			  :show-password="item.type === 'password'"
			  v-model="formData[`${item.field}`]"
			/>
    </el-form>
</template>

<script lang="ts">
import { defineComponent, PropType, ref, watch, computed } from 'vue'
export default defineComponent({
  props: {
    modelValue: {
      type: Object,
      required: true
    }
  },
  setup(props, { emit }) {
	//因为是浅拷贝,所以当改到formData.value.key,这里还是可以动态变化
    const formData = ref({ ...props.modelValue })

	  watch(
		  formData,
		  (newValue) => {
			console.log(newValue)
			emit('update:modelValue', newValue)
		  },
		  {
			deep: true
		  }
		)
    return {
      formData
    }
  }
})
</script>
+ 父组件
<div class="page-search">
<hy-form v-bind="searchFormConfig" v-model="formData">
  <template #header>
	<h1 class="header">高级检索</h1>
  </template>
  <template #footer>
	<div class="handle-btns">
	  <el-button icon="el-icon-refresh" @click="handleResetClick"
		>重置</el-button
	  >
	  <el-button type="primary" icon="el-icon-search">搜索</el-button>
	</div>
  </template>
</hy-form>
</div>
const formOriginData: any = {}
for (const item of formItems) {
  formOriginData[item.field] = ''
}
//父组件接收到重置表单的命令,清空原表单的数据
const handleResetClick = () => {
  for (const key in formOriginData) {
	formData.value[`${key}`] = formOriginData[key]
  }
}
- 另一种模式
<!-- 父组件 -->
<template>
  <div class="page-search">
    <hy-form v-bind="searchFormConfig" v-model="formData">
      <template #footer>
        <div class="handle-btns">
          <el-button icon="el-icon-refresh" @click="handleResetClick"
            >重置</el-button
          >
        </div>
      </template>
    </hy-form>
  </div>
</template>

<script lang="ts">
import { defineComponent, ref } from 'vue'
import HyForm from '@/base-ui/form'

export default defineComponent({
  props: {
    searchFormConfig: {
      type: Object,
      reuqired: true
    }
  },
  components: {
    HyForm
  },
  emits: ['resetBtnClick', 'queryBtnClick'],
  setup(props, { emit }) {
    // 双向绑定的属性应该是由配置文件的field来决定
    // 1.优化一: formData中的属性应该动态来决定
    const formItems = props.searchFormConfig?.formItems ?? []
    const formOriginData: any = {}
    for (const item of formItems) {
      formOriginData[item.field] = ''
    }
    const formData = ref(formOriginData)

    // 2.优化二: 当用户点击重置
    const handleResetClick = () => {
      formData.value = formOriginData

    }

    return {
      formData,
      handleResetClick,
      handleQueryClick
    }
  }
})
</script>
- 子组件使用modelValue
<template>
  <div class="hy-form">

    <el-form :label-width="labelWidth">
			<el-input
			  :placeholder="item.placeholder"
			  v-bind="item.otherOptions"
			  :show-password="item.type === 'password'"
			  :model-value="modelValue[`${item.field}`]"
			  @update:modelValue="handleValueChange($event, item.field)"
			/>
    </el-form>

  </div>
</template>

<script lang="ts">
import { defineComponent, PropType } from 'vue'

export default defineComponent({
  props: {
    modelValue: {
      type: Object,
      required: true
    },
  },
  emits: ['update:modelValue'],
  setup(props, { emit }) {
    const handleValueChange = (value: any, field: string) => {
      emit('update:modelValue', { ...props.modelValue, [field]: value })
    }

    return {
      handleValueChange
    }
  }
})
</script>
← 封装elementplus threejs →