# angular-cli
# angular-cli 命令行命令
- ng new
<project-name> 或 ng n <project-name>:创建一个新的Angular项目。 - ng generate
<entity> 或 ng g <entity>:根据模板生成文件。<entity>可以是组件(component)、服务(service)、管道(pipe)、指令(directive)、枚举(enum)、类(class)、接口(interface)等。
#例如:
ng g component my-component:生成名为my-component的组件。
ng g service my-service:生成名为my-service的服务。
- ng build:将Angular应用程序编译到输出目录中(默认为dist/)。
- ng serve:启动一个本地开发服务器,并实时重新编译项目文件。
# angular app.module.ts
在Angular应用中,app.module.ts 是一个重要的文件,它代表了Angular的根模块(Root Module)。在Angular的早期版本中(尤其是Angular 2到Angular 12),AppModule(在app.module.ts中定义)是每个Angular应用的入口点。它负责声明应用的根组件(通常是AppComponent),配置应用的路由(如果使用了Angular Router),并且导入并声明了应用中所需的其他模块和组件。
然而,在Angular的最新版本中(特别是Angular 13及更高版本),引入了新的工作区架构(Workspace Architecture)和单项目架构(Single-Project CLI Layout),这导致了一些变化。
import { NgModule } from '@angular/core';
import { BrowserModule } from '@angular/platform-browser';

import { AppComponent } from './app.component';
// ... 其他组件、指令、服务等的导入

@NgModule({
  declarations: [
    AppComponent,
    // ... 其他需要在此模块中声明的组件、指令等
  ],
  imports: [
    BrowserModule,
    // ... 其他需要在此模块中导入的Angular模块(如RouterModule、FormsModule等)
  ],
  providers: [
    // ... 需要在此模块中提供的服务(可选)
  ],
  bootstrap: [AppComponent]
})
export class AppModule { }
- 导入语句
- import { NgModule } from '@angular/core';:从 @angular/core 导入 NgModule 装饰器,用于声明Angular模块。
- import { BrowserModule } from '@angular/platform-browser';:从 @angular/platform-browser 导入 BrowserModule,它是每个Angular应用都需要导入的模块,它包含了在浏览器中运行Angular应用所需的基本指令和提供者。
- import { AppComponent } from './app.component';:从当前目录下的 app.component.ts 文件导入 AppComponent,这是应用的根组件。
- @NgModule 装饰器
- @NgModule 装饰器用于定义Angular模块的属性。
- declarations:一个数组,包含该模块中声明的视图类(如组件、指令和管道)。这些类在模板中可用。
- imports:一个数组,包含该模块需要的其他模块。例如,如果你使用路由,你需要导入 RouterModule。
- providers:一个数组,包含由该模块的提供者(例如服务)组成的令牌,它们会被添加到应用的全局提供者中,可以在应用中的任何地方访问。
- bootstrap:指定应用启动时应该加载和启动的根组件。对于大多数应用,这通常是 AppComponent。
- @NgModule 装饰器用于定义Angular模块的属性。
- AppModule 类
- AppModule 类本身通常是空的,因为它只是一个容器,用于包含 @NgModule 装饰器中的元数据。然而,你可以在这个类中添加逻辑,但这并不常见,除非你有特定的需求。
总的来说,ApplicationConfig 是 Angular 应用程序的新配置中心,取代了旧版本中的 AppModule。它提供了一个更加模块化和可扩展的方式来配置应用程序的各个部分。
import { ApplicationConfig } from '@angular/core';
import { provideRouter, RouterModule, Routes } from '@angular/router';
import { provideHttpClient } from '@angular/common/http';
import { provideStore, provideState } from '@ngrx/store';
import { MyStateModule } from './my-state.module';

const routes: Routes = [
  { path: '', component: HomeComponent },
  { path: 'about', component: AboutComponent },
  // 其他路由配置
];

export const appConfig: ApplicationConfig = {
  providers: [
    provideRouter(routes),
    provideHttpClient(),
    provideStore(),
    provideState(MyStateModule)
  ]
};
# angular.json
- 静态文件访问:在这里配置后可以,其他资源都会重定向到可能的页面
"assets": [
    "src/favicon.ico",
    "src/assets"// 静态资源静态页面通常放在这里
],
- 配置script :这样配置当打包的时候,会单独生成一个scripts的文件
    "build": {
          "options": {
            "scripts": ["node_modules/xxx/xxx.js"]
          },
          "defaultConfiguration": "production"
        },
# ts.config.json
/* To learn more about this file see: https://angular.io/config/tsconfig. */
{
"extends": "./tsconfig.json",
"compilerOptions": {
"outDir": "./out-tsc/app",
"types": ["jquery"]
},
"files": [
"src/main.ts"
],
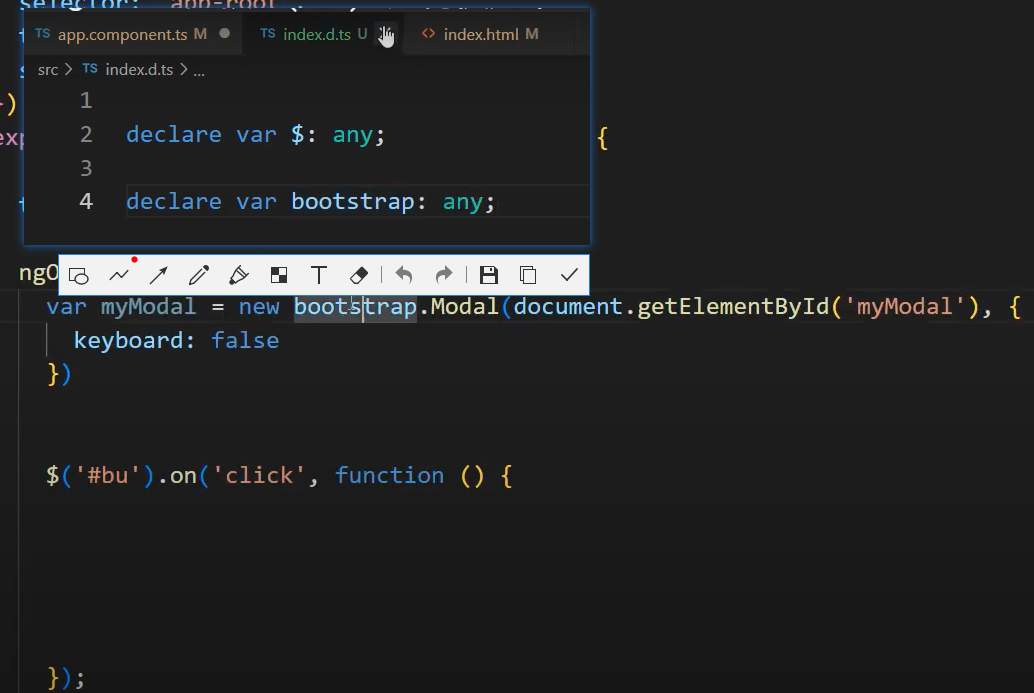
// 告诉程序在src下的所有的.d.ts都会被受用,这样定义在这里全局宣告,就可以让文件中能明白这里的declare
"include": [
"src/**/*.d.ts"
]
}
方案1 :
方案2:去ts官网下载对应的type,然后在compilerOptions进行配置