# angular
# @Component
@Component({
  selector: 'app-component-overview',
  // 或者template
  templateUrl: './component-overview.component.html',
  // 或者styles
  styleUrls: ['./component-overview.component.css']
})
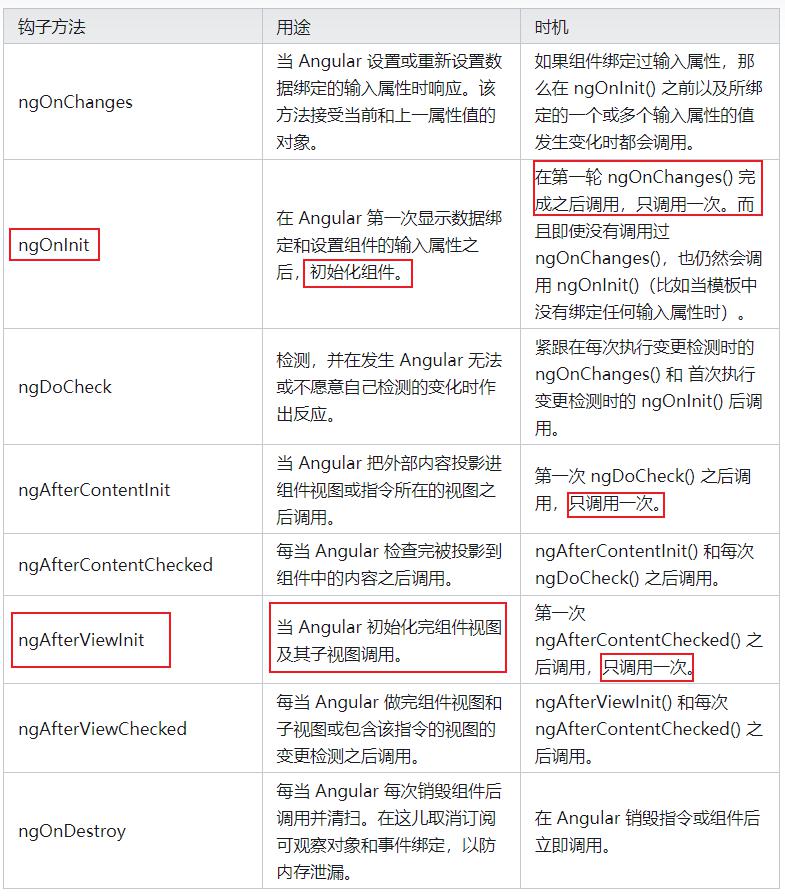
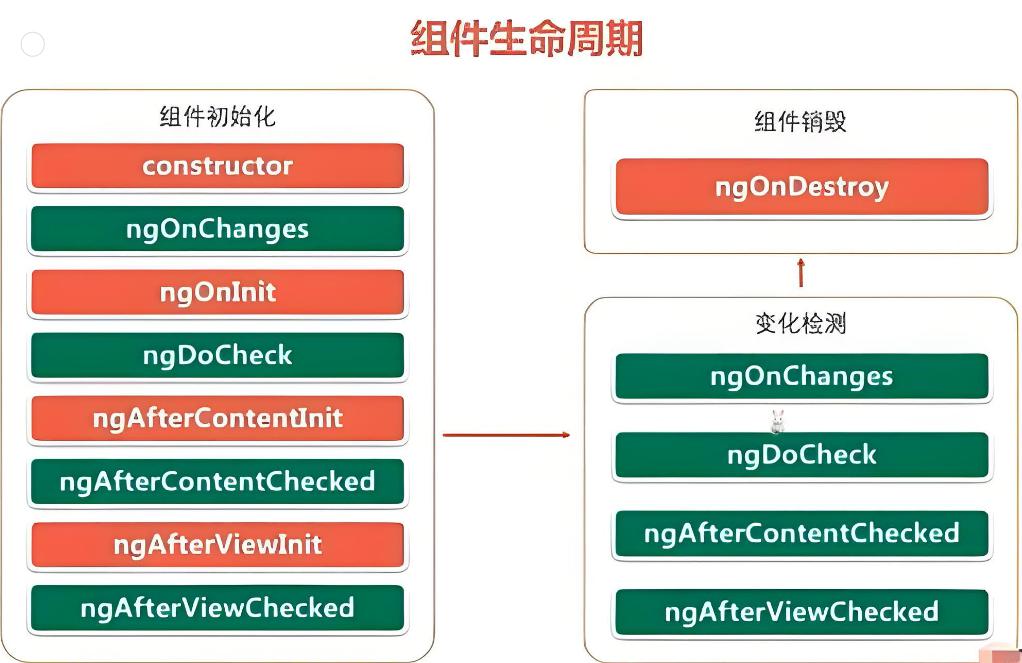
# angular的生命周期
export class MarketMaterialComponent implements OnInit, AfterViewInit {
	  ngAfterViewInit() {
	  }
	  ngOnInit() {
	  }
}
# ngOnDestroy
这里是释放资源的地方,这些资源不会自动被垃圾回收。如果不这样做,就存在内存泄漏的风险。
- 取消订阅可观察对象和 DOM 事件。
- 停止 interval 计时器。
- 反注册该指令在全局或应用服务中注册过的所有回调。
- ngOnDestroy() 方法也可以用来通知应用程序的其它部分,该组件即将消失。
除了 ngOnDestroy() 之外,还可以注入 Angular 的 DestroyRef,并向它注册将在闭包上下文被销毁时调用的回调函数。这在构建需要清理的可复用实用工具时很有用。
@Component(...)
class Counter {
  count = 0;
  constructor() {
		// Start a timer to increment the counter every second.
		const id = setInterval(() => this.count++, 1000);

		// Stop the timer when the component is destroyed.
		const destroyRef = inject(DestroyRef);
		destroyRef.onDestroy(() => clearInterval(id));
	}
}
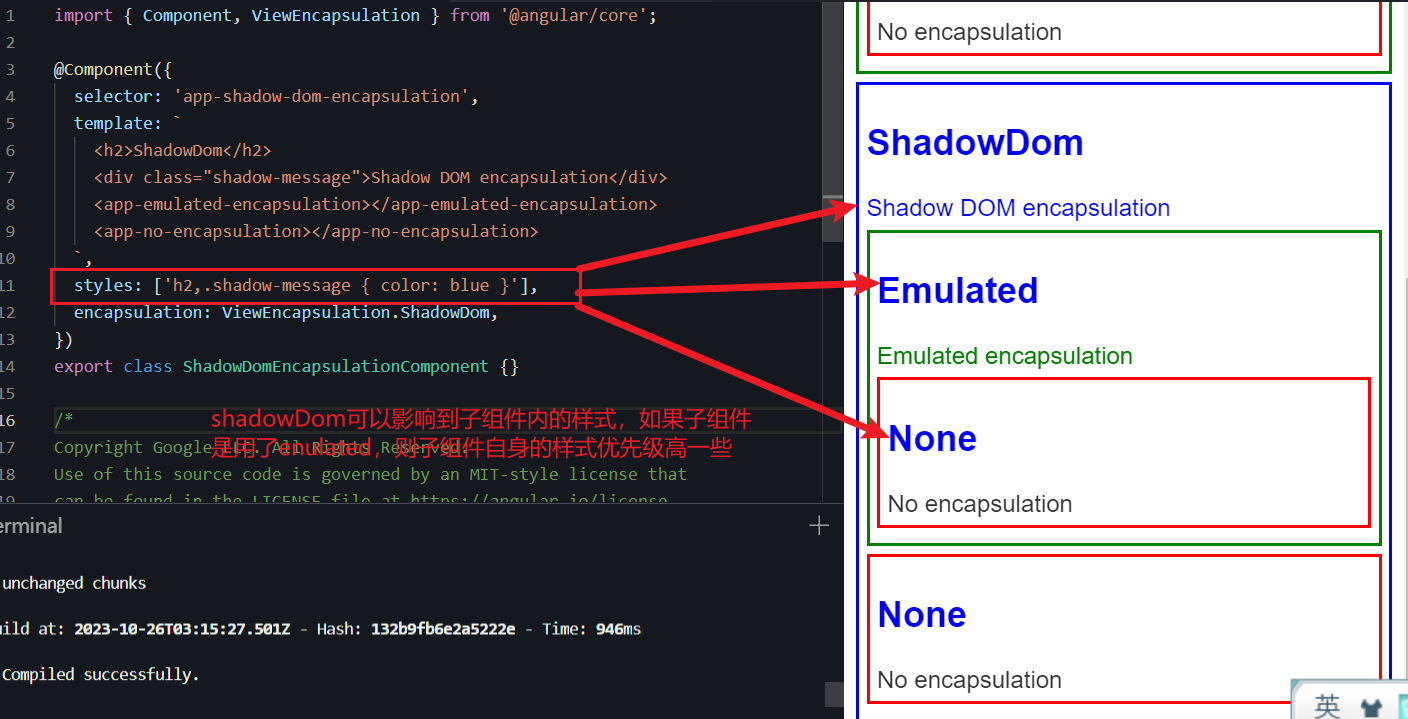
# angular 视图封装
| 模式 | 详情 |
|---|---|
| ViewEncapsulation.Emulated | 组件的样式会添加到文档的 <head> 中,使它们在整个应用程序中可用,但它们的选择器只会影响它们各自组件模板中的元素。(只影响组件自身样式,不管子组件) |
| ViewEncapsulation.None | 组件的样式会添加到文档的 <head> 中,使它们在整个应用程序中可用,因此是完全全局的,会影响文档中的任何匹配元素。 |
| ViewEncapsulation.ShadowDom | 组件样式仅添加到 shadow DOM 宿主中,确保它们仅影响各自组件视图中的元素。(如果子组件设置了Emulated |
# angular组件间交互

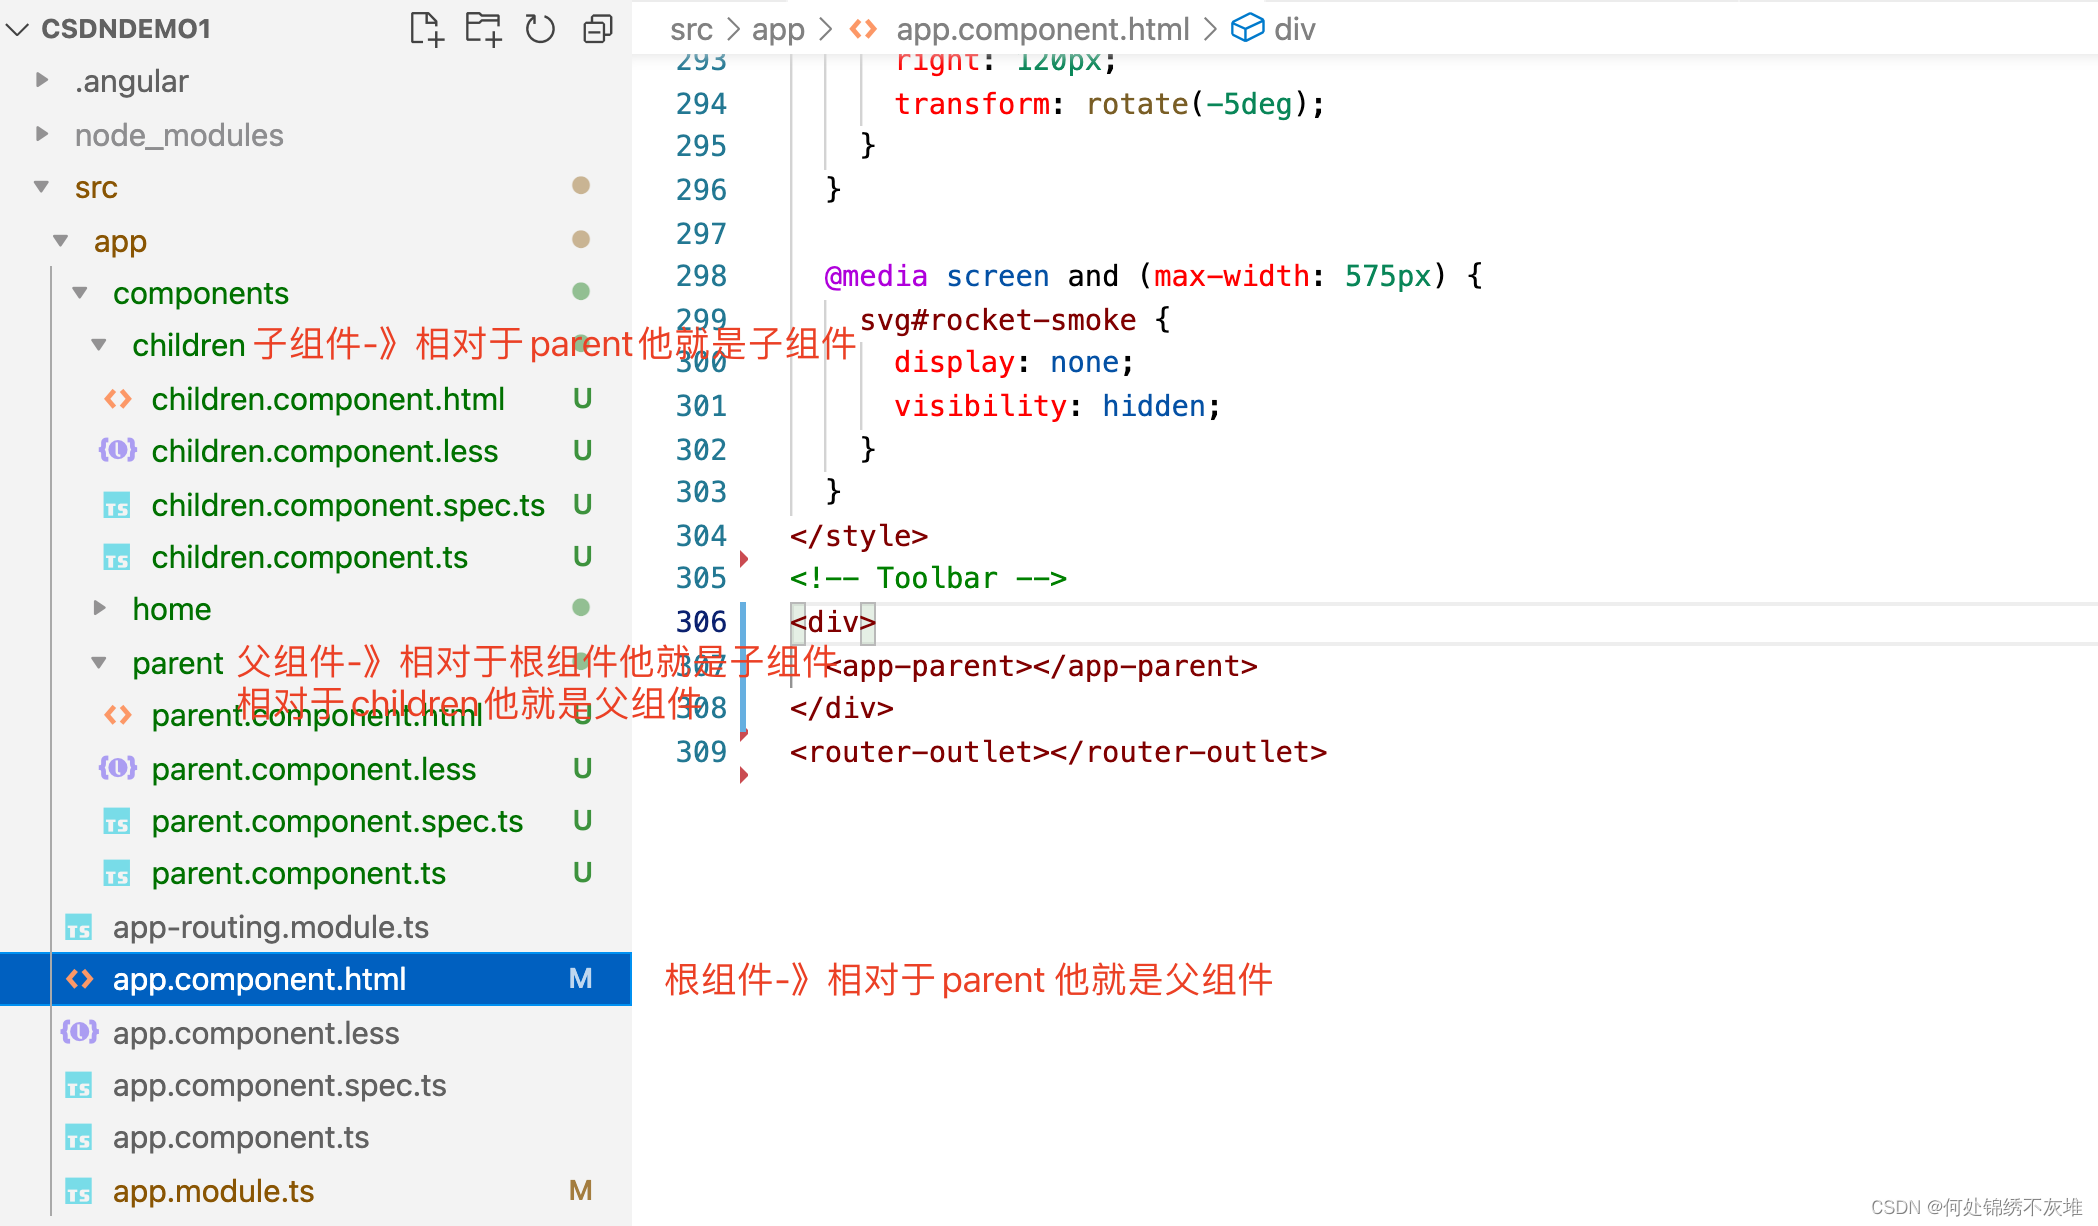
ng g component xxx/xxx/...
当前的结构是app引入了parent、parent引入了children
# NgModule
按需求可能也需要手动去配置,如xxx.module.ts中
declarations、imports、providers和exports是NgModule(模块)装饰器中的关键配置项,用于定义和配置Angular应用的模块。
- declarations(声明):
declarations 数组中列出了当前模块中所有属于这个模块的组件、指令和管道。 所有在 declarations 中列出的组件、指令和管道都可以在当前模块中的任何组件模板中使用。 Angular只会创建和管理在 declarations 中声明的组件、指令和管道。
import { NgModule } from '@angular/core';
import { MyComponent } from './my-component';
import { MyDirective } from './my-directive';
import { MyPipe } from './my-pipe';

@NgModule({
  declarations: [MyComponent, MyDirective, MyPipe],
  // ...
})
export class MyModule { }
- imports(导入):
imports 数组中列出了当前模块所依赖的其他模块。通过 imports,你可以在当前模块中使用其他模块中声明的组件、指令和服务。
Angular模块之间的依赖关系是通过 imports 来建立的。
import { NgModule } from '@angular/core';
import { CommonModule } from '@angular/common'; // 导入CommonModule

@NgModule({
  imports: [CommonModule], // 导入CommonModule
  // ...
})
export class MyModule { }
- providers(提供者):
providers 数组中列出了当前模块提供的服务。服务是用来共享数据或功能的,providers 声明了哪些服务在当前模块中是可用的。
当在 providers 中列出的服务被注入到组件或其他服务中时,它们会被创建或共享。
import { NgModule } from '@angular/core';
import { MyService } from './my-service';

@NgModule({
  providers: [MyService], // 提供MyService服务
  // ...
})
export class MyModule { }
- exports(导出):
exports 数组中列出了当前模块中声明的组件、指令和管道,这些组件、指令和管道可以被其他模块导入并使用。
通常,exports 用于共享模块中的一些可重用的组件、指令或管道,使它们在其他模块中可用。
import { NgModule } from '@angular/core';
import { MyComponent } from './my-component';
@NgModule({
  declarations: [MyComponent],
  exports: [MyComponent], // 导出MyComponent组件
  // ...
})
export class MyModule { }
# 父组件传值(也可以是函数)给子组件
DANGER
子组件调用父组件的方法,注意里的this指向,parentFun里的操作的this仍然是指向子组件的。
/在父组件中
 parentFun(value:boolean){
	这个this仍然指向子组件,不可以这样操作
    // this.hasSelectTenant = value
    // console.warn(this.hasSelectTenant)
  }
- 第一步:在parent组件的ts文件中 声明一个变量 【parent.component.ts】
import { Component, OnInit } from '@angular/core';

@Component({
  selector: 'app-parent',
  templateUrl: './parent.component.html',
  styleUrls: ['./parent.component.less']
})
export class ParentComponent implements OnInit {
  //声明一个需要传递给子组件的变量
  public msg: string = "我是parent组件传递过来的msg"
  constructor() { }
  ngOnInit(): void {
  }
  //声明一个需要传递给子组件的函数
  parentRun(){
    console.log("this is function of parent")
  }

}
- 第二步:在父组件的html视图层文件中引入子组件 【parent.component.html】
<p>我是父组件</p>
<!-- 引入子组件 -->
<!-- 这里的写法是 [msg] 是我们需要发送的变量,这里的名字可以自己定义,后面"msg"是我们ts文件中定义的变量 -->
<!-- 这里需要注意的是,我们传递给子组件函数的时候不可以加(),因为加上以后代表函数的执行 -->
<app-children [msg]="msg" [parentRun]="parentRun"></app-children>
- 第三步:在子组件中的ts文件中使用@Input进行接收父组件的值 【children.component.ts】
//这里我们需要引入angular核心模块中的Input模块进行接收父组件的变量值
import { Component, OnInit,Input } from '@angular/core';

@Component({
  selector: 'app-children',
  templateUrl: './children.component.html',
  styleUrls: ['./children.component.less']
})
export class ChildrenComponent implements OnInit {
  //使用@Input装饰器进行接收父组件的变量值
  @Input() msg:any
  //使用@Input装饰器接收父组件的函数
  @Input() parentRun:any
  constructor() { }

  ngOnInit(): void {
  }
  /**
   * @function run 子组件本地函数
   */
  run(){
    //通过this进行执行父组件的函数
    this.parentRun()
  }

}
- 第四步:在子组件的视图层文件中进行变量值的获取 【children.component.html】
<!-- 直接使用{{}}进行变量值的获取,这里的写法和vue的基本是一致的 -->
<p>{{msg}}</p>
<!-- 这里和vue的区别在于,vue调用函数是需要@click,angular需要的是(click) 只是语法上的区别,执行过程是一致的 -->
<button (click)="run()">
    执行parentRun
</button>
# 子组件传值(函数)给父组件
- 通过viewchild进行节点获取
第一步:在父组件引入子组件的地方添加节点值 【parent.component.html】
<!-- 这里给子组件起一个节点名字,为后续父组件获取该节点的值提供名字 -->
<app-children #childrenNode></app-children>
<button (click)="passfun()"> 执行子组件的childfunc方法</button>
第二步:在子组件中声明一些需要传递的变量 【children.component.ts】
//这里我们需要引入angular核心模块中的Input模块进行接收父组件的变量值
import { Component, OnInit,Input } from '@angular/core';
......
export class ChildrenComponent implements OnInit {
  public childmsg:any = "我是子组件中即将被父组件进行获取的变量"
  childfunc(){
    console.log("我是子组件的函数")
  }
  /**
   * @function run 子组件本地函数
   */
  run(){
    this.home.parentRun()
    console.log("this is run")
  }
}
第三步:在父组件的ts文件中引入viewchild模块 【parent.component.ts】
// 引入angular核心模块的viewchild模块
import { Component, OnInit,ViewChild } from '@angular/core';
......
export class ParentComponent implements OnInit {
//使用viewchild装饰器进行节点值的获取
  @ViewChild('childrenNode') children:any
  parentRun(){
  //通过viewchild进行子组件数据的获取
    console.log(this.children)
    console.log(this.children.childmsg)
  }
  //父组件执行子组件的函数
  passfun(){
    this.children.childfunc()
  }
}
- 方案二:通过@Output触发父组件的方法
这个方式就是同归广播的方式进行触发函数,将子组件中的数据主动传递到父组件中去
//这里需要引入angular核心模块中的Input模块进行接收父组件的变量值
import { Component, OnInit,Input,Output,EventEmitter } from '@angular/core';

@Component({
  selector: 'app-children',
  templateUrl: './children.component.html',
  styleUrls: ['./children.component.less']
})
export class ChildrenComponent implements OnInit {
  constructor() { }
  //通过Output进行子组件给父组件传递数据 childOut 是自己随意起的名字
  @Output() public childOut = new EventEmitter()
  ngOnInit(): void {
  }
  //声明一个使用output方式传递数据的函数
  passOutput(){
    this.childOut.emit("我是子组件的output方法")
  }
}
<!-- 子组件添加出发事件 -->
<button (click)="passOutput()">
    passOutput
</button>
<!-- 父组件引用子组件 -->
<!-- (childOut) 就是子组件中自己起的名字,不可更改,$event非必写,这里就是子组件传递的数据,但是写的话只能写$event-->
<app-children (childOut)="parentInput($event)"></app-children>
// 父组件
export class ParentComponent implements OnInit {
  //通过output进行子组件数据的获取
  parentInput(e:any){
    console.log("执行了....")
    console.log(e)
  }
}
# angular跨层级数据交互
在 Angular 中,可以利用 RxJS Subject 来实现组件间通信,具体示例如下:
message.service.ts
import { Injectable } from '@angular/core';
import { Observable, Subject } from 'rxjs';

export enum EmitType{
    // 无
    None,
    // 左侧目录更新
    LeftMenu
}

export interface IEmitMessageParams{
    type:EmitType, // 类型
    from:string, // 来自哪个文件,主要定位异常的触发
    message?:any, //发送信息
}

@Injectable({
  providedIn: 'root'
})
export class EmitMessage {
  private subject = new Subject<any>();

  sendMessage(message: IEmitMessageParams) {
    this.subject.next(message);
  }

  clearMessage() {
    this.subject.next();
  }

  getMessage(): Observable<any> {
    return this.subject.asObservable();
  }
}
component1.ts
import { Component } from '@angular/core';

import { MessageService } from '../message.service';

@Component({
  selector: 'app-home',
  template: `
    <div>
      <h1>Home</h1>
      <button (click)="sendMessage()">Send Message</button>
      <button (click)="clearMessage()">Clear Message</button>
    </div>

  `
})

export class HomeComponent {
  constructor(private messageService: MessageService) { }

  sendMessage(): void { // 发送消息
	this.emitMessage.sendMessage({
	  type: EmitType.LeftMenu,
	  from: 'data-set'
	})
  }

  clearMessage(): void { // 清除消息
    this.messageService.clearMessage();
  }
}
component2.ts
import { Component, OnDestroy } from '@angular/core';
import { Subscription } from 'rxjs';

import { MessageService } from './message.service';

@Component({
  selector: 'my-app',
  template: `
      <div *ngIf="message">{{message.text}}</div>
      <app-home></app-home>
    `
})

export class AppComponent implements OnDestroy {
  message: any;
  subscription: Subscription;

  constructor(private messageService: MessageService) {
     // 监听是否需要更新
     this.subscription = this.emitMessage.getMessage().subscribe((message:IEmitMessageParams) => {
       if(message?.type === EmitType.LeftMenu){
         this.menuData = []
         this.getMenuData(false)
       }
     });
  }

  ngOnDestroy() {
    this.subscription.unsubscribe();
  }
}
import { NgModule } from '@angular/core';
import { MessageService } from './message.service';
@NgModule({
  ......
  providers: [MessageService]
})
export class AppModule { }
# rxjs
Subject 其实是观察者模式的实现,所以当观察者订阅 Subject 对象时,Subject 对象会把订阅者添加到观察者列表中,每当有 subject 对象接收到新值时,它就会遍历观察者列表,依次调用观察者内部的 next() 方法,把值一一送出。
Subject 之所以具有 Observable 中的所有方法,是因为 Subject 类继承了 Observable 类,在 Subject 类中有五个重要的方法:
- next —— 每当 Subject 对象接收到新值的时候,next 方法会被调用。
- error —— 运行中出现异常,error 方法会被调用。
- complete —— Subject 订阅的 Observable 对象结束后,complete 方法会被调用。
- subscribe —— 添加观察者。
- unsubscribe —— 取消订阅(设置终止标识符、清空观察者列表)。
除了 Subject 之外,RxJS 还为提供了 Subject 的几种变体,如 BehaviorSubject、ReplaySubject 和 AsyncSubject。