# vue.sync
.sync 相当于对一个props进行双向绑定,也是一个语法糖
<!--语法糖.sync,vue3不支持这种语法了-->
<my-component :value.sync="msg" />
<!--编译后的写法,这种写法可以继续在vue3中使用,相当于v-model:value-->
<my-component
  :value="msg"
  @update:value="(val) => msg = val"
/>
# 案例
<!DOCTYPE html>
<html lang="en">

<head>
    <meta charset="UTF-8">
    <title>vue-03</title>
    <!-- 引入Vue -->
    <link href="https://cdn.bootcss.com/bootstrap/4.1.1/css/bootstrap.min.css" rel="stylesheet">
    <script src="https://cdn.bootcss.com/vue/2.5.16/vue.js"></script>
</head>

<body>

    <div class="container" style="margin-top: 12px;">
        <div id="demo" class="row">
            {{ say }}
            <br />
            <my-input :value.sync="say"></my-input>
        </div>
    </div>


    <script>
        new Vue({
            el: '#demo',
            data: {
                say: "123"
            },
            components: {
                "my-input": {
                    props: ['value'],
                    template: "<div><input v-bind:value='value' v-on:input='change1' />{{value}}</div>",
                    watch: {
                        value: function(newValue, oldValue) {
                            console.log('子组件value新旧值' + newValue + '/' + oldValue);
                        }

                    },
                    methods: {
                        change1: function(e) {
                            var v = e.target.value
                            this.$emit('update:value', v)
                        },

                    }
                }
            },
            watch: {
                say: function(n, o) {
                   console.log('父组件新旧值' + n + '-' + o)
                }
            },
        })
    </script>
</body>
props的.sync在vue3中被移除
替代方案:
<ChildComponent v-model:title="pageTitle" />

<!-- 是以下的简写: -->

<ChildComponent :title="pageTitle" @update:title="pageTitle = $event" />
+ v-model:show="valueChild" => show作为props传给子组件
+ 子组件调用update:show=>this.$emit('update:show', false); 通知父组件
+ 父组件直接valueChild = 传递过来的值;修改了show的值,子组件进行响应的变化
- 父组件
<template>
	<div>
		 <Children1  v-model:show="valueChild" style="padding: 30px 20px 30px 5px;border:1px solid #ddd;margin-bottom: 10px;"/>
		  <button @click="changeValue">toggle</button>
	</div>
</template>

<script>
	import { ref } from 'vue'
	import Children1 from './com/Children1.vue'
	export default {
		data(){
		        return{
		            valueChild:true,
		        }
		    },
		    methods:{
		        changeValue(){
		            this.valueChild = !this.valueChild
		        }
		    },
		components:{
			Children1
		},


	}
</script>
- 子组件
<template>
	<div v-if="show">
		<p>默认初始值是{{show}},所以是显示的</p>
		<button @click.stop="closeDiv">关闭</button>
	 </div>
</template>

<script>
export default{
	props:['show'],
	  methods: {
		closeDiv() {
		  this.$emit('update:show', false); //触发 input 事件,并传入新值
		}
	  }
}
</script>
# v-model
# v-model的修饰符
修饰符 lazy, number, trim
v-model其实只是语法糖,在input标签内写上v-model后,实际上在vue内会编译为:
<!--v-model写法-->
<input type="text" v-model="value">
<!--编译后的写法-->
<input type="text"
  :value="value"
  @input="value = $event.target.value"
>
问题来了,如果这个input是个组件(暂且叫input-component吧),想在父组件中使用input-component这个组件,我们能直接使用v-model进行双向绑定吗?
答案是:很遗憾,不能,因为v-model只是一个语法糖,他的原本写法上面已经提过,绑定value值,监听input事件,通过event拿到value并赋值给value。
那么要怎么做才能在组件上使用v-model呢? 很简单,当input-component触发input事件时,让他发布一个input事件,并带上$event.target.value,在父组件上,我们用v-model监听这个input事件,就能实现了
this.$emit('input',e.target.value)触发input事件怎么理解
<!--子组件-->
<input type="text"
  :value="value"
  @input="$emit('input', $event.target.value);"
>
<!--父组件-->
<input-component v-model="value">
<!DOCTYPE html>
<html lang="en">

<head>
    <meta charset="UTF-8">
    <title>vue-10</title>
    <!-- 引入Vue -->
    <link href="https://cdn.bootcss.com/bootstrap/4.1.1/css/bootstrap.min.css" rel="stylesheet">
    <script src="https://cdn.bootcss.com/vue/2.5.16/vue.js"></script>
</head>

<body>

    <div class="container" style="margin-top: 12px;">
        <div id="demo" class="row">
            {{ say }}
            <br />
            <my-input v-model="say"></my-input>
        </div>
    </div>


    <script>
        new Vue({
            el: '#demo',
            data: {
                say: "123"
            },
            components: {
                "my-input": {
                    props: ['value'],
                    template: "<div><input v-bind:value='value' v-on:input='change' />{{value}}</div>",
                    watch: {
                        value: function(newValue, oldValue) {
                             console.log('子组件value新旧值' + newValue + '/' + oldValue);
                        }

                    },
                    methods: {
                        change: function(e) {
                            this.$emit('input', e.target.value)
                        }
                    }
                }
            }
        })
    </script>
</body>
# v-model 自定义组件checkbox使用方法
- 子组件T1, 定义一个model用来接受属性和调用的方法
<template>
	<div>
		<input type="checkbox" :checked='checked' @change="changeval">
	</div>

</template>
<script>
	export default {
		props:{
			checked:Boolean
		},
		model:{
			prop:'checked',
			event:'change'
		},
		methods:{
			changeval(e){
				console.log(e.target.checked)
				this.$emit('change',e.target.checked)
			}
		}
	}
</script>
<style>

</style>
- 父组件
<template>
  <div class="home">
	<T1 v-model='checked'/>
	{{checked}}
  </div>
</template>

<script>
import T1 from '@/components/T1.vue'

export default {
  name: 'Home',
  components: {
	T1
  },
  data(){
	  return {
		  checked:false
	  }
  }
}
</script>
# vue3 v-model的改变
<!-- input上使用v-model -->
<input v-model="message">
<!-- 等价于 -->
<input :value="message" @input="message = $event.target.value">
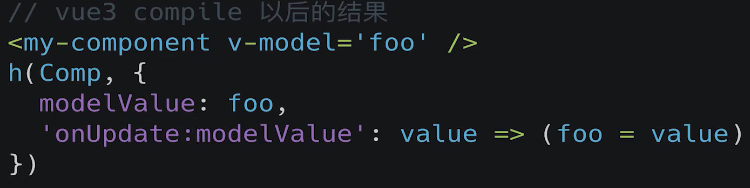
<!-- 组件上使用v-model -->
<hy-input v-model="message"></hy-input>
<!-- 等价于 -->
<hy-input :modelValue="message" @update:model-value="message = $event"></hy-input>
依然希望在组件内部按照双向绑定的做法去完成,应该如何操作呢?可以使用计算属性的setter和getter来完成。
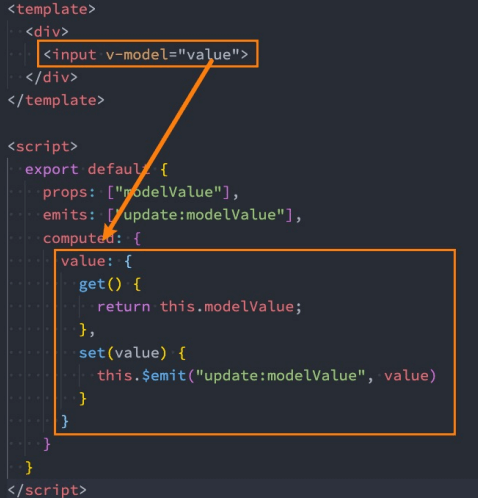
<template>
  <div class="validate-input-container pb-3">
    <input
      v-model="inputRef.val"
      v-bind="$attrs"
    >
  </div>
</template>
<script lang="ts">
import { defineComponent, reactive, PropType, computed } from 'vue'

export default defineComponent({
  props: {
    modelValue: String,
  },
  setup(props, context) {
    const inputRef = reactive({
      val: computed({
        get: () => props.modelValue || '',
        set: val => {
          context.emit('update:modelValue', val)
        }
      }),
    })
    return {
      inputRef
    }
  }
})
</script>
v-model 可以使用在双向绑定的场景,此时,v-model的用法有限制
- 传递给子组件props名字固定为modelValue,更新值得事件需要$emit发送'update:modelValue'
- 如果不想使用modelValue,需要改成v-model:xx='ss',props=>xx ,发送事件为update:xx
<!DOCTYPE html>
<html lang="en">
<head>
  <meta charset="UTF-8">
  <meta name="viewport" content="width=device-width, initial-scale=1.0">
  <title>lesson 18</title>
  <script src="https://unpkg.com/vue@next"></script>
</head>
<body>
  <div id="root"></div>
</body>
<script>
  const app = Vue.createApp({
    data() {
      return { count: 1 }
    },
    template: `
      <counter v-model="count" />
    `
  });

  app.component('counter', {
    props: ['modelValue'],
    methods: {
      handleClick() {
        this.$emit('update:modelValue', this.modelValue + 3);
      }
    },
    template: `
      <div @click="handleClick">{{modelValue}}</div>
    `
  });

  const vm = app.mount('#root');
</script>
</html>
自定义插件如果需要监听多个数据的变动,可以同时绑定多个v-model,需要自主命名来区分. v-model:app1 ,v-model:app2,同时还可以添加自定义修饰符
<!DOCTYPE html>
<html lang="en">
<head>
  <meta charset="UTF-8">
  <meta name="viewport" content="width=device-width, initial-scale=1.0">
  <title>lesson 19</title>
  <script src="https://unpkg.com/vue@next"></script>
</head>
<body>
  <div id="root"></div>
</body>
<script>
  const app = Vue.createApp({
    data() {
      return {
        count: 'a',
      }
    },
    template: `
      <counter v-model.uppercase="count" />
    `
  });

  app.component('counter', {
    props: {
      'modelValue': String,
      'modelModifiers': {
        default: ()=> ({})
      }
	  //modelModifiers固定写法
    },
    methods: {
      handleClick() {
        let newValue = this.modelValue + 'b';
        if(this.modelModifiers.uppercase) {
          newValue = newValue.toUpperCase();
        }
        this.$emit('update:modelValue', newValue);
      },
    },
    template: `
      <div @click="handleClick">{{modelValue}}</div>
    `
  });

  const vm = app.mount('#root');
</script>
</html>
# vue3 v-model自定义修饰符
当我们学习表单输入绑定时,我们看到 v-model 有内置修饰符——.trim、.number 和 .lazy。但是,在某些情况下,你可能还需要添加自己的自定义修饰符。
让我们创建一个示例自定义修饰符 capitalize,它将 v-model 绑定提供的字符串的第一个字母大写。
添加到组件 v-model 的修饰符将通过 modelModifiers prop 提供给组件。在下面的示例中,我们创建了一个组件,其中包含默认为空对象的 modelModifiers prop。
请注意,当组件的 created 生命周期钩子触发时,modelModifiers prop 会包含 capitalize,且其值为 true——因为 capitalize 被设置在了写为 v-model.capitalize="myText" 的 v-model 绑定上。
<my-component v-model.capitalize="myText"></my-component>
app.component('my-component', {
  props: {
    modelValue: String,
    modelModifiers: {
      default: () => ({xxx:false||true})//
	  //比如在父组件v-model如果没有定义这个自定义修饰符,可以在这里使用默认值。根据实际情况去设置
	  // v-model.capitalize =>v-model 那就取这里的默认值了
    }
  },
  emits: ['update:modelValue'],
  template: `
    <input type="text"
      :value="modelValue"
      @input="$emit('update:modelValue', $event.target.value)">
  `,
  created() {
    console.log(this.modelModifiers) // { capitalize: true }
  }
})
现在我们已经设置了 prop,我们可以检查 modelModifiers 对象键并编写一个处理器来更改发出的值。在下面的代码中,每当 <input/> 元素触发 input 事件时,我们都将字符串大写。
<div id="app">
  <my-component v-model.capitalize="myText"></my-component>
  {{ myText }}
</div>
const app = Vue.createApp({
  data() {
    return {
      myText: ''
    }
  }
})

app.component('my-component', {
  props: {
    modelValue: String,
    modelModifiers: {
      default: () => ({})
    }
  },
  emits: ['update:modelValue'],
  methods: {
    emitValue(e) {
      let value = e.target.value
      if (this.modelModifiers.capitalize) {
        value = value.charAt(0).toUpperCase() + value.slice(1)
      }
      this.$emit('update:modelValue', value)
    }
  },
  template: `<input
    type="text"
    :value="modelValue"
    @input="emitValue">`
})

app.mount('#app')
对于带参数的 v-model 绑定,生成的 prop 名称将为 arg + "Modifiers":
<my-component v-model:description.capitalize="myText"></my-component>
app.component('my-component', {
  props: ['description', 'descriptionModifiers'],
  emits: ['update:description'],
  template: `
    <input type="text"
      :value="description"
      @input="$emit('update:description', $event.target.value)">
  `,
  created() {
    console.log(this.descriptionModifiers) // { capitalize: true }
  }
})
# vue2和vue3的v-model的总结
- 2.x 中 v-model 语法糖底层使用的是 :value 和 emit(‘input’), 绑定属性值是 value
- 3.0 中可以绑定一个自定义值,支持统一组件绑定多个 v-model,v-model:firstName=“firstName”, :value=“firstName” 和 @input="$emit(‘update:firstName’, $event.target.value)" 添加自定义修饰符 v-model.capitalize
- app.vue
<template>
  <div id="app">
    <h1>Vue3中v-model的变化</h1>
    <input type="text" v-model="name"/>
    <p>{{ name }}</p>
    <!-- Vue2的写法 -->
    <!-- v-model实际上就是:value和@input的语法糖 -->
    <!-- 双向绑定多个属性的时候可以使用.sync关键字 -->
    <CustomInput v-model="age" :name.sync="name"/>
    <!-- Vue3的写法 -->
    <CustomInput v-model:age="age" v-model:name="name"/>
  </div>
</template>

<script>
import CustomInput from "../components/CustomInput.vue";
export default {
  name: "App",
  components: {
  	CustomInput
  },
	data() {
    return {
    	name: "你好",
      age: 20,
    }
  },
}
</script>
- CustomInput.vue
<template>
  <div class="custom-input">
    <h1>自定义的input</h1>
    <!-- Vue2的写法 -->
    <input type="text" :value="value" @input="onInput" />
    <input type="text" :value="name" @input="onNameInput" />
    <!-- Vue3的写法 -->
    <input type="text" :value="age" @input="onInput" />
    <input type="text" :value="name" @input="onNameInput" />
  </div>
</template>

<script>
import CustomInput from "../components/CustomInput.vue";
export default {
  // Vue2的写法
  props: ["value", "name"],
  // Vue3的写法,直接接收绑定的参数
  props: ["age", "name"],
  // Vue3双向绑定单个属性时,可以使用modelValue来接收参数并更新,对应的触发事件为update:modelValue
  props: ["modelValue"],
  methods: {
  	onInput(e) {
      // Vue2的写法
      // 触发的事件只能是input
      // e.target.value是字符串需要转换成数字
    	this.$emit("input", parseInt(e.target.value));
      // Vue3的写法
      this.$emit("update:age", e.target.value);
    },
    onNameInput(e) {
      // 只能用update
    	this.$emit("update:name", e.target.value);
    },
  },
}
</script>
# 2022年4月27日整理(vue2)
- v-model是语法糖,
可以用在自定义组件中,会被解析为value和@input事件 - 如果子组件中完全没用到input,select,textarea,checkbox也是可以用v-model,如例myinput.vue
- 默认子组件接受value,触发事件input,但是可以通过子组件中的
model修改props中的名字和事件触发的名字,如myinput2.vue - (如果不是用model,那么参数仍然是value,触发条件仍然是input事件)
- 注意checkbox修改的值是
e.target.checked,不是e.target.value
<template>
	<div>
		<input type="text" v-model='t1'/>
		<myinput type="text" v-model='t2'/>
		t2:{{t2}}
		<br>
		<myinput1 v-model='t3' />
		t3:{{t3}}
		<br>
		<myinput2 v-model='t4'/>
		t4:{{t4}}
	</div>
</template>

<script>
	import myinput from './myinput.vue'
	import myinput1 from './myinput1.vue'
	import myinput2 from './myinput2.vue'
	export default{
		data(){
			return {
				t1:10,
				t2:20,
				t3:30,
				t4:true
			}
		},
		components:{
			myinput,
			myinput1,
			myinput2
		},
		methods:{

		}
	}
</script>
- myinput.vue
<template>
	<div>
		<p>my input</p>
		{{value}}
		<button @click='add'>+</button>
	</div>
</template>
<script>
	export default {
		props:{
			value:Number,
		},
		methods:{
			add(){
				this.$emit('input',this.value+5)
			}
		}
	}
</script>
- myinput1.vue
<template>
	<div>
		<select name="" :value='value' @change='changefun'>
			<option :value="item" v-for='item in arr' :key='item' >{{item}}</option>
		</select>
	</div>
</template>
<script>
	export default{
		props:['value'],
		data(){
			return{
				arr:[5,10,15,20,25,30,35,40]
			}
		},
		methods:{
			changefun(e){
				console.log(e.target.value)
				this.$emit('input',e.target.value)
			}
		}
	}
</script>
- myinput2.vue
<template>
	<input type="checkbox" :checked="checked" @change='fun'/>
</template>

<script>
	export default{
		props:['checked'],
		model:{
			prop:'checked',
			event:'change'
		},
		methods:{
			fun(e){
				this.$emit('change',e.target.checked)
			}
		}
	}
</script>