# 封装
# 封装大纲
- 按照对象规范自己一个个写
- 封装函数导出需要的对象类型
- 构造函数模式new Function,缺点浪费内存=>公有的方法和属性应该重复
- 构造函数+prototype:公用的方法属性提取到prototype中
- 查看是否是自身还是原型的方法属性hasOwnProperty()
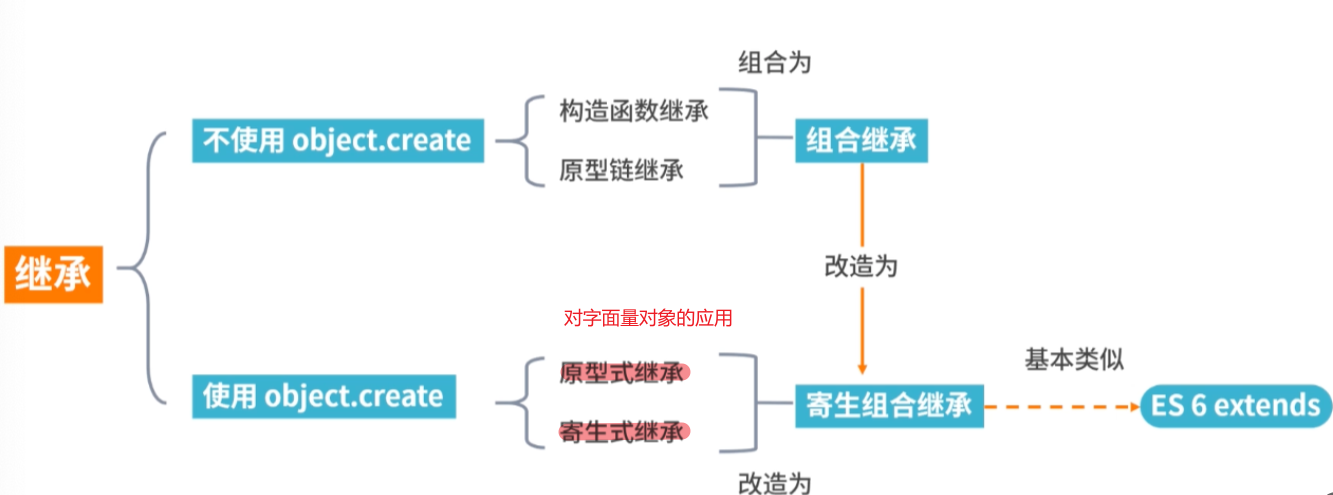
# 继承大纲
- 构造函数绑定:用call/apply调用父级函数,可以传参,引用类型数据不受其他干扰,但是 不支持父级prototype的属性和方法
# 生成实例对象的原始模式
字面量和使用Object构造函数不能批量创建对象,需要重复编写,所以需要更优的办法。
把猫看成一个对象,它有"名字"和"颜色"两属性。
  var Cat = {
    name : '',
    color : ''
  }
根据这个原型对象的规格(schema),生成一个实例对象。
var cat1 = {}; // 创建一个空对象
cat1.name = "大毛"; // 按照原型对象的属性赋值
cat1.color = "黄色";
这是最简单的封装了,把两个属性封装在一个对象里面。但是,如果多生成几个实例,写起来麻烦;二是实例与原型之间,没有办法看出关联。
# 原始模式的改进-工厂模式
可写一个函数,解决代码重复的问题。
  function Cat(name,color) {
    return {
      name:name,
      color:color
    }
		// 或者let o =new Object()
		// o.name = name ...
		//return o
  }
	// 然后生成实例对象,就等于是在调用函数:
  var cat1 = Cat("大毛","黄色");
  var cat2 = Cat("二毛","黑色");
这种方法的问题依然是,cat1和cat2之间没有内在的联系,不能反映出它们是同一个原型对象的实例。
# 构造函数模式
为了解决从原型对象生成实例的问题,Javascript提供了一个 构造函数(Constructor)模式
所谓"构造函数",其实就是一个普通函数,但是内部使用了this变量。对构造函数使用new运算符,就能生成实例,并且this变量会绑定在实例对象上。
  function Cat(name,color){
    this.name=name;
    this.color=color;
  }
	// 生成实例对象
  var cat1 = new Cat("大毛","黄色");
  var cat2 = new Cat("二毛","黑色");
  console.log(cat1.name); // 大毛
  console.log(cat1.color); // 黄色
这时cat1和cat2会自动含有一个constructor属性,指向它们的构造函数。
console.log(cat1.constructor == Cat); //true
console.log(cat1.__proto__.constructor == Cat); //true
console.log(cat2.constructor == Cat); //true
// js还提供了instanceof运算符,验证原型对象与实例对象之间关系。
console.log(cat1 instanceof Cat); //true
构造函数与工厂函数大致一样,区别在于:
- 没有显式的创建对象
- 属性和方法直接赋值给了this
- 没有return
# 构造函数模式的问题
构造函数方法很好用,但是存在 浪费内存 的问题。
现在为Cat对象添加一个不变的属性type(种类),再添加一个方法eat(吃)。那么,原型对象Cat就变成了下面这样:
  function Cat(name,color){
    this.name = name;
    this.color = color;
    this.type = "猫科动物";
    this.eat = function(){alert("吃老鼠");};

  }

  var cat1 = new Cat("大毛","黄色");
  var cat2 = new Cat ("二毛","黑色");
  alert(cat1.type); // 猫科动物
  cat1.eat(); // 吃老鼠
对于每一个实例对象,type属性和eat()方法都是一模一样的内容,每一次生成一个实例,都必须为重复的内容,多占用一些内存,也缺乏效率。当然可以把这个函数提取出来,不过那样在别的地方也可以调用,且比较混乱。
alert(cat1.eat == cat2.eat); //false
# Prototype模式
每一个构造函数都有一个prototype属性,指向另一个对象。这个对象的所有属性和方法,都会被构造函数的实例继承。
这意味着,可以把那些不变的属性和方法,直接定义在prototype对象上。
  function Cat(name,color){
    this.name = name;
    this.color = color;
  }

  Cat.prototype.type = "猫科动物";
  Cat.prototype.eat = function(){alert("吃老鼠")};

  var cat1 = new Cat("大毛","黄色");
  var cat2 = new Cat("二毛","黑色");
  alert(cat1.type); // 猫科动物
  cat1.eat(); // 吃老鼠
这时所有实例的type属性和eat()方法,其实都是同一个内存地址,指向prototype对象,因此就提高了运行效率。
alert(cat1.eat == cat2.eat); //true
# isPrototypeOf()
这个方法用来判断,某个proptotype对象和某个实例之间的关系。
alert(Cat.prototype.isPrototypeOf(cat1)); //true
# Object.getPrototypeOf 得到实例的原型
console.log(Object.getPrototypeOf(cat1))//Cat
# Object.setPrototypeOf(a,b) 修改实例的原型将b参数作为a的原型
尽量不要使用,因为可能会严重影响性能,可使用 Object.create 来处理
let a={
	name:1,
	age:1
}
let b={
	name:3,
	height:175
}
Object.setPrototypeOf(a,b)
console.log(a.height)//175
console.log(a.name)//1
# hasOwnProperty() 判断属性属于原型还是自身
每个实例对象都有一个 hasOwnProperty() 方法,用来判断某一个属性到底是本地属性,还是继承自prototype对象的属性。
  alert(cat1.hasOwnProperty("name")); // true
  alert(cat1.hasOwnProperty("type")); // false
# in运算符
in运算符可以用来判断,某个实例是否含有某个属性,不管是不是本地属性。
  alert("name" in cat1); // true
  alert("type" in cat1); // true
# 继承
比如,现在有一个"动物"对象的构造函数。
  function Animal(){
    this.species = "动物";
  }
还有一个"猫"对象的构造函数。
  function Cat(name,color){
    this.name = name;
    this.color = color;
  }
怎样使"猫"继承"动物"呢?
# 构造函数绑定(盗用构造函数/对象伪装/经典继承)
第一种方法也是最简单的方法,使用call或apply方法,将父对象的构造函数绑定在子对象上,即在子对象构造函数中加一行:
	function Animal(params){
    this.species = "动物";
		this.animal=function(){
			console.log('1000'+params)
		};
		this.arr=[1,2,3,4];

  }
	Animal.prototype.dosomething = function(){
		console.log("do something")
	}
 	function Cat(name,color,test){
    Animal.apply(this, [test]); //把this传进去,再调用父类(这里当成一个普通的函数调用),可以获得对应属性的添加
    this.name = name;
    this.color = color;
  }

  var cat1 = new Cat("大毛","黄色",'book');
  console.log(cat1.species=100000); // 100000
  console.log(cat1.species); // 100000
	cat1.animal()// 1000book
	console.log(cat1.arr.push(2))// 5
	console.log(cat1.arr)// [1, 2, 3, 4, 2]
	try{
		cat1.dosomething()
	}catch(e){
		console.log(e)
		//TypeError: cat1.dosomething is not a function
	}
	var cat2 = new Cat("三花","三色");
  console.log(cat2.species); // 动物
	cat1.animal()// 1000book
	console.log(cat2.arr)//[1, 2, 3, 4]
优缺点
- 优点:和原型链继承完全反过来。
- 父类的引用属性不会被共享
- 子类构建实例时可以向父类传递参数
- 缺点:父类的方法不能复用(原型上),子类实例的方法每次都是单独创建的。
如果同时也要利用父类的原型的话,那么就需要结合原型链模式。【详细见下面的组合继承】
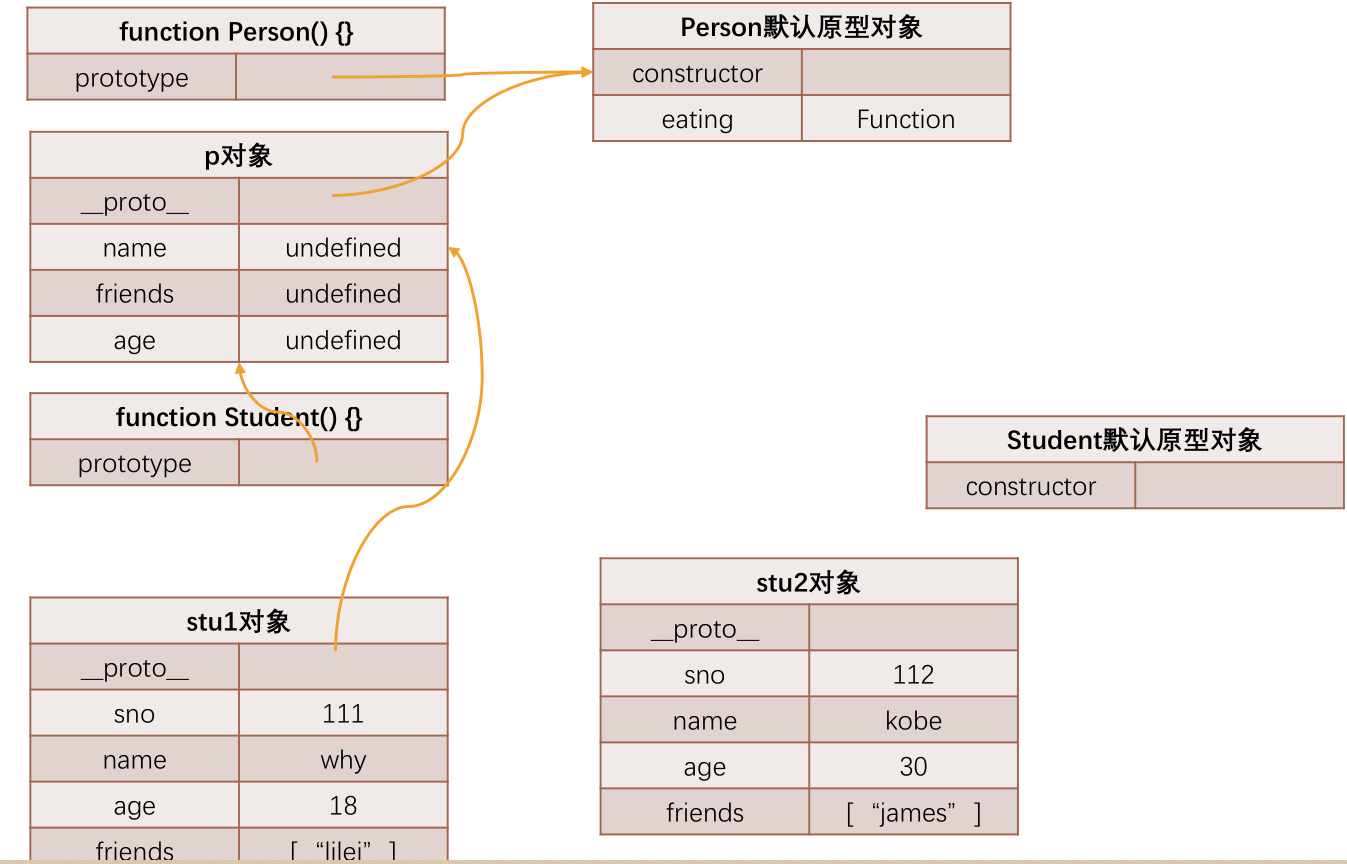
// 父类: 公共属性和方法
function Person(name, age, friends) {
// this = stu
this.name = name
this.age = age
this.friends = friends
}
Person.prototype.eating = function() {
console.log(this.name + " eating~")
}
// 子类: 特有属性和方法
function Student(name, age, friends, sno) {
Person.call(this, name, age, friends)
this.sno = 111
}
var p = new Person()
Student.prototype = p
Student.prototype.studying = function() {
console.log(this.name + " studying~")
}
// name/sno
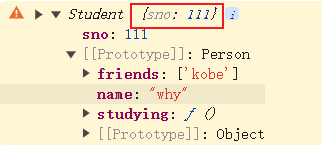
var stu = new Student("why", 18, ["kobe"], 111)
// console.log(stu.name)
// stu.eating()
// stu.studying()
// 这里解决了只用原型链实现继承的一些弊端
// 1.第一个弊端: 打印stu对象, 继承的属性是看不到的
console.log(stu)// Student {name: 'why', age: 18, friends: Array(1), sno: 111}
// 2.第二个弊端: 创建出来两个stu的对象
var stu1 = new Student("why", 18, ["lilei"], 111)
var stu2 = new Student("kobe", 30, ["james"], 112)
// // 直接修改对象上的属性, 是给本对象添加了一个新属性
// stu1.name = "kobe"
// console.log(stu2.name)
// // 解决了单纯使用原型链模式时 获取引用, 修改引用中的值, 会相互影响
stu1.friends.push("lucy")
console.log(stu1.friends) //['lilei', 'lucy']
console.log(stu2.friends) //['james']
// // 3.第三个弊端: 在前面实现类的过程中都没有传递参数
// var stu3 = new Student("lilei", 112)
// 强调: 借用构造函数也是有弊端:
// 1.第一个弊端: Person函数至少被调用了两次
// 2.第二个弊端: stu的原型对象上会多出一些属性, 但是这些属性是没有存在的必要
# prototype原型链模式
第二种方法更常见,使用prototype属性。
如果"猫"的prototype对象,指向一个Animal的实例,那么所有"猫"的实例,就能继承Animal了。
	function Animal(params){
    this.species = "动物";
		this.animal=function(){
			console.log('1000'+params)
		};
		this.arr=[1,2,3,4];

  }
	Animal.prototype.dosomething = function(){
		console.log("do something")
	}
 	function Cat(name,color){
    this.name = name;
    this.color = color;
  }

	Cat.prototype = new Animal();
  Cat.prototype.constructor = Cat;
  var cat1 = new Cat("大毛","黄色");
  var cat2 = new Cat("三花","三色");

	cat1.animal() // 1000undefined
	console.log(cat1.arr.push(100)) // 5
	console.log(cat1.arr) // [1, 2, 3, 4, 100]
	cat1.dosomething() //do something
	console.log(cat2.arr)// [1, 2, 3, 4, 100]
将Cat的prototype对象指向一个Animal的实例。
Cat.prototype = new Animal();
它相当于完全删除了prototype 对象原先的值,然后赋予一个新值。
Cat.prototype.constructor = Cat;
任何一个prototype对象都有一个constructor属性,指向它的构造函数。如果没有"Cat.prototype = new Animal();"这一行,Cat.prototype.constructor是指向Cat的;加了这一行以后,Cat.prototype.constructor指向Animal。
alert(Cat.prototype.constructor == Animal); //true
更重要的是,每一个实例也有一个constructor属性,默认调用prototype对象的constructor属性。
alert(cat1.constructor == Cat.prototype.constructor); // true
因此,在运行"Cat.prototype = new Animal();"这一行之后,cat1.constructor也指向Animal!
alert(cat1.constructor == Animal); // true
这显然会导致继承链的紊乱(cat1明明是用构造函数Cat生成的),因此必须手动纠正,将Cat.prototype对象的constructor值改为Cat。这就是第二行的意思。
这很重要,编程时务必遵守。即如果替换了prototype对象,那么,下一步必然是为新的prototype对象加上constructor属性,并将这个属性指回原来的构造函数。
  o.prototype = {};
  o.prototype.constructor = o;
原型链模式优缺点
- 优点:父类方法可以复用,可以继承原型链上的方法
- 缺点:
- 父类的
引用属性会被所有子类实例共享 - 子类构建实例时不能向父类传递参数,因为这个对象是一次性创建的(没办法定制化)
- 子类原型上的方法会被直接覆盖无效
- 打印的对象,
继承的属性是无法直接看到的
- 父类的
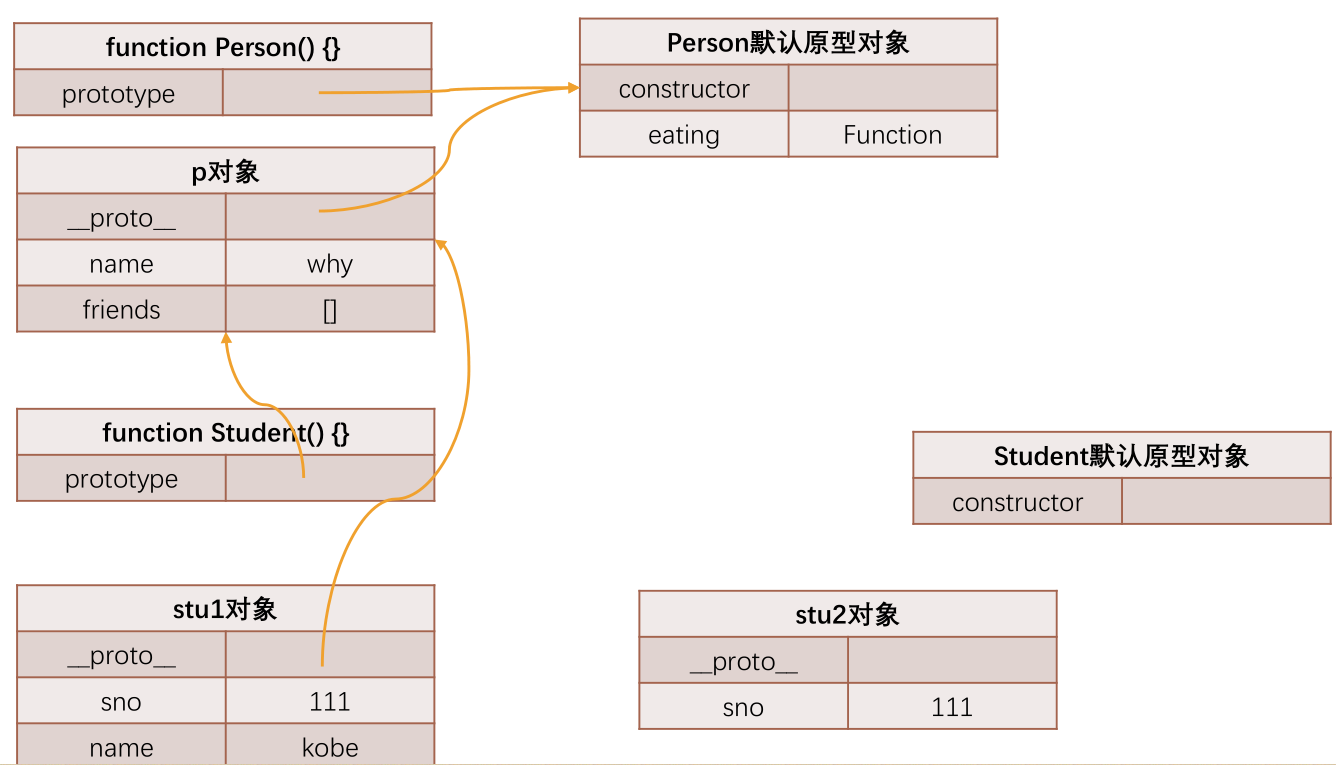
// 父类: 公共属性和方法
function Person() {
  this.name = "why"
  this.friends = []
}

Person.prototype.eating = function() {
  console.log(this.name + " eating~")
}

// 子类: 特有属性和方法
function Student() {
  this.sno = 111
}

var p = new Person()
Student.prototype = p

Student.prototype.studying = function() {
  console.log(this.name + " studying~")
}


// name/sno
var stu = new Student()

// console.log(stu.name)
// stu.eating()

// stu.studying()


// 原型链实现继承的弊端:
// 1.第一个弊端: 打印stu对象, 继承的属性是看不到的
// console.log(stu.name)

// 2.第二个弊端: 创建出来两个stu的对象
var stu1 = new Student()
var stu2 = new Student()

// 直接修改对象上的属性, 是给本对象添加了一个新属性
stu1.name = "kobe"
console.log(stu2.name)

// 获取引用, 修改引用中的值, 会相互影响
stu1.friends.push("kobe")

console.log(stu1.friends)
console.log(stu2.friends)

// 3.第三个弊端: 在前面实现类的过程中都没有传递参数
var stu3 = new Student("lilei", 112)
# 直接继承prototype
第三种方法是对第二种方法的改进。由于Animal对象中,不变的属性都可以直接写入Animal.prototype。所以,我们也可以让Cat()跳过 Animal(),直接继承Animal.prototype。
现在,我们先将Animal对象改写:
  function Animal(){ }
  Animal.prototype.species = "动物";
//然后,将Cat的prototype对象,然后指向Animal的prototype对象,这样就完成了继承。
  Cat.prototype = Animal.prototype;
  Cat.prototype.constructor = Cat;
  var cat1 = new Cat("大毛","黄色");
  console.log(cat1.species); // 动物
与前一种方法相比,这样做的优点是效率比较高(不用执行和建立Animal的实例了),比较省内存。缺点是 Cat.prototype和Animal.prototype现在指向了同一个对象,那么任何对Cat.prototype的修改,都会反映到Animal.prototype。
所以,上面这一段代码其实是有问题的。
Cat.prototype.constructor = Cat;
这一句实际上把Animal.prototype对象的constructor属性也改掉了!
alert(Animal.prototype.constructor); // Cat
# 原型式继承
用途场景:通过原型实现对象之间的信息共享。
- anotherPerson.name这种是往自身实例对象添加name,不会影响到原型上的name
- yetAnotherPerson.friends.push则因为自身没有friends,会引着原型链寻找,自然更改了person里的friends
function object(o) {
  function F() {}
  F.prototype = o;
  return new F();
}

let person = {
  name: "Nicholas",
  friends: ["Shelby", "Court", "Van"]
};

let anotherPerson = object(person);
anotherPerson.name = "Greg";
anotherPerson.friends.push("Rob");

let yetAnotherPerson = object(person);
yetAnotherPerson.name = "Linda";
yetAnotherPerson.friends.push("Barbie");

console.log(person.friends);   // "Shelby,Court,Van,Rob,Barbie"
console.log(anotherPerson.name,yetAnotherPerson.name)//Greg Linda
console.log(anotherPerson.__proto__.name)// Nicholas
es5通过增加Object.create()方法将原型式继承的概念规范化了。
var obj = {
  name: "why",
  age: 18
}

var info = Object.create(obj)

// 原型式继承函数
function createObject1(o) {
  var newObj = {}
  Object.setPrototypeOf(newObj, o)
  return newObj
}
// 最古老的方法,没有对应的api时
function createObject2(o) {
  function Fn() {}
  Fn.prototype = o
  var newObj = new Fn()
  return newObj
}

// var info = createObject2(obj)
var info = Object.create(obj)
console.log(info)
console.log(info.__proto__)
# 组合继承
//父类:人
function Person () {
  this.head = '脑袋瓜子';
  this.emotion = ['喜', '怒', '哀', '乐']; //人都有喜怒哀乐
}
//将 Person 类中需共享的方法放到 prototype 中,实现复用
Person.prototype.eat = function () {
  console.log('吃吃喝喝');
}
Person.prototype.sleep = function () {
  console.log('睡觉');
}
//子类:学生,继承了“人”这个类
function Student(studentID) {
  this.studentID = studentID;
  Person.call(this);/*第二次调用Person*/
}
/*第一次调用Person*/
Student.prototype = new Person();
Student.prototype.constructor = Student;

var stu1 = new Student(1001);
console.log(stu1.emotion); //['喜', '怒', '哀', '乐']

stu1.emotion.push('愁');
console.log(stu1.emotion); //["喜", "怒", "哀", "乐", "愁"]

var stu2 = new Student(1002);
console.log(stu2.emotion); //["喜", "怒", "哀", "乐"]

stu1.eat(); //吃吃喝喝
stu2.sleep(); //睡觉
console.log(stu1.constructor);  //Student
优缺点
- 优点:
- 父类的方法可以被复用
- 父类的引用属性不会被共享
- 子类构建实例时可以向父类传递参数
- 缺点:调用了两次父类的构造函数,第一次给子类的原型添加了父类的eat, sleep属性(其实head和emotion也会被添加),第二次又给子类的构造函数添加了父类的head, emotion属性, 从而覆盖了子类原型中的同名参数。这种被覆盖的情况造成了性能上的浪费。
# 寄生式继承
寄生式(parasitic)继承是与原型式继承紧密相关的一种思路。寄生式继承的思路与寄生构造函数和工厂模式类似,即创建一个仅用于封装继承过程的函数,该函数在内部以某种方式来增强对象,最后再像真地是它做了所有工作一样返回对象。
//核心:使用原型式继承获得一个目标对象的浅复制,然后增强这个浅复制的能力。
function object(o){
    function F() {}
    F.prototype = o;
    return new F();
}
function createAnother(original){
    var clone = object(original);//通过调用函数创建一个新对象
    clone.sayHi = function () {//以某种方式来增强这个对象
        console.log("Hi");
    };
    return clone; //返回这个对象
}
var person = {
    name:"李白",
    friends:["杜甫","陆游"]
};

var anotherPerson = createAnother(person)
anotherPerson.sayHi();//Hi
anotherPerson.friends.push('陶渊明')
console.log(anotherPerson.friends);//['杜甫', '陆游', '陶渊明']
var anotherPerson1 = createAnother(person)
console.log(anotherPerson1.friends);//['杜甫', '陆游', '陶渊明']
# 寄生组合继承
刚才说到组合继承有一个会两次调用父类的构造函数造成浪费的缺点,寄生组合继承就可以解决这个问题。算是比较完美的方法
function object(o) {
function F() {}
F.prototype = o;
return new F();
}
function inheritPrototype(subType, superType){
var prototype = object(superType.prototype); // 创建了父类原型的浅复制
prototype.constructor = subType; // 修正原型的构造函数
console.log(SuperType.prototype.constructor)
//直接用Object(superType.prototype),相当于new Object,
//会修改掉SuperType.prototype.constructor,所以需要中间创建一个空对象中介一下
subType.prototype = prototype; // 将子类的原型替换为这个原型
}
function SuperType(name){
this.name = name;
this.colors = ["red", "blue", "green"];
}
SuperType.prototype.sayName = function(){
console.log(this.name);
};
// [[如果父类的原型上加的不是方法,而是一些数据值,那么仍然会出现引用类型的值会被共享的情况]]
// 所以尽量不要在父类原型上加数据值
SuperType.prototype.arr =[1]
function SubType(name, age){
SuperType.call(this, name);
this.age = age;
}
// 核心:因为是对父类原型的复制,所以不包含父类的构造函数,也就不会调用两次父类的构造函数造成浪费
inheritPrototype(SubType, SuperType);
SubType.prototype.sayAge = function(){
console.log(this.age);
}
let s1 =new SubType('zhang','30')
let s2 =new SubType('huang','20')
console.log(s1.colors.push(1)) // 4
console.log(s1.colors) // ["red", "blue", "green", 1]
console.log(s2.colors) // ["red", "blue", "green"]
s1.arr.push(2)
s2.arr.push(3)
console.log(s1.arr)
function OtherSubType(name,money){
SuperType.call(this, name);
this.money = money
}
inheritPrototype(OtherSubType, SuperType);
let other1 =new OtherSubType('zy','10')
console.log(other1)//OtherSubType {name: 'zy', colors: Array(3), money: '10'}
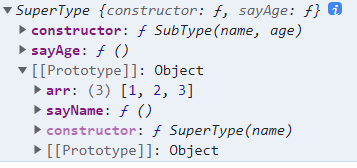
console.log(SuperType.prototype)//{arr: Array(3), sayName: ƒ, constructor: ƒ}
console.log(SubType.prototype)//见下图
# 利用空对象作为中介
由于"直接继承prototype"存在上述的缺点,所以利用一个空对象作为中介。
  var F = function(){};
  F.prototype = Animal.prototype;
  Cat.prototype = new F();
  Cat.prototype.constructor = Cat;
F是空对象,所以几乎不占内存。这时,修改Cat的prototype对象,就不会影响到Animal的prototype对象。
alert(Animal.prototype.constructor); // Animal
我们将上面的方法,封装成一个函数,便于使用。
  function extend(Child, Parent) {
    var F = function(){};
    F.prototype = Parent.prototype;
    Child.prototype = new F();
    Child.prototype.constructor = Child;
    Child.uber = Parent.prototype;
  }
使用的时候,方法如下
  extend(Cat,Animal);

  var cat1 = new Cat("大毛","黄色");

  alert(cat1.species); // 动物
这个extend函数,就是YUI库如何实现继承的方法。
另外,说明一点,函数体最后一行
Child.uber = Parent.prototype;
意思是为子对象设一个uber属性,这个属性直接指向父对象的prototype属性。(uber是一个德语词,意思是"向上"、"上一层"。)这等于在子对象上打开一条通道,可以直接调用父对象的方法。这一行放在这里,只是为了实现继承的完备性,纯属备用性质。
# 拷贝继承
上面是采用prototype对象,实现继承。我们也可以换一种思路,纯粹采用"拷贝"方法实现继承。简单说,如果把父对象的所有属性和方法,拷贝进子对象,不也能够实现继承吗?这样我们就有了第五种方法。
首先,还是把Animal的所有不变属性,都放到它的prototype对象上。
  function Animal(){}

  Animal.prototype.species = "动物";
然后,再写一个函数,实现属性拷贝的目的。
  function extend2(Child, Parent) {

    var p = Parent.prototype;

    var c = Child.prototype;

    for (var i in p) {

      c[i] = p[i];

      }

    c.uber = p;

  }
这个函数的作用,就是将父对象的prototype对象中的属性,一一拷贝给Child对象的prototype对象。
使用的时候,这样写:
  extend2(Cat, Animal);

  var cat1 = new Cat("大毛","黄色");

  alert(cat1.species); // 动物
# "非构造函数"的继承
现在有一个对象,叫做"中国人"。
  var Chinese = {
    nation:'中国'
  };
还有一个对象,叫做"医生"。
  var Doctor ={
    career:'医生'
  }
请问怎样才能让"医生"去继承"中国人",也就是说,我怎样才能生成一个"中国医生"的对象?
这里要注意,这两个对象都是普通对象,不是构造函数,无法使用构造函数方法实现"继承"。
# object()方法
  function object(o) {
    function F() {}
    F.prototype = o;
     return new F();
  }
这个object()函数,其实只做一件事,就是把子对象的prototype属性,指向父对象,从而使得子对象与父对象连在一起。
使用的时候,第一步先在父对象的基础上,生成子对象:
var Doctor = object(Chinese);
然后,再加上子对象本身的属性:
Doctor.career = '医生';
这时,子对象已经继承了父对象的属性了。
console.log(Doctor.nation); //中国
# 浅拷贝
除了使用"prototype链"以外,还有另一种思路:把父对象的属性,全部拷贝给子对象,也能实现继承。
下面这个函数,就是在做拷贝:
  function extendCopy(p) {

    var c = {};

    for (var i in p) {
      c[i] = p[i];
    }

    c.uber = p;

    return c;
  }
使用的时候,这样写:
  var Doctor = extendCopy(Chinese);

  Doctor.career = '医生';

  alert(Doctor.nation); // 中国
但是,这样的拷贝有一个问题。那就是,如果父对象的属性等于数组或另一个对象,那么实际上,子对象获得的只是一个内存地址,而不是真正拷贝,因此存在父对象被篡改的可能。
请看,现在给Chinese添加一个"出生地"属性,它的值是一个数组。
Chinese.birthPlaces = ['北京','上海','香港'];
通过extendCopy()函数,Doctor继承了Chinese。
var Doctor = extendCopy(Chinese);
然后,我们为Doctor的"出生地"添加一个城市:
Doctor.birthPlaces.push('厦门');
发生了什么事?Chinese的"出生地"也被改掉了!
  alert(Doctor.birthPlaces); //北京, 上海, 香港, 厦门

  alert(Chinese.birthPlaces); //北京, 上海, 香港, 厦门
所以,extendCopy()只是拷贝基本类型的数据,我们把这种拷贝叫做"浅拷贝"。这是早期jQuery实现继承的方式。
# 深拷贝
所谓"深拷贝",就是能够实现真正意义上的数组和对象的拷贝。它的实现并不难,只要递归调用"浅拷贝"就行了。
  function deepCopy(p, c) {

    var c = c || {};

    for (var i in p) {

      if (typeof p[i] === 'object') {

        c[i] = (p[i].constructor === Array) ? [] : {};

        deepCopy(p[i], c[i]);

      } else {

         c[i] = p[i];

      }
    }

    return c;
  }
使用的时候这样写:
var Doctor = deepCopy(Chinese);
现在,给父对象加一个属性,值为数组。然后,在子对象上修改这个属性:
  Chinese.birthPlaces = ['北京','上海','香港'];

  Doctor.birthPlaces.push('厦门');
这时,父对象就不会受到影响了。
  alert(Doctor.birthPlaces); //北京, 上海, 香港, 厦门

  alert(Chinese.birthPlaces); //北京, 上海, 香港
目前,jQuery库使用的就是这种继承方法。
# 判断对象存在的几种方法
要判断一个全局对象myObj是否存在,如果不存在,就对它进行声明。用自然语言描述的算法如下:
  if (myObj不存在){
    声明myObj;
  }
第一种写法
根据直觉,你可能觉得可以这样写:
  if (!myObj) {
    myObj = { };
  }
但是,运行这段代码,浏览器会直接抛出ReferenceError错误,导致运行中断。请问错在哪里?
对了,if语句判断myObj是否为空时,这个变量还不存在,所以才会报错。改成下面这样,就能正确运行了。
  if (!myObj) {

    var myObj = { };

  }
为什么加了一个var以后,就不报错了?难道这种情况下,if语句做判断时,myObj就已经存在了吗?
要回答这个问题,就必须知道Javascript解释器的工作方式。Javascript语言是"先解析,后运行",解析时就已经完成了变量声明,所以上面的代码实际等同于:
  var myObj;

  if (!myObj) {

    var myObj = { };

  }
因此,if语句做判断时,myObj确实已经存在了,所以就不报错了。这就是var命令的"代码提升"(hoisting)作用。Javascript解释器,只"提升"var命令定义的变量,对不使用var命令、直接赋值的变量不起作用,这就是为什么不加var会报错的原因。
第二种写法
除了var命令,还可以有另一种改写,也能得到正确的结果:
  if (!window.myObj) {

    myObj = { };

  }
window是javascript的顶层对象,所有的全局变量都是它的属性。所以,判断myobj是否为空,等同于判断window对象是否有myobj属性,这样就可以避免因为myObj没有定义而出现ReferenceError错误。不过,从代码的规范性考虑,最好还是对第二行加上var:
  if (!window.myObj) {

    var myObj = { };

  }
或者写成这样:
  if (!window.myObj) {

    window.myObj = { };

  }
第三种写法
上面这种写法的缺点在于,在某些运行环境中(比如V8、Rhino),window未必是顶层对象。所以,考虑改写成:
  if (!this.myObj) {

    this.myObj = { };

  }
在全局变量的层面中,this关键字总是指向顶层变量,所以就可以独立于不同的运行环境。
第四种写法
但是,上面这样写可读性较差,而且this的指向是可变的,容易出错,所以进一步改写:
  var global = this;

  if (!global.myObj) {

    global.myObj = { };

  }
用自定义变量global表示顶层对象,就清楚多了。
第五种写法
还可以使用typeof运算符,判断myObj是否有定义。
  if (typeof myObj == "undefined") {

    var myObj = { };

  }
这是目前使用最广泛的判断javascript对象是否存在的方法。
第六种写法
由于在已定义、但未赋值的情况下,myObj的值直接等于undefined,所以上面的写法可以简化:
  if (myObj == undefined) {

    var myObj = { };

  }
这里有两个地方需要注意,首先第二行的var关键字不能少,否则会出现ReferenceError错误,其次undefined不能加单引号或双引号,因为这里比较的是undefined这种数据类型,而不是"undefined"这个字符串。
第七种写法
上面的写法在"精确比较"(===)的情况下,依然成立:
  if (myObj === undefined) {

    var myObj = { };

  }
第八种写法
根据javascript的语言设计,undefined == null,所以比较myObj是否等于null,也能得到正确结果:
  if (myObj == null) {

    var myObj = { };

  }
不过,虽然运行结果正确,但是从语义上看,这种判断方法是错的,应该避免。因为null指的是已经赋值为null的空对象,即这个对象实际上是有值的,而undefined指的是不存在或没有赋值的对象。因此,这里只能使用"比较运算符"(==),如果这里使用"精确比较运算符"(===),就会出错。
第九种写法
还可以使用in运算符,判断myObj是否为顶层对象的一个属性:
  if (!('myObj' in window)) {

    window.myObj = { };

  }
第十种写法
最后,使用hasOwnProperty方法,判断myObj是否为顶层对象的一个属性:
  if (!this.hasOwnProperty('myObj')) {

    this.myObj = { };

  }
总结
如果只判断对象是否存在,推荐使用第五种写法。
如果除了对象是否存在,还要判断对象是否有null值,推荐使用第一种写法。
除特殊情况,所有变量都应该使用var命令声明。
为了跨平台,建议避免使用window表示顶层对象。
在Js中,null和undefined容易混淆。建议使用"精确比较"运算符(===)。