# 高效与优化
# ul li a阶梯状
在IE8以下,会变成阶梯状,解决办法,让li浮动或者设成inline。(如果是div包裹a标签,则没有这个问题)
# 伪类
需要优化页面结构的时候
<!DOCTYPE html>
<html>
	<head>
		<meta charset="utf-8" />
		<meta name="viewport" content="width=device-width, initial-scale=1">
		<title></title>
		<style>
			*{
				margin:0;
				padding:0
			}
			ul li{
				height:50px ;
				width:100px;
				text-align:center;
				float:left;
				list-style: none;
				line-height:50px;
				border:1px solid #409EFF
			}
			ul .list{
				position:relative
			}
			ul .list:before{
				content:"";
				width:20px;
				height:50px;
				background:seagreen;
				position:absolute;
				left:0;
			}

		</style>
	</head>
	<body>
		<ul>
			<li>1</li>
			<li class="list">2</li>
			<li>3</li>
		</ul>
	</body>
</html>
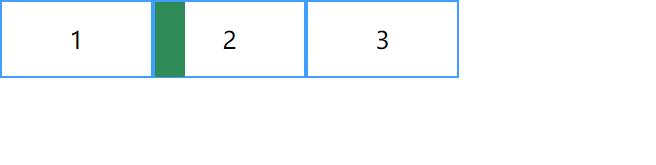
提示
伪类content如果为空没设置定位又或者没设置display属性,那么可能在页面上找不到;
.greendot::before{
  content:"";
  width:10px;
  height:10px;
  border-radius: 10px;
  background: #42b983;
  /*display:inline-block;
   position:absolute
  */

}
# 获取伪类内容content [window.getComputedStyle]
Window.getComputedStyle()方法返回一个对象,该对象在应用活动样式表并解析这些值可能包含的任何基本计算后报告元素的所有CSS属性的值。 私有的CSS属性值可以通过对象提供的API或通过简单地使用CSS属性名称进行索引来访问。
let k1=document.getElementsByClassName("k1")[0]
console.log(window.getComputedStyle(k1, ':before').getPropertyValue("content"))
//	console.log(window.getComputedStyle(k1, ':before').content)也可以这样写
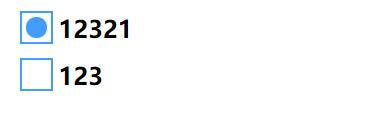
# checkbox
用css3画checkbox
css3提供了一个伪类:checked,只要radio/checkbox是选中状态,这个伪类就会生效(IE8以上浏览器)
<!DOCTYPE html>
<html>
	<head>
		<meta charset="utf-8" />
		<meta name="viewport" content="width=device-width, initial-scale=1">
		<title></title>
		<style>
			label{
				margin:5px;
				display: block;
				width:300px
			}
			input[type=checkbox]{
				display: none;
			}
			.checkbox{
				display:inline-block;
				width:20px;
				height:20px;
				border:1px solid #409EFF;
				cursor:pointer
			}
			input[type=checkbox]:checked + .checkbox{
				position:relative
			}
			input[type=checkbox]:checked + .checkbox  i{
				position: absolute;
				width:14px;
				height:14px;
				background:#409EFF;
				border-radius: 100%;
				top:3px;
				left:3px;

			}
			b{
				position: relative;
				top:-4px;
				left:4px
			}
		</style>
	</head>
	<body>
		<label>
			<input type="checkbox">
			<span class="checkbox"><i></i></span><b>12321</b>

		</label>
		<label>
			<input type="checkbox">
			<span class="checkbox"><i></i></span><b>123</b>

		</label>
	</body>
</html>
# form 和 ajax
form表单提交默认跳转页面和ajax提交默认不跳转;form表单按回车键会自动监听
let http = require("http")
let querystring = require("querystring")
http.createServer((req,res)=>{
	res.writeHead(200,{"Content-Type":"text/html;charset=UTF8"});
	let url=req.url;
	let method= req.method;
	console.log(url)
	if(url==="/favicon.ico"){
		return;
	}
	if(url==="/"&&method==="GET"){
		let body=`


			<div id="form-div">
				<form id="form1" action="/users/login" method="post">
					<p>用户名:<input name="userName" type="text" id="txtUserName" tabindex="1" size="15" value=""/></p>
					<p>密 码:<input name="password" type="password" id="TextBox2" tabindex="2" size="16" value=""/></p>
					<p><input type="submit" value="登录"> <input type="reset" value="重置"></p>
				</form>
			</div>

		`
		return res.write(body)

	}
	if(url==="/test"&&method==="GET"){
		let body=`
			<!DOCTYPE html>
			<html>
			<head>
			    <title>login test</title>
			</head>
			<body>
			<div id="form-div">

			        <p>用户名:<input type="text" id="txtUserName"  value=""/></p>
			        <p>密 码:<input type="password" id="TextBox2" value=""/></p>
			        <p><input type="submit" value="登录"  id="test"></p>

			</div>
			</body>
			</html>
			<script type="text/javascript">
			let go=document.getElementById("test");
			go.onclick=function(){
				let username=document.getElementById("txtUserName").value
				let password=document.getElementById("TextBox2").value
				let message="username="+username+"&password="+password
				console.log(message)
				let xmlhttp = new XMLHttpRequest()
				xmlhttp.onreadystatechange = function(){

						if(xmlhttp.status == 200){
							if (xmlhttp.readyState == 4 ){
								var tem=document.createElement("div");
								tem.innerHTML="333333";
								document.body.append(tem)
						}


					}else{
							console.log(xmlhttp.status);
							console.log(xmlhttp)
						}
					}

					xmlhttp.open("post", "/users/login1");
					xmlhttp.setRequestHeader("content-type", "application/x-www-form-urlencoded")
					xmlhttp.send(message);
			}

			</script>
		`
		return res.end(body)
	}
	if(url==="/users/login"&&method==="POST"){
		let data=""
		req.on("data",(chunk)=>{
			data+=chunk
			console.log(chunk)
		})
		req.on("end",(chunk)=>{
			var dataObject = querystring.parse(data);
			res.write(data)
			res.write("-------")
			res.end(JSON.stringify(dataObject))


		})
		return ;
	}
	if(url==="/users/login1"&&method==="POST"){
		let data=""
		req.on("data",(chunk)=>{
			data+=chunk
			console.log(chunk)
		})
		req.on("end",(chunk)=>{
			var dataObject = querystring.parse(data);
			console.log("************")
			console.log(dataObject)


		})
		res.end()
		return ;
	}

	res.end()
}).listen(3000,()=>{
	console.log("server is ok")
})
# input的invalid focus
<!DOCTYPE html>
<html>
	<head>
		<meta charset="utf-8" />
		<meta name="viewport" content="width=device-width, initial-scale=1">
		<title></title>
		<style>
			input[type=email]:focus{
				color:red
			}
			input[type=email]:invalid{
				background:blue
			}
		</style>
	</head>
	<body>
			<input type="email">
	</body>
</html>
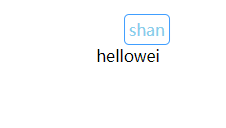
# data-title
觉得元素自带title太丑,又不想用tooltip第三方库,可用attr属性画一个
<!DOCTYPE html>
<html>
	<head>
		<meta charset="utf-8" />
		<meta name="viewport" content="width=device-width, initial-scale=1">
		<title></title>
		<style>
			p{
				margin:50px auto;
				text-align:center
			}
			span[data-title]{
				position:relative;
				cursor:pointer

			}
			span[data-title]:hover:before{
				content:attr(data-title);
				position:absolute;
				top:-150%;
				left:50%;
				transform:translateX(-50%);
				white-space:nowrap;
				color:skyblue;
				border:1px solid #409EFF;
				padding:4px;
				border-radius:5px;
			}
		</style>
	</head>
	<body>
		<p>hello<span data-title="apple">wei</span></p>
	</body>
</html>
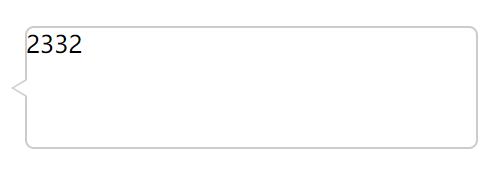
# 用css画一个三角形
画两个三角形,用白的的覆盖掉原色的大部分区域
<!DOCTYPE html>
<html>
	<head>
		<meta charset="utf-8" />
		<meta name="viewport" content="width=device-width, initial-scale=1">
		<title></title>
		<style>
			#k1{
				width:300px;
				height:80px;
				border:1px solid #ccc;
				position:fixed;
				top:0;
				bottom:0;
				right:0;
				left:0;
				margin:auto;
				border-radius:6px;
			}
			#k1:before{
				content:"";
				position:absolute;
				left:-10px;
				top:34px;
				border-top:6px solid transparent;
				border-bottom:6px solid transparent;
				border-right:10px solid #ccc;
			}
			#k1:after{
				content:"";
				position:absolute;
				left:-8px;
				top:34px;
				border-top:6px solid transparent;
				border-bottom:6px solid transparent;
				border-right:10px solid #FFF;
			}

		</style>
	</head>
	<body>
		<div id="k1">2332</div>
	</body>
</html>
# 纯css画三角形
<!DOCTYPE html>
<html>
	<head>
		<meta charset="utf-8" />
		<meta name="viewport" content="width=device-width, initial-scale=1">
		<title></title>
		<style>
			#k1{
			  width: 0;
			  height: 0;
			  border: 50px solid transparent;
			  border-top-color: springgreen;
			}

		</style>
	</head>
	<body>
		<div id="k1">
		</div>
	</body>
</html>
# 按强类型风格写代码
能指明变量类型的情况下先赋值。方便解释器解析.
let num; ×
let num=0; √
var num=5;
num="-"+num; ×
js最终都会被解释成汇编语言,而汇编语言变量的类型肯定要确定,如果把一个整形变成字符串,解释器需要额外处理,且不易阅读
var num =5;
var sign="-"+num √
使用es6语法来替代某些es5,更便捷,如let 和解构赋值 ,箭头函数,字符串模板,class
# 查兼容性
caniuse 网站链接 (opens new window)